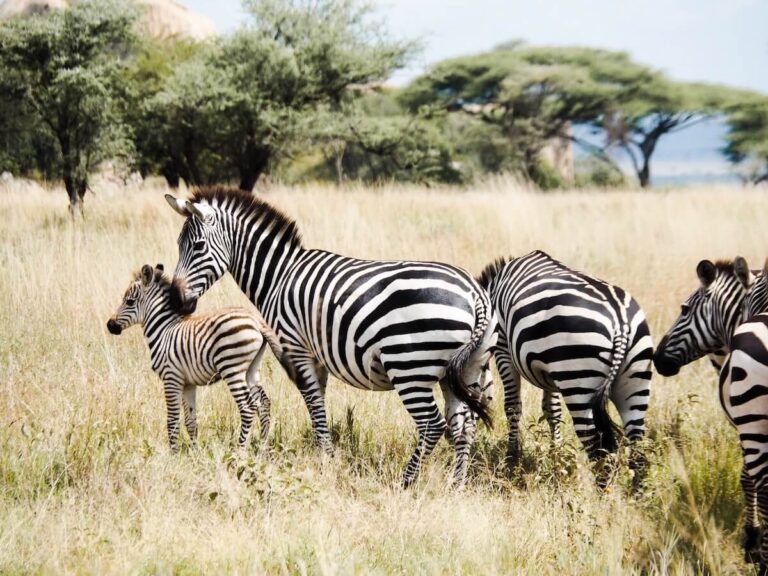
The Ultimate Guide to Zoo Photography: Make Your Photos Look Like a Safari!
This website contains affiliate links from trusted partners. If you purchase through a link on this site, I may earn a commission at no extra cost to you. As an Amazon Associate, I earn from qualifying purchases. See my Privacy Policy and Disclosure for more information.
You finally make it to the zoo, camera in hand, heart racing at the thought of capturing lions mid-roar and monkeys mid-leap. But instead…reality hits.
You’re dodging kids with sticky fingers, squinting through fingerprint-covered glass, battling glare, fences, and crowds.
And when you finally review your shots? Meh. Every “majestic” animal looks trapped behind bars, and your photos scream tourist snapshot instead of wildlife masterpiece.
I get it. Zoo photography can be brutal…but it doesn’t have to be.
As a travel and adventure photographer, I went on an epic quest to figure out how to turn chaotic zoo environments into opportunities for stunning, safari-level photos.
In this guide, I’ll share everything I’ve learned that will make your pictures look like they were taken on safari, not behind plexiglass.
By the end, you’ll know exactly how to take zoo photos that pop off the screen, capture authentic animal behavior, and make your friends wonder if you secretly went to Africa last weekend.
P.S. I didn’t lug $3,000 worth of camera gear into a zoo. I used a semi-professional lightweight mirrorless camera. So, if I can get these shots, so can you!

Key Takeaways
- 🐯 Zoo photography can be tricky, but with the right gear, settings, and composition techniques, you can capture wildlife-style photos that look like they were taken on safari.
- 🐼 Master tips for dealing with glass glare, fences, and crowds, learn how to anticipate animal behavior, and discover editing tricks to make your photos pop naturally.
- 🐻 With a little patience and creativity, your pictures at the zoo will go from tourist snapshots to magazine-worthy masterpieces.
Why Zoo Photography is So Tricky
Zoo photography is an art, but it comes with unique challenges that can make even experienced photographers struggle.
The Common Problems
1. Glass Reflections and Glare
Many animals live behind glass enclosures that act like giant mirrors.
Suddenly, instead of focusing on that gorgeous snow leopard, you are capturing your own reflection, someone’s neon t-shirt behind you, and about fifteen smudgy fingerprints.
2. Fences and Bars in the Shot
Zoos often use chain-link fences or metal bars, which can make it tough to create clean, natural-looking compositions.
If you do not know the right technique, these distractions will dominate your frame instead of your subject.
Sometimes, unfortunately, it is unavoidable.
3. Harsh Lighting Conditions
It’s not like you can wake up at 4am and camp out at the zoo for that dreamy golden hour.
Most likely, you will be confined to the zoos hours. Booooo!
Outdoor exhibits can be extremely bright, creating harsh shadows and blown-out highlights.
On the flip side, indoor exhibits often have low or uneven lighting that can make your images look noisy and dull.
4. Crowds Blocking Your Perfect Shot
There is nothing worse than finally spotting the red panda climbing into a perfect pose, only to have five heads, three strollers, and a giant balloon in the foreground.
5. Uncooperative Animals
Sometimes, the animals are just not interested in giving you that dream shot.
They nap, hide in the shade, or turn their backs entirely.
You are working with unpredictable subjects, which adds another layer of complexity.
Planning Your Zoo Photography Adventure
Zoo photography is part timing, part strategy, and part patience.
The right planning can be the difference between “just okay” snapshots and breathtaking wildlife portraits that look like they were taken on safari.
Best Times to Visit
Early Mornings: Animals are most active in the morning when temperatures are cooler and crowds are lighter. Morning light is also softer and warmer, making it ideal for vibrant, natural-looking zoo photos.
Overcast Days: A cloudy day is your best friend for zoo photography. Diffused lighting creates balanced exposure, eliminates harsh shadows, and brings out detail in animal fur and feathers.
Feeding Schedules: Check the zoo’s feeding times or animal encounters schedule before you go. These moments almost guarantee movement, interaction, and action shots that feel more “wild” than posed.
Choosing the Right Zoo for Photography
Not all zoos are created equal when it comes to photography opportunities.
- Naturalistic Enclosures: Prioritize zoos that create habitats designed to mimic the wild. These enclosures often have better backgrounds and fewer visual distractions.
- Open-Air and Glass-Free Exhibits: These give you more freedom to shoot without worrying about glare or fingerprints.
- Photographer Days and Events: Some zoos host early-access sessions or special photography workshops. These events usually mean smaller crowds and better viewing angles.
I also try to pick zoos that prioritize animal care and comfort.
Pre-Trip Prep Checklist
| Prep Task | Why It Matters | Quick Tip |
| Research zoo maps | Know where the best exhibits are | Mark shaded glass-free spots for easier shooting |
| Check rules | Some zoos ban tripods or flash | Look online or call ahead to avoid surprises at the gate |
| Check weather | Impacts lighting and animal behavior | Use apps for accurate forecasts |
| Pack strategically | Saves time and avoids frustration | Bring only what you need for mobility and comfort |
| Charge batteries | Nothing ruins a shoot like dead gear | Pack extras if you plan to stay all day |
| Clean your lenses | Smudges and dust can ruin clarity | Carry a microfiber cloth for quick wipes |

Zoo Photography Gear Guide
The right gear will not automatically make you a better photographer, but it can make zoo photography a whole lot easier.
Read More – How to Become an Adventure Photographer
Camera Choices
Zoo photography does not require the most expensive gear, but different setups come with their own strengths and weaknesses.
| Camera Type | Pros | Cons | Best For |
| DSLR | Excellent image quality, versatile lens options, long battery life | Bulky and heavy, can be intimidating for beginners | Intermediate to pro photographers |
| Mirrorless | Lighter, faster autofocus, silent shooting for skittish animals | Shorter battery life, pricier lenses | Beginners and pros who want portability |
| Smartphone | Always with you, lightweight, easy to share photos instantly | Limited zoom, less control in challenging lighting | Casual photographers or quick social shots |
My Go-To Travel Cameras: Canon EOS M50 mark II | Canon EOS 5D mark IV | What’s in My Camera Bag?
If you are serious about zoo photography, a mirrorless or DSLR camera with interchangeable lenses will give you the best flexibility.
Smartphones work well when paired with good shooting techniques and clever positioning, but it is nothing compared to a sturdy camera with a telephoto lens.
As mentioned before, I didn’t bring an expensive camera. Just a cheap(er) mirrorless camera with a 55-200mm lens and good vibes.
Read More – Cheap vs Expensive Camera | Top Photography Gear for Travelers
Best Lenses for Zoo Photography
Animals move quickly, habitats are unpredictable, and you will often be shooting from a distance.
That means your choice of lens can make or break your photos.
| Lens Type | Best Use | Example Setup |
| ⭐️ Telephoto Zoom | Isolates animals, blurs busy backgrounds, works great through fences | 70–200mm or 100–400mm |
| Wide-Angle | Captures entire habitats and creates storytelling compositions | 16–35mm or 24mm prime |
| Fast Primes | Perfect for indoor, low-light exhibits with less noise | 50mm or 85mm |
Tips for Choosing Lenses
- A telephoto zoom is the MVP for zoo photography. It lets you shoot from a distance without disturbing the animals and blurs fences beautifully with wide apertures.
- Wide-angle lenses are great for storytelling, especially if you want to include more of the habitat or people interacting with the animals.
- Fast prime lenses are lifesavers for darker exhibits like nocturnal houses and aquariums.
I am all about transparency here at The Bucket List Mermaid, so I’m going to give it to you straight. I brought a standard zoom lens as well as a telephoto.
My standard zoom lens collected dust. The telephoto reigned! I would stick to 55/70-200mm or 100-400mm lenses.
Must-Have Accessories
A few small accessories can drastically improve your results:
- Circular Polarizer Filter: Reduces reflections on glass and water while deepening colors for richer zoo photos.
- Lens Hood: Blocks unwanted light and minimizes glare, especially helpful when shooting behind glass or in direct sunlight.
- Monopods vs. Tripods:
- Monopods are easier to maneuver in crowded spaces and offer quick stabilization.
- Tripods are useful for slow-shutter indoor shots, but some zoos restrict them, so check the rules first.
- If I’m being honest, you might not be able to get a long exposure shot anyway because most animals are constantly moving. I would just use a tripod for stabilization for larger lenses.
- Cleaning Kit: Keep a microfiber cloth handy for smudges on your lens or fingerprints on viewing glass.
Smartphone Zoo Photography
Not everyone wants to carry a heavy camera bag, and smartphones have come a long way in zoo photography.
Although it is not my favorite, here are some tips in case a phone is all that you have.
Tips for Better Smartphone Shots at the Zoo
- Use Portrait Mode: Creates background blur and makes your subject pop, even through fences.
- Enable HDR Mode: Balances highlights and shadows in tricky lighting situations.
- Shoot in RAW (if available): Apps like Lightroom Mobile or Halide let you capture more data for better editing later.
- Stabilize Your Shots: If you do not have a tripod, brace your phone against railings, fences, or glass for sharper images.
- Tap to Focus and Adjust Exposure: Always tap on the animal’s eyes for the sharpest focus and fine-tune the brightness before shooting.
Best Camera Settings for Zoo Photography
Zoo photography is tricky because lighting changes constantly, animals move unpredictably, and you often shoot through glass or fences.
The good news is that with the right settings, you can take control and capture sharp, vibrant, natural-looking images every time.
Use Aperture Priority for Blurry Backgrounds
Best for: Animal portraits and hiding distracting fences or crowds.
Set your camera to Aperture Priority (A or Av mode) and choose a wide aperture (small f-number like f/2.8–f/5.6).
This blurs the background and isolates the animal, making your photos look more like they were taken in the wild.
Pro tips
- Stand as close to the fence or glass as possible for maximum blur.
- Longer lenses (200mm+) combined with wide apertures work wonders for removing distractions.
- On smartphones, enable Portrait Mode to mimic this effect.
Shutter Priority for Fast-Moving Animals
Best for: Birds in flight, monkeys swinging, or playful otters.
Switch to Shutter Priority (S or Tv mode) and set a fast shutter speed to freeze motion. Start at 1/1000s for animals on the move and adjust as needed.
Pro tips
- Use burst mode (continuous shooting) for a series of shots. One of them will almost always capture the perfect expression or pose.
- If your camera struggles with exposure, slightly bump up your ISO to maintain faster shutter speeds.
ISO Hacks for Low-Light Situations
Indoor exhibits and shaded enclosures often have dim lighting. To avoid blurry photos, increase your ISO…but do it strategically:
- Outdoors in bright light: ISO 100–200
- Cloudy or shaded areas: ISO 400–800
- Indoor exhibits or aquariums: ISO 1600+
Newer cameras handle high ISOs really well, so don’t be afraid to push it when needed. If noise creeps in, you can fix it later in editing.
Are you new to shutter speed, aperture, and ISO? Check out my beginner’s guide to the exposure triangle for adventurous photographers.
Continuous Autofocus vs. Single-Point AF
Animals rarely sit still, which makes choosing the right autofocus mode critical:
- Continuous AF (AI Servo/AF-C): Tracks moving animals and keeps them sharp even if they change direction. Perfect for running tigers, swinging monkeys, or pacing lions.
- Single-Point AF (One-Shot/AF-S): Best for calm subjects or close-up portraits. Focus on the eyes for maximum impact.
Use back-button focus if your camera supports it. It gives you more control over when to lock focus without having to half-press the shutter button.
Burst Mode Tricks for Natural Expressions
Some of the most incredible zoo photos happen in micro-moments: a yawning lion, a baby giraffe taking its first step, or a chimp giving side-eye to a passing stroller.
Burst mode (continuous high-speed shooting) lets you capture these fleeting expressions.
- Set your camera to high-speed continuous shooting.
- Hold down the shutter and fire off short bursts when you anticipate movement.
- Sort through later and pick the sharpest, most expressive frame.
Zoo Photography Settings Cheat Sheet
| Scenario | Mode | Aperture | Shutter Speed | ISO | Focus Mode |
| Animal portraits | Aperture Priority | f/2.8–f/5.6 | Auto | 100–400 | Single-point AF |
| Fast-moving animals | Shutter Priority | f/4–f/5.6 | 1/1000s+ | 400–800 | Continuous AF |
| Indoor or aquarium shots | Manual / Aperture | f/1.8–f/3.5 | 1/125s+ | 800–3200 | Continuous AF |
| Habitat storytelling | Aperture Priority | f/8–f/11 | Auto | 100–400 | Single-point AF |
| Birds in flight | Shutter Priority | f/5.6–f/8 | 1/2000s+ | 400–800 | Continuous AF |

Mastering Composition in Zoo Photography
Zoo photography is not just about snapping a sharp picture of an animal; it is about creating an image that feels alive, authentic, and immersive.
The difference between a quick tourist snapshot and a frame-worthy wildlife portrait often comes down to composition.
Shoot at Eye Level
Want your zoo photos to instantly feel more personal and engaging? Get on the animal’s level. Literally.
- Crouch, kneel, or even lie on the ground if it gives you a better angle. Shooting from above often makes animals look small, trapped, or unflattering. Shooting at eye level creates intimacy and connection.
- If the enclosure has elevation differences, look for natural vantage points like ramps, platforms, or staircases to align yourself with the animal’s gaze.
- On smaller animals like meerkats, penguins, or red pandas, getting lower creates a sense of empathy and brings your viewer into their world.
Focus on the eyes whenever possible. Sharp, expressive eyes make your photo feel alive and emotionally powerful.
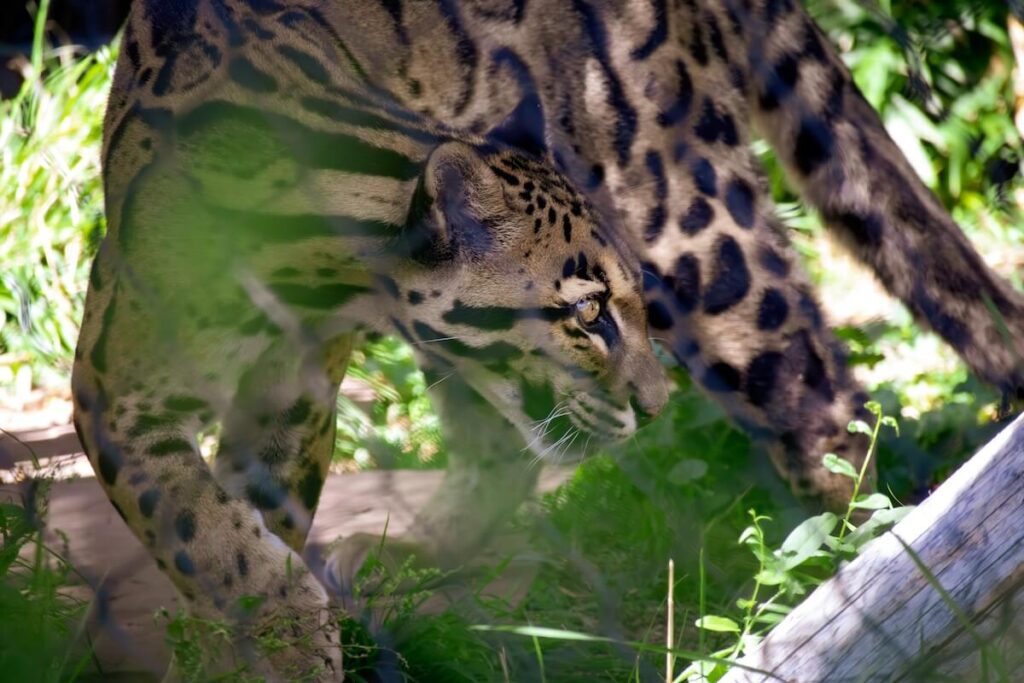
Use Foreground and Background Creatively
Busy backgrounds are the fastest way to ruin zoo photos.
Fences, crowds, food carts, and railings can scream “this was shot at the zoo,” but you can hide those distractions with smart composition.
- Frame your shot using natural elements: Branches, rocks, leaves, or logs near the enclosure can hide artificial structures. Step to the side or change your angle to line these up in the frame.
- Look for clean backgrounds: Sometimes moving just a foot to the left or right creates a composition where the background melts away into soft bokeh or neutral tones.
- Shoot through natural elements: If a leafy bush is between you and the animal, use a wider aperture (f/2.8–f/4) and let those leaves blur into dreamy foreground frames. It creates depth and makes your photo look less “zoo” and more “wild.”
Tell a Story
Great zoo photography goes beyond single-subject portraits. It invites viewers into the moment and tells a story.
- Capture behavior, not just poses: Wait for interaction – like a gorilla gently cradling its baby, a lioness stretching after a nap, or playful otters wrestling in the water. These candid moments feel more authentic and emotional than perfectly posed portraits.
- Include environmental context shots: Step back occasionally to include more of the habitat. These wide shots provide variety and make your gallery feel complete, giving viewers a sense of place and scale.
- Use sequences to build narratives: For example, photograph an elephant walking toward the waterhole, drinking, and then spraying itself. When viewed together, the images feel cinematic.
Patience pays off here. The longer you watch an animal, the better you learn its patterns and anticipate its next move.
Composition Tools for Pro-Level Shots
Even in chaotic zoo environments, you can use tried-and-true photography techniques to bring structure and artistry to your images.
1. Rule of Thirds
Divide your frame into nine equal sections and place your subject along one of the intersecting points instead of dead center.
This creates balance and draws the eye naturally to your subject.
I am also a big advocate for breaking the rule of thirds intentionally. Do whatever your inner artist feels!
2. Negative Space
Leave breathing room around your subject to emphasize scale and emotion.
For example, a small lemur in a big, open habitat tells a very different story than a tight crop.
Personally, I suck at negative space (in both interior design and in photography). However, it can sometimes be very powerful!
3. Leading Lines
Use pathways, logs, or branches inside enclosures to guide the viewer’s eye toward your subject.
This adds depth and makes your photo feel intentional.
4. Natural Frames
Position your subject within elements like leaves, rocks, or tree trunks.
Framing focuses attention on the animal and adds visual interest without distracting the viewer.
5. Break the Rules (When It Works)
Sometimes the strongest images come from ignoring “textbook” composition and going bold.
Tilt your frame slightly, center your subject dramatically, or go ultra-wide for an immersive perspective.

Conquering Glass, Fences, and Crowds
If zoo photography had a boss battle, this would be it: smudged glass, chain-link fences, and crowds of balloon-wielding toddlers blocking your perfect shot.
Glass Enclosures
Glass can make or break your photos, especially when photographing animals like big cats, reptiles, and primates.
Reflections are your worst enemy here, but there are a few simple fixes:
- Press your lens directly to the glass: This instantly eliminates most reflections and creates a clearer, more vibrant shot.
- Wear dark clothing: Light-colored shirts reflect straight back into your frame. Dark clothing absorbs light and keeps your reflection out of the photo.
- Use a circular polarizer filter: A must-have for stubborn reflections, especially when shooting at aquariums or through heavily coated glass. This worked about 50/50 for me…so use with a grain of salt.
- Step off to the side where crowds are thinner and angles are less obstructed.
- Clean the glass (if allowed): A quick swipe with a microfiber cloth can remove smudges that would otherwise ruin your image. Again, this worked sometimes and didn’t make a difference otherwise.
- Use wide apertures and longer lenses to blur out fences and bars so they almost disappear.
- Visit exhibits multiple times throughout the day since animals are often more active during certain hours.
If your camera allows, slightly underexpose the shot when shooting through glass.
You can brighten the subject later in editing while keeping reflections less noticeable.
Read More – How to Edit Adventure Photos
Fences and Bars
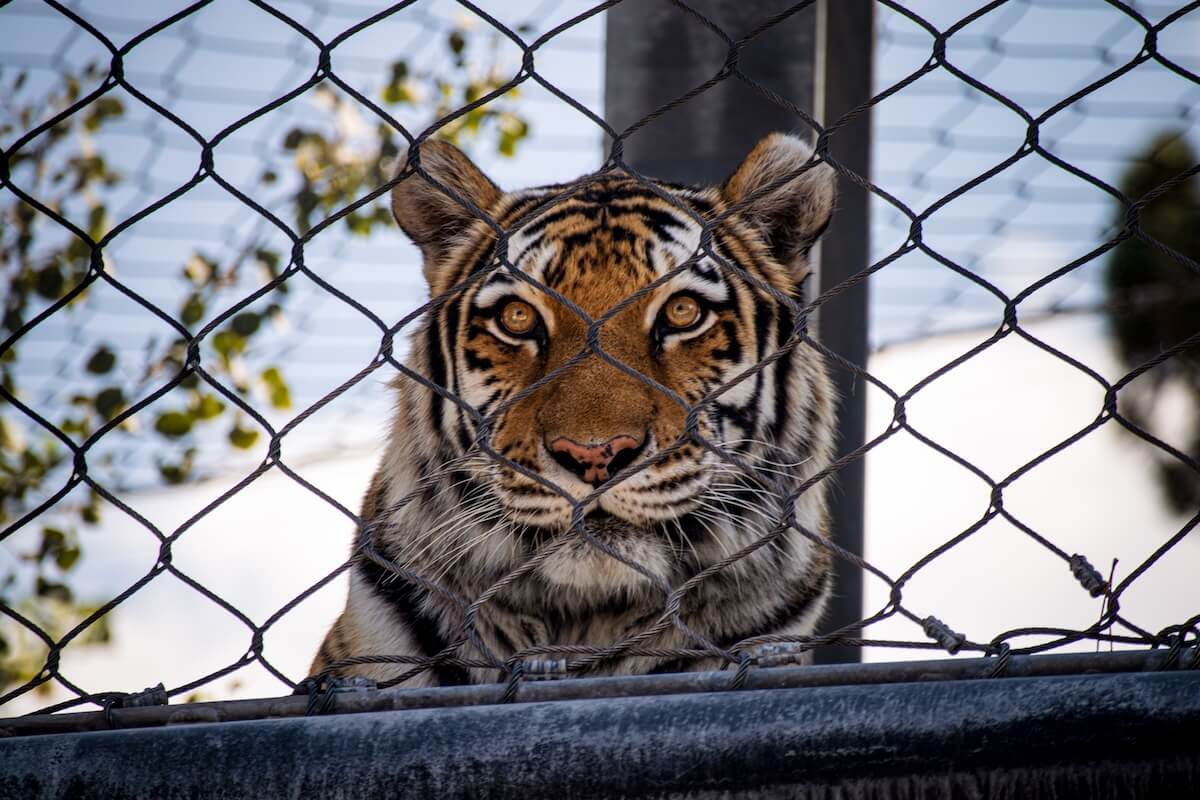
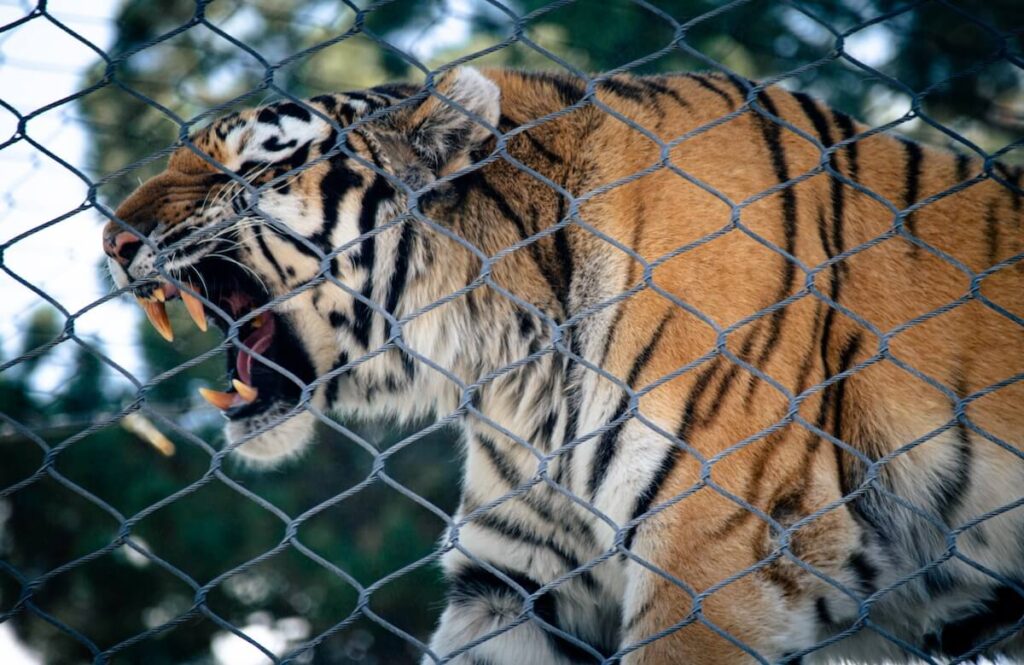
Chain-link fences and metal bars are probably the number-one reason zoo photos look “trapped.”
I’m gonna hold your hand when I say this: sometimes they are unavoidable. I got this incredible image of a tiger yawning and the DANG fence was in the way!
I tried everything with no luck (excuse me while I go ugly cry into my camera).
Luckily, sometimes this can be avoided:
- Use a long telephoto lens and a wide aperture (f/2.8–f/5.6): This combination melts fences into creamy, out-of-focus bokeh, leaving the animal crisp and isolated.
- Get as close to the fence as possible: Press your lens right against it, and you’ll minimize visible patterns.
- Position yourself strategically: Move left, right, or even crouch until the fence aligns behind leaves, rocks, or shadows to blend more naturally.
- Avoid autofocus on the fence: Switch to single-point focus and aim directly at the animal’s eye to stop your camera from locking onto the wrong subject.
If you are using a smartphone, get as close to the fence as possible and tap to focus on the animal.
Portrait mode helps blur the fence, but stepping slightly sideways until the fence fades behind foliage makes a huge difference.
Dealing With Crowds
Zoos can get chaotic, especially on weekends or during summer breaks.
But with the right strategy, you can avoid having fifteen strangers’ heads in every photo.
- Arrive early or stay late: The first and last hours of zoo operation are golden for both lighting and fewer people.
- Revisit exhibits later: If it’s busy now, circle back in an hour – crowds ebb and flow throughout the day.
- Change your angle: Most people shoot straight on. Move off to the side, crouch low, or raise your camera above the crowd for a unique perspective.
- Bring a lightweight step stool (if allowed): Even a few extra inches of height can give you a clear, unobstructed shot.
- Patience pays off: Sometimes, simply waiting thirty seconds after a family leaves gets you an empty frame.
Capturing Natural-Looking Animal Behavior
The secret to next-level zoo photography is making your photos look less “zoo” and more “wild.”
You can have the best gear, perfect settings, and clean compositions, but if the animal looks bored, asleep, or hiding in a corner, the shot will still feel flat.
Learn Animal Habits Ahead of Time
Every animal has unique behaviors, routines, and activity patterns. Spend a few minutes researching before you go or ask zoo staff for insights.
- Big cats tend to be most active early in the morning or right before feeding.
- Primates like gorillas, chimps, and orangutans often interact socially in the middle of the day.
- Nocturnal animals may only move during darker hours or in low-lit exhibits.
When you know what to expect, you can position yourself ahead of time and be ready to capture the perfect moment instead of reacting too late.
Study Feeding Times and Trainer Talks
Feeding times are pure gold for photographers. Animals perk up, interact, and move around more than usual, giving you dynamic shots filled with energy.
Check the zoo’s schedule online or grab a map when you arrive so you know when to be at the right exhibit.
Trainer talks are another hidden gem. Keep an eye out for scheduled demonstrations or enrichment sessions where zookeepers encourage animals to climb, leap, or play.
These create opportunities for action shots that look completely natural.
Just remember to position yourself so you don’t get the trainer in your shot (unless that is the shot you are going for).
Anticipate Motion for Action Shots
One of the biggest differences between a snapshot and a magazine-worthy wildlife photo is anticipation. The best moments are over in seconds.
Tips for anticipating movement
- Watch their body language. Animals often give subtle cues before they act, like crouching before pouncing or twitching tails before sprinting.
- Use continuous autofocus and burst mode so you are always ready when the action happens.
- Frame your composition before the movement starts so you can capture the entire sequence instead of scrambling to keep up.
Be Patient
This is the hardest but most rewarding part of capturing natural animal behavior: patience.
Sometimes, the best zoo photos happen after ten minutes of absolute stillness.
The lion yawns. The giraffe stretches. The bear jumps into the water. If you leave too quickly, you miss the magic.
Here’s a little pro photographer mantra: “Be a shadow, not a tourist.”
Blend into the environment, observe quietly, and let the moment unfold.
Advanced Photography Techniques
Once you’ve mastered the basics of settings, composition, and behavior, it’s time to level up.
Using Backlighting for Silhouettes and Drama
Backlighting is when the light source is behind your subject, creating glowing outlines or dramatic silhouettes.
It can instantly turn a flat photo into something cinematic.
- Golden hour magic: Shoot early morning or late afternoon when the sun is low. Backlighting during these times creates soft, warm halos around fur and feathers. I would be there as soon as the zoo opens or be the last one to leave.
- Create silhouettes: Expose for the brightest part of the sky and let the animal fall into shadow. This works beautifully with giraffes, elephants, and birds with striking outlines.
- Watch your positioning: Move until the sun peeks just behind the animal’s shape to avoid lens flare and blown highlights.
Combine backlighting with a slightly underexposed shot to deepen contrast and make colors pop during editing.
Shooting Through Foliage for Cinematic Depth
Want to make your zoo photos feel wild and immersive? Add layers to your image.
- Find natural elements to frame your subject: Branches, leaves, or flowers near the enclosure can act as soft, blurred foregrounds.
- Use a wide aperture (f/2.8–f/4) to turn those elements into dreamy, blurry masterpieces.
- Hide artificial distractions: Foliage also helps block fences, bars, and people in the background.
Creative Motion Blur with Slow Shutter Speeds
Not every wildlife shot has to be tack-sharp. Intentional motion blur can add energy and artistry to your zoo photography.
- Set a slower shutter speed around 1/30s to 1/60s to capture soft streaks of movement while keeping part of the scene sharp.
- Works beautifully with splashing water, birds taking off, or animals running through grass.
- Stabilize your camera with a monopod, railing, or glass panel to keep your background clean and sharp while the subject blurs.
Combine this with burst mode to capture several variations, then choose the one where the blur feels smooth and intentional.
Panning Techniques for Speed and Action
If you want a photo that screams power and motion, try panning.
- Set your shutter speed between 1/30s and 1/125s, depending on the animal’s speed.
- Follow the subject smoothly as it moves, keeping it centered in your frame.
- The background will blur into streaks, while the animal stays relatively sharp, creating that dynamic “cheetah-on-the-hunt” effect.
This technique takes practice, so start with birds, antelopes, or other animals with predictable movement patterns.

Editing Zoo Photos Like a Pro
Zoo photography doesn’t end when you click the shutter – that’s only half the magic.
I am also an advocate for editing to whatever fits your style! So, have fun!
Post-Processing Workflow
Before diving into Lightroom sliders and Photoshop tools, start with a clean, efficient workflow.
1. Import and Organize Your Photos
- Create folders by date and zoo location so you can easily revisit sessions.
- Use star ratings or color labels to sort your best shots quickly and skip hours of endless scrolling later.
2. Remove Glass Glare and Reflections
- Use Lightroom’s generative AI remove tool or Photoshop’s Spot Healing Brush to clean up small reflections.
- For heavy glare, adjust Dehaze and Shadows carefully to balance tones.
3. Fix Weird Color Casts
- Zoo glass, artificial lighting, and shaded enclosures can mess with your white balance.
- Use Lightroom’s White Balance Picker or fine-tune Temperature and Tint until the animal’s fur and skin tones look natural.
4. Boost Contrast and Vibrance
- Increase Vibrance slightly to make colors pop without blowing out your reds and oranges.
- Use Tone Curves or Contrast adjustments to add depth and definition, especially in fur and feathers.
Lightroom & Photoshop Tips
Once your basics are set, you can add a professional polish that takes your photos to the next level.
1. Sharpen the Eyes for Maximum Impact
- In Lightroom, select the masking tool and highlight the eyes and slightly increase Clarity, Texture, and Sharpness.
- This draws instant focus and makes portraits feel alive.
2. Mask the Background to Create Depth
- Use Lightroom’s Select Subject masking tool to isolate the animal and reduce Clarity or Sharpness in the background.
- This creates separation and mimics a shallow depth of field effect, especially useful if you couldn’t blur distractions in-camera.
3. Batch Editing for Consistency
- If you spent the entire day at the zoo, your lighting conditions may vary across shots, but a consistent editing style makes your gallery cohesive.
- Sync adjustments across similar photos or create your own presets to speed up the process.
4. Speed Things Up with Professional Presets
If editing every photo from scratch sounds overwhelming, my custom Lightroom presets are designed to handle common zoo photography challenges.
Whether you want me to build you a unique editing style from scratch or grab my pre-made presets, they’ll save you hours while giving your images a professional, wildlife-inspired finish.
Ethical Zoo Photography
Zoo photography is about more than just getting “the shot.”
As photographers, we carry a responsibility to respect the animals, their environment, and the efforts behind wildlife conservation.
Respect Boundaries
It might be tempting to tap on the glass, whistle, or make noises to get an animal’s attention, but this can cause stress and disrupt their natural behavior.
The best zoo photos come from patience, not provocation. Let the animals set the pace…if they want to interact, they will.
Blend in, stay still, and allow moments to unfold naturally.
Follow Zoo Rules
Zoos set guidelines to protect both you and the animals. Always check posted signs or ask staff if you are unsure about:
- Flash photography: Bright flashes can startle animals and cause unnecessary stress.
- Tripod or monopod use: Some zoos restrict them for safety and crowd control.
- Drone policies: In almost every case, drones are prohibited (and for good reason).
- Enclosure entry: Never cross barriers, even for a “better shot.”
Final Thoughts on Capturing Epic Zoo Photography
Zoo photography is tricky, but it is absolutely doable when you have the right techniques.
From mastering camera settings to working around glass, fences, and crowds, you now have the tools to capture stunning, wildlife-style photos — even in the middle of a busy zoo.
Now it’s your turn to put these tips into action.
Grab your camera, plan your next zoo adventure, and start experimenting with the techniques you’ve learned here.
Patience, practice, and creativity will take your pictures at the zoo from “tourist snapshots” to wildlife masterpieces.
Want to save even more time editing? Check out my custom Lightroom presets and editing services designed to make your zoo photos pop!
And if you’re looking for inspiration, join Shutterbugs Gone Wild, my travel and adventure photography community.
It’s the perfect place to share your shots, ask questions, and connect with fellow photography lovers from around the world.
Because the best zoo photos don’t just capture animals. They tell stories, spark curiosity, and make people fall in love with wildlife all over again. 🐅📸
More Travel Photography Resources
How to Play With Light in Travel Photography and Create Magical Shots
Cheap vs Expensive Camera: The Truth Nobody Tells You
I Paid For a Pro Travel Photoshoot and Here’s What I Learned
Is the Canon EOS M50 Mark II camera still worth it in 2026 or is it DEAD?
More Travel Resources
Adventure Bucket List Resources
I am here to help your travel adventures go as smoothly as possible! That way you can check off that bucket list with minimal complications and spending!
SHOP – Shop the best adventure gear and essentials on my Amazon Storefront – handpicked by a full-time adventuring mermaid!
AIRFARE – There are a few I use, but Aviasales is normally my go-to for flights without any extra fees or markups.
ACCOMMODATION – My two favorites are Booking.Com for hotels and VRBO for rentals.
GUIDED TOURS – If you are looking for quick and easy tours, check out GetYourGuide and Viator.
MULTI-DAY TOURS – For more in-depth tours that span several days, TourHub has many great options with reputable travel companies. Use my code (ALEXANDRA1GURU) for up to 5% off your next bucket list adventure.
TRANSPORTATION – You can either rent a car yourself with Discover Cars or do a guided bus tours like Big Bus Tours.
SIM CARDS – Avoid expensive roaming charges with an eSim card with Airalo. Personally, I prefer wifi boxes, and recommend WiFi Candy (get 10% of with the code THEBUCKETLISTMERMAID).
TRAVELER’S INSURANCE – Check out VisitorsCoverage for affordable insurance plans. If you are a nomad or remote worker, I would check out SafetyWing.
SEE MORE – Adventure Resources | Photography Resources
See Some Photos You Like?
Check out my full photography page for a full gallery and prices.