Tips for Photographing Half Dome (Without Risking Your Life)
This website contains affiliate links from trusted partners. If you purchase through a link on this site, I may earn a commission at no extra cost to you. As an Amazon Associate, I earn from qualifying purchases. See my Privacy Policy and Disclosure for more information.
You’re gripping cold steel cables. Legs shaking. Wind whipping straight up the granite like it has a personal vendetta.
Your heart’s doing that oh-this-is-real thump… and somehow—somehow—you’re supposed to take a photo?
Welcome to Half Dome. Where the views are legendary, the exposure is spicy, and bad decisions? Yeah… they come with consequences.
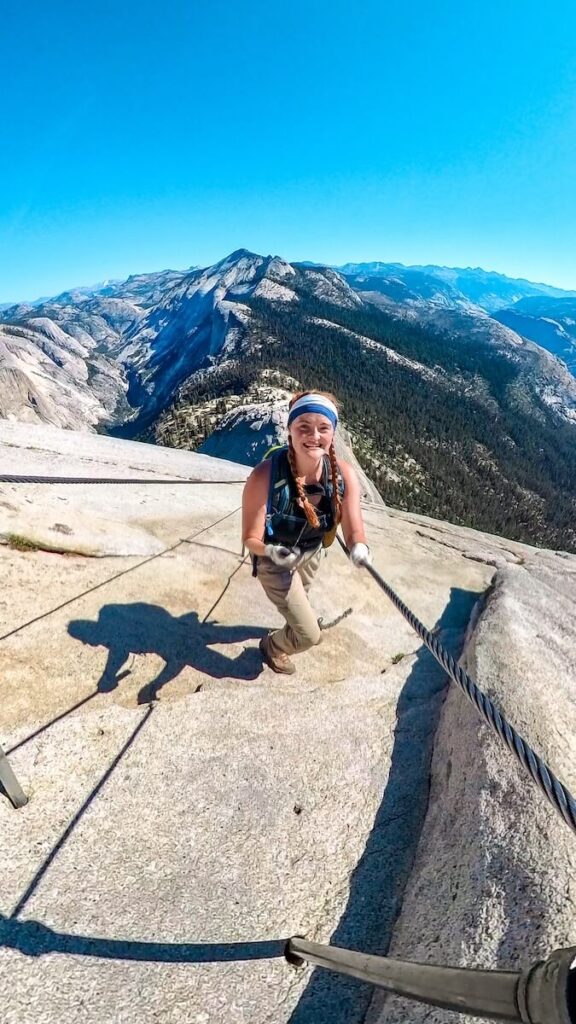
I hiked Half Dome solo. One day. As a photographer. Which means I didn’t just survive the cables… I figured out how to shoot them without doing anything reckless (or, you know, becoming a cautionary tale whispered at the trailhead).
Because here’s the truth no one tells you: getting the shot up there isn’t about guts. It’s about strategy, timing, knowing exactly when to shoot, and when to keep both hands glued to those cables like your life depends on it… because it kinda does.
So if you’ve got this bucket-list beast on your radar and you want photos that actually feel as epic as the climb? I’ve got you.
Here are my real-world, been-there-done-that tips for photographing Half Dome safely, especially when it comes to the cables, the chaos, and capturing that “I can’t believe I’m standing here” moment without doing anything reckless.
1. Safety First
(Because Dead Photographers Don’t Edit Photos)
Let me be blunt with you… this is not your cute little “bring snacks and vibe” hike.
People fall on Half Dome. Every year. And it’s almost never because they weren’t strong enough.
It’s because they got complacent, distracted, or let the shot matter more than the situation.
I remember hitting the cables solo, already deep into the hike. My legs cooked, brain a little foggy, that sneaky altitude fatigue was creeping in.
Halfway up, a gust of wind ripped through the cables and my stomach dropped with it. I froze….Full stop. And clipped my focus back in like, okay… we’re not playing games today.
That was the moment it clicked: this isn’t a photography mission. It’s a safety mission with a camera along for the ride.
The Real Risks
- Slippery granite: Looks grippy and lies to your face. Add dust, worn shoes, or moisture? Instant nope. Don’t even think about it.
- Crowded cables: People going up. People going down. Some panicking. Some stopping randomly. Trust me… it’s chaos.
- Weather exposure: Rain = deadly. Lightning = absolutely not. Even wind can mess with your balance. My aunt literally had a friend whose daughter died cause she went up with adverse weather.
- Fatigue-induced bad decisions: It’s a 14+ mile day. Your brain gets sloppy when you’re tired. That’s when people take risks.
Safety Rules
- Always maintain 3 points of contact
Two hands, one foot—or two feet, one hand. You are not a mountain goat. Stay grounded. - No photos while actively climbing the cables
I don’t care how epic the angle looks mid-move. Not worth it. Ever. - Clip in if you’re using a harness (optional—but honestly, smart)
Especially if exposure messes with your head or crowds stress you out. - Check the weather obsessively
Not once. Not casually. Obsessively. If there’s even a hint of storms—don’t go up.
Before you go, read the official safety guidance from the National Park Service.
They’re not trying to scare you. They’re trying to keep you alive.
2. Logistics You Can’t Wing
This is where a lot of people fumble the bag.
Because Half Dome isn’t just a hike… it’s a full-day endurance event with a strict guest list.
Show up unprepared, late, or without a plan? Congrats, you just signed up for suffering… or turning around before the good stuff.
Let’s not do that.
Half Dome Hike Quick Stats
| Category | Details |
| Distance | ~14–17 miles round trip, I did 18+ cause I had to hike from my car. |
| Elevation Gain | ~4,800 ft+ |
| Time Required | 10–14+ hours |
| Permit Needed | Yes (lottery system) |
| Difficulty | Strenuous + technical cables |
| Best Time to Start | 2–4 AM (for sunrise + fewer crowds) |
| Cable Section | Final 400 ft ascent |
Permits
- You must win a permit through the lottery to access the cables
- Daily quotas = limited spots = plan ahead or cry later
- Rangers do check (and yes, you can get turned around)
Apply for multiple dates if you can because flexibility = better odds.
Timing Strategy
You’ve got two main photo goals here: epic light and not getting stuck in cable traffic jams from hell.
Sunrise Strategy (My Pick)
- Start hiking at an ungodly hour (think 2–4 AM… yeah, I said it). I ALSO had a three hour drive before and hiked an extra 2 miles. Quit your crying.
- Reach the cables early before crowds stack up
- Soft morning light = chef’s kiss for half dome hike photography
Sunset Strategy (High Risk, High Reward)
- Golden light on the summit? Unreal.
- But descending in the dark after a 14-mile day? That’s spicy.
Avoid Peak Cable Chaos
If you take one thing from this section, let it be this:
Do. Not. Hit. The. Cables. At. Midday.
That’s when:
- Lines form
- People freeze up
- Traffic stops moving
And suddenly your “quick photo” turns into a balancing act while someone panics next to you.
It’s not ideal for half dome cables photography and not ideal for your nerves either.
3. Camera Gear That Won’t Get You Killed
Let me paint you a picture: mile 11, legs screaming, sun baking the granite, and your camera suddenly feels like a brick strapped to your soul.
Now imagine hauling that weight up the cables.
Yeah… no thanks.
I’m a pretty active little adventurer and I was DYING on those cables and sub dome.
Half Dome is not the place to flex your full kit. This is where you go minimal, strategic, and brutally honest about what you’ll actually use.
Camera Body
- Go mirrorless if you can
- Compact. Fast. Easy to handle one-handed when safe
- You want something that doesn’t throw off your balance
I carried a lightweight mirrorless setup (I took my Canon EOS m50 Mark II and my Insta360), and it was perfect. It was small enough to stay out of the way, powerful enough to deliver those crisp, dramatic shots.
My Go-To Travel Cameras: Canon EOS M50 mark II | Canon EOS 5D mark IV | What’s in My Camera Bag?
Lens Picks
You do NOT need a full lens lineup. Pick your battles.
- Wide Angle (10–18mm-ish)
→ For summit drama, scale, and those “tiny human, massive world” shots - Mid-Range Zoom (18–50mm-ish)
→ Your all-rounder for cables, hikers, and storytelling moments
That’s it. One to two lenses max.
Anything more? You’ll hate yourself halfway up.
Read More – Best Lenses for Travel Photography
Action Cameras
If there’s one piece of gear that actually levels up your Half Dome experience without making it more dangerous? It’s an action camera.
You physically cannot (and should not) be messing with a traditional camera on the cables. But an Insta360 or a GoPro? That’s a different story.
Set it. Forget it. Climb like your life depends on it (because… yeah).
Best Mounting Options for Action Cameras
- Backpack Mount (Top Pick)
→ Extends above you for that epic third-person angle - Invisible Selfie Stick (carefully used)
→ Only when stopped + stable. Never while actively climbing - Chest Mount
→ More grounded POV, super immersive, less dramatic but very real
Safety Rules
- Set it up before you hit the cables
- Do NOT adjust it mid-climb
- Make sure it’s securely mounted (last thing you want is your camera yeeting into Yosemite Valley)
- Be aware of people around you and don’t smack anyone with your setup
What NOT to Bring
- Tripods
- Just… no. Not on the cables. Not in crowds. Not when space is tight and people are gripping for their lives. I even left my hiking poles down at the bottom of the cables.
- Heavy setups
- If it makes you hesitate before packing it, then leave it.
- Loose gear
- If it can fall, it will. And it won’t stop. That is a SERIOUS safety risk for the person below you.
Smart Carry Systems
You need your camera:
- Accessible
- Secure
- Not swinging around like a wrecking ball
Here’s what works:
- Peak Design Capture Clip
→ Clips to your backpack strap. Locked in. Easy access when you’re stable. - Chest Harness
→ Keeps your camera centered and tight to your body (great for balance) - Secure Straps
→ Wrist strap, neck strap, backup tether. Pick your system, but don’t go naked either. I had a wrist strap for my Insta360 that worked, but I didn’t love the sway of the camera.
Set Up Your Settings Before
Before you even touch the cables, lock in your settings:
- Shutter speed fast enough for movement
- Exposure dialed
- Focus mode ready
Because once you’re climbing? Your only job is to climb and let your camera be on autopilot.
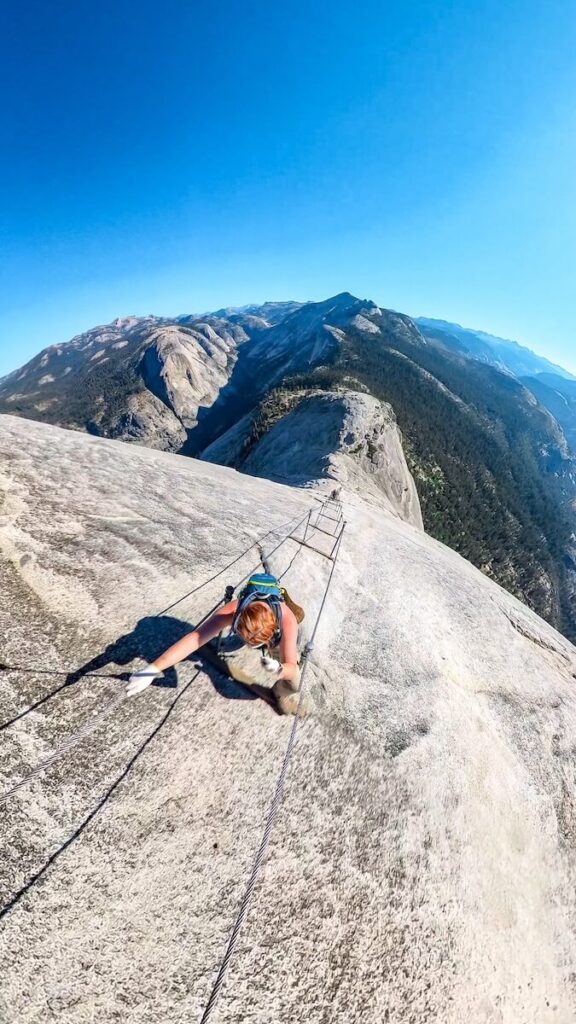
4. Half Dome Cables Photography Tips
This is the part everyone hypes up… and the exact place where people start making questionable life choices in the name of “the shot.”
Let me say it louder for the people halfway up the cables with one hand on their phone:
Golden Rule
You don’t shoot while climbing, you shoot when stable.
Not “quickly.” Not “just one sec.” Stable. Planted. In control.
Anything else? You’re gambling.
Safe(ish) Shooting Spots
These are your moments to capture the magic without being reckless.
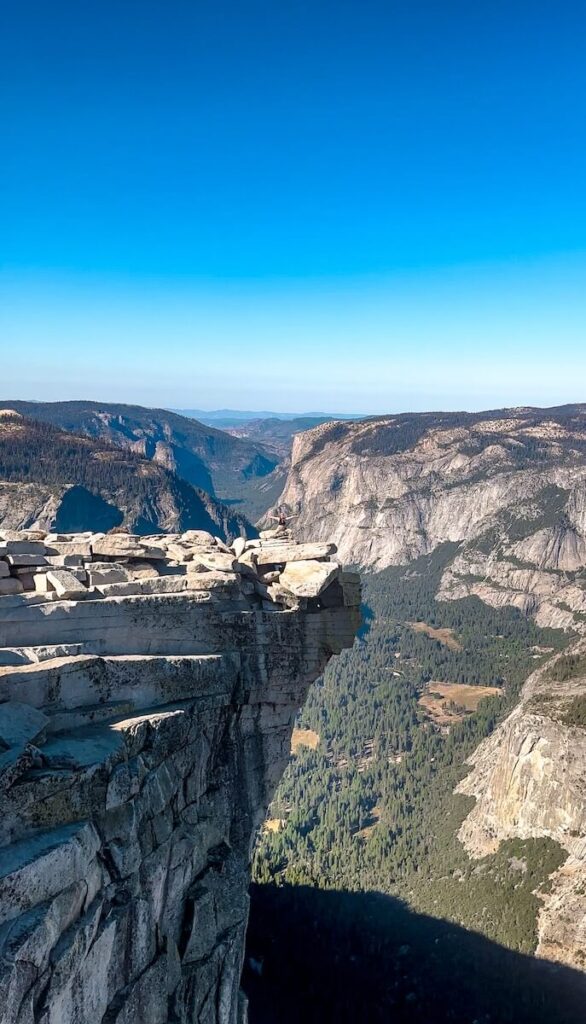
- Base of the Cables (ICONIC)
This is where you get that dramatic, towering perspective with the cables stretching straight into the sky, tiny humans gripping their way up.
👉 Honestly? One of the best half dome cables photography spots, period. - Between the Boards (ONLY if stable)
Those wooden planks aren’t rest stops, they’re controlled pause points.
If you’re fully balanced, feet solid, hands secure… then maybe you grab a quick shot.
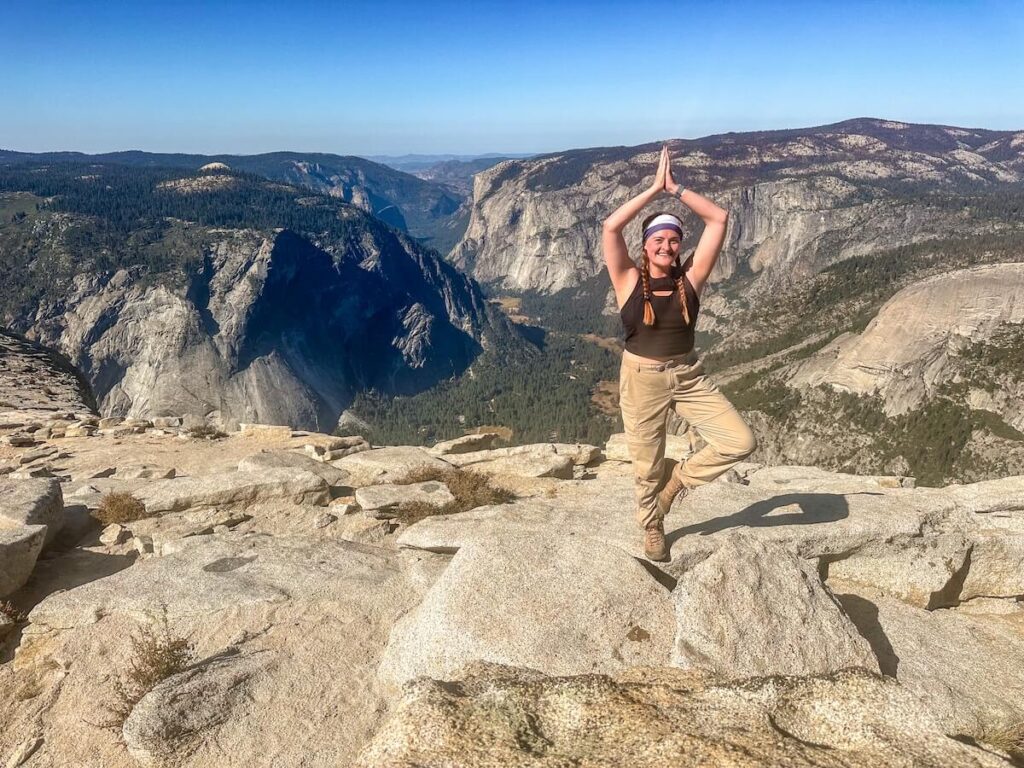
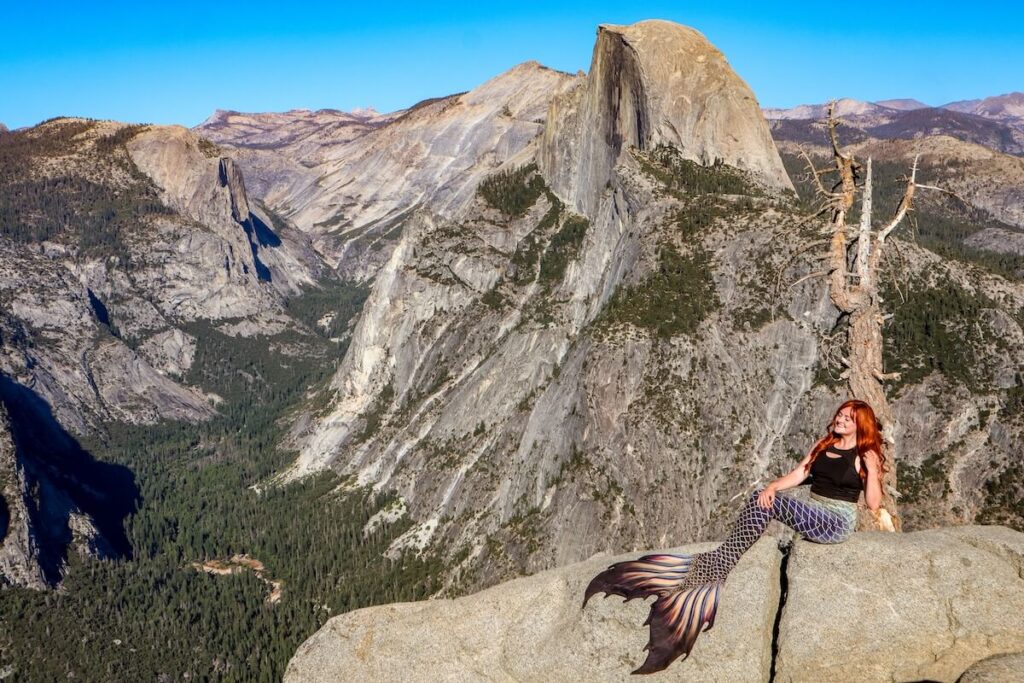
If not? Keep moving. I would ONLY do this with an Insta360 and ONLY if it isn’t a hassle and requires your hands. - Summit Plateau (Your Victory Lap)
Wide open space. Room to breathe. Room to shoot freely.
This is where you can finally go wild creatively without white-knuckling your camera. And just thing…you are getting a perspective that very few people get!
Shot List Ideas
You don’t need gimmicks. You need intention.
- Leading Lines of the Cables
Pull the viewer straight into the climb. It’s clean, powerful, storytelling gold. - Silhouettes of Climbers
Especially in early or late light with tiny humans vs massive granite = instant drama. - Compression Shots Looking Down
That stacked, dizzying perspective of people on the cables? Yeah… that hits.
What NOT to Do (Seriously, Don’t Be That Person)
- One-handed dangling shots 🙃
I’ve seen it. I hated it. Don’t do it. - Blocking traffic for photos
People behind you are tired, exposed, and trying to move. Don’t turn this into a photoshoot bottleneck. - Stopping in awkward, unstable spots
If your stance feels sketchy, it is sketchy.
Camera Settings to be aware of
Fast Shutter Speed
Wind hits. People move. Your hands aren’t exactly tripod-steady.
If your shutter speed is too slow? Congrats—you just climbed 4,800 feet for a blurry mess.
What to aim for:
- 1/500 or faster for people + cables
- Even faster if it’s windy or you’re slightly off-balance
Use Burst Mode (Your Secret Weapon)
You’re not shooting in a studio. Instead, you’re capturing split-second moments.
- Someone stepping up the cables
- A glance down
- That micro-expression of “I’m doing this??”
Hold that shutter down. Let it rip.
Later, you’ll pick the frame that actually hits.
Read More – See More Epic Bucket List Hikes to Photograph
Pre-Set Your Settings Before the Cables
Let me say this with love:
If you’re adjusting settings mid-climb… you’ve already messed up.
Before you even touch the cables:
- Dial in exposure
- Set shutter speed
- Choose focus mode
So when the moment comes? You just point, shoot (when stable), and move on.
Real Talk Moment
I remember pausing near the base, watching someone try to frame a shot mid-climb. They were twisting their body, shifting their grip, clearly focused on their screen instead of their footing.
It didn’t look epic. It looked dangerous.
Meanwhile, the best shots I got? All from moments where I was fully grounded, fully present, and fully in control.
Funny how that works.
6. Lighting & Conditions
If you’ve ever looked at your photos after a hike and thought, “Why does this look like a flat, overexposed potato?”yeah… lighting did you dirty.
Half Dome is all granite. Bright. Reflective. Zero chill in harsh sun.
So if you want photos that actually match the feeling of being up there? You’ve gotta play the light game right.
Best Conditions
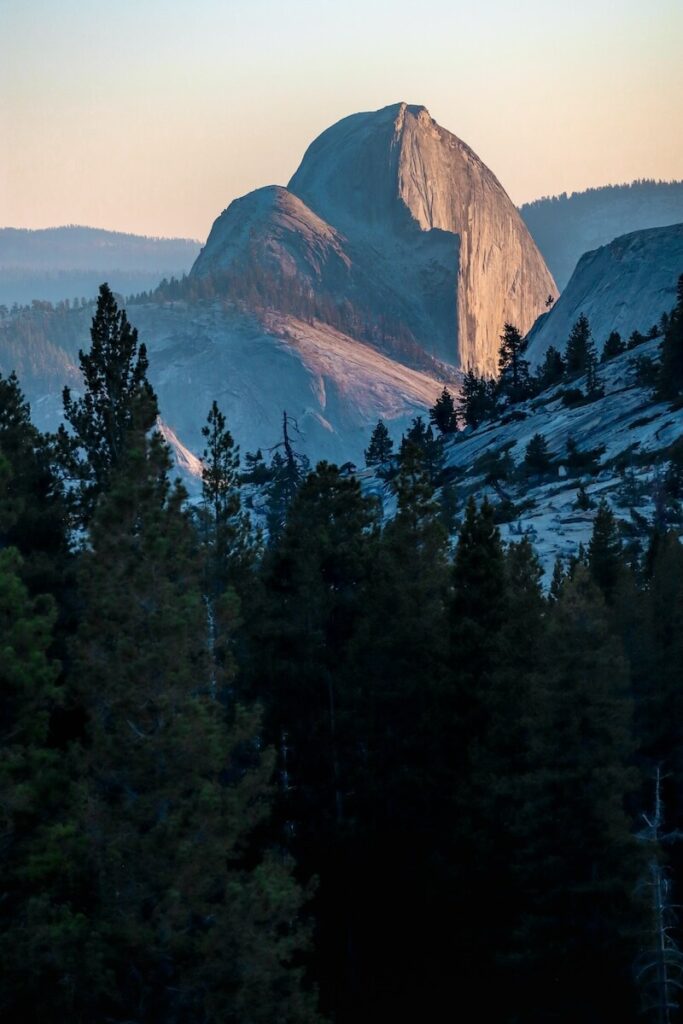
- Sunrise Glow
- Soft. Diffused. Forgiving.
- The granite isn’t blasting your highlights into oblivion, and you get that dreamy, pastel vibe.
- Golden Hour on Descent
- This is the sleeper hit.
- Warm light hitting the cables, shadows stretching, Yosemite Valley glowing like it knows it’s being photographed.
Worst Conditions
- Midday Sun (aka the dream killer)
- Blown-out highlights on granite
- Flat, shadowless scenes
- Squinty faces + harsh contrast
This is when your photos start looking… meh. Even if the moment felt epic.
6. Advanced Photography Tips for Half Dome
- Use Shadows to Create Depth
- Light is cool… but shadows? That’s where the drama lives.
Look for contrast on the cables, textures in the rock, silhouettes of climbers.
- Light is cool… but shadows? That’s where the drama lives.
- Shoot in RAW
- Non-negotiable if you care about your photos.
- You’ll recover highlights, pull back shadows, and save shots that would otherwise be trash.
- Expose for Highlights
- The granite is bright, so protect those highlights first, then bring shadows back in editing.
- Watch the Direction of Light
- Side lighting = texture heaven
- Front lighting = flat city
7. The Mental Game
This is the part nobody wants to admit.
Not the gear. Not the lighting. Not even the cables.
It’s your brain that will get you into trouble up here.
Summit Fever Is Real
You didn’t hike 14+ miles, climb thousands of feet, and stare down those cables just to… not get the shot, right?
That little voice kicks in:
- “You’re already here…”
- “Just one quick photo…”
- “Everyone else is doing it…”
And suddenly, you’re negotiating with your own safety like it’s optional.
The Social Pressure Is Wild
The cables are basically a live audience.
- People watching you
- People waiting behind you
- People moving faster than you
- People doing sketchy stuff that makes it look “normal”
It messes with your head.
You feel rushed. You feel judged. You feel like you need to perform.
You don’t. Trust me.
It’s Okay to NOT Take the Shot
Read that again.
There will be moments where:
- The wind picks up
- Your footing feels off
- The crowd gets chaotic
- Your gut says “nope”
That’s not fear holding you back, and that’s instinct doing its job.
Listen to it.
My “Nope” Moment
I had a shot in mind, looking down the cables, climbers stacked below, that dizzying perspective everyone loves.
I found a spot. Stopped. Looked down.
And immediately felt it.
Not fear exactly… just off. My stance wasn’t solid. My balance felt weird. The exposure hit different from that angle.
Could I have taken the shot? Probably.
Would it have been worth that split-second of instability? Nope. So I didn’t take it.
And guess what? I still walked away with photos I love and zero “that was a bad idea” moments replaying in my head later.
Final Pep Talk on Photographing Half Dome
Here’s the truth nobody puts in the highlight reel:
You don’t need the most wild shot, need to hang off the edge, or prove anything to anyone on that mountain.
You just need to come home with the story.
Because the real flex? It’s not the riskiest angle or the sketchiest moment.
It’s standing on that summit (or even turning around before it) and knowing you made smart calls the entire way up.
You respected the climb, your limits, and you still walked away with photos that feel like something.
That’s the win.
Your Turn
If you take on Half Dome, I want to see it.
- What shot were you chasing?
- What moment made your heart absolutely pound out of your chest?
- Did you skip a shot because it didn’t feel right? (proud of you already 👏)
Drop your photos, your stories, your “I can’t believe I did that” moments.
Because this isn’t just about one hike, it’s about building a crew of people who go after epic experiences and come back to tell the story.
Don’t Stop There!
If you love extreme adventures and capturing the bucket list moment, I am here to help!
- Become an affiliate
- Do you talk nonstop about photography? You might as well get paid for it!
- Join my paid newsletter – Shutterbugs Gone Wild
- A behind-the-scenes look at selling travel photos, building a photography income stream, and living a wildly adventurous life with a camera.
- Subscribe to my free newsletter
- Get more travel photography tips, destination guides, and adventure inspiration straight to your inbox.
More Extreme Hike Inspiration
Adventure Travel Resources
Adventure Bucket List Resources
I am here to help your travel adventures go as smoothly as possible! That way you can check off that bucket list with minimal complications and spending!
SHOP – Shop the best adventure gear and essentials on my Amazon Storefront – handpicked by a full-time adventuring mermaid!
AIRFARE – There are a few I use, but Aviasales is normally my go-to for flights without any extra fees or markups.
ACCOMMODATION – My two favorites are Booking.Com for hotels and VRBO for rentals.
GUIDED TOURS – If you are looking for quick and easy tours, check out GetYourGuide and Viator.
MULTI-DAY TOURS – For more in-depth tours that span several days, TourHub has many great options with reputable travel companies. Use my code (ALEXANDRA1GURU) for up to 5% off your next bucket list adventure.
TRANSPORTATION – You can either rent a car yourself with Discover Cars or do a guided bus tours like Big Bus Tours.
SIM CARDS – Avoid expensive roaming charges with an eSim card with Airalo. Personally, I prefer wifi boxes, and recommend WiFi Candy (get 10% of with the code THEBUCKETLISTMERMAID).
TRAVELER’S INSURANCE – Check out VisitorsCoverage for affordable insurance plans. If you are a nomad or remote worker, I would check out SafetyWing.
SEE MORE – Adventure Resources | Photography Resources
See Some Photos You Like?
Check out my full photography page for a full gallery and prices.