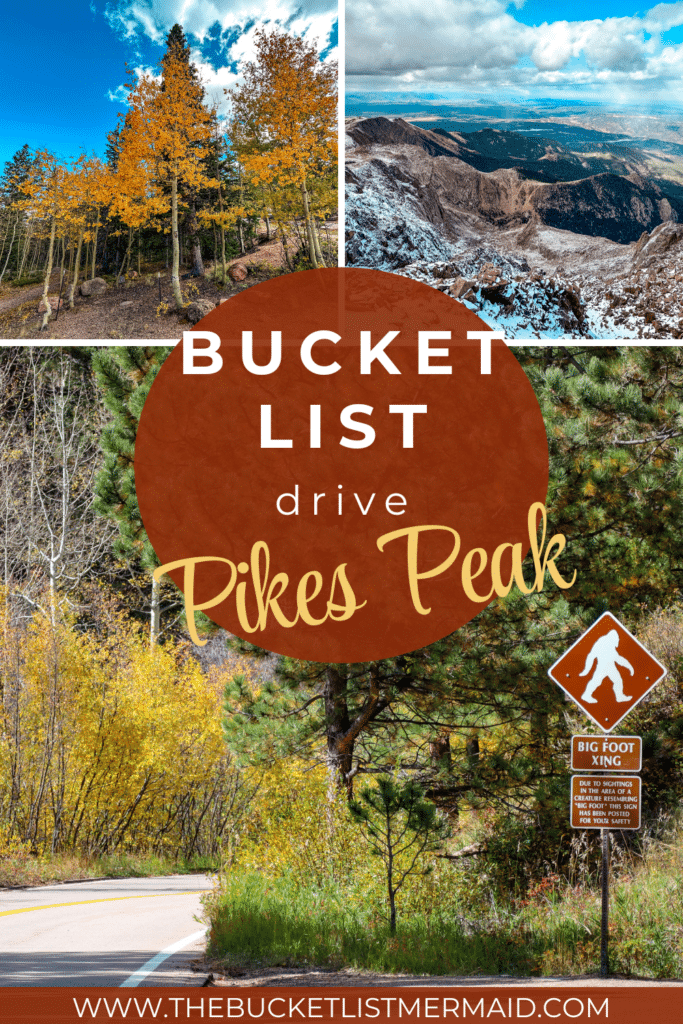
Driving Pikes Peak Highway: What To Expect & How to Photograph it
This website contains affiliate links from trusted partners. If you purchase through a link on this site, I may earn a commission at no extra cost to you. As an Amazon Associate, I earn from qualifying purchases. See my Privacy Policy and Disclosure for more information.
Updated October 2025
Ready to tackle one of Colorado’s most legendary drives and come home with jaw-dropping photos to prove it? 🚗📸
Welcome to Pikes Peak Highway. This is a winding, high-altitude rollercoaster that climbs from forested foothills to 14,115 feet of pure “holy-wow” views.
This isn’t just a drive…it’s an experience.
You’ll snake through alpine lakes, hairpin turns, and cloud-brushing panoramas that look straight out of a fantasy film.
And for photographers? Every turn is a new composition waiting to happen.
As a Colorado local and adventure photographer, I’ve made this drive more than once (and yes, I still get goosebumps every single time).
In this guide, we’ll cover how to drive Pikes Peak safely, what to expect, and how to photograph it like a pro.
So buckle up, grab your camera, and get ready for the ride of a lifetime. 🚙✨
Love it? Pin it!
Not into REading? Check out the Video
Bucket List Review of Driving Pikes Peak Highway
| Category | Outdoor |
| Who Should Add This to Their Bucket List? | Nature lovers who love mountain drives |
| Best Time to Go | End of September |
| Traveling Difficulty | Moderate |
| Physical Difficulty | Easy to Moderate |
| Popularity Rating | 7/10 |
| Tour Required | No |
| Budget | $$ |
| Wheelchair Accessible | Yes |
| Favorite Place to Stay | The Broadmoor – a bit of a drive, but the best resort in CO Springs |
| Favorite Tour | Small Group Tour of Pikes Peak and the Garden of the Gods from Denver |
| Traveler’s Insurance | Get Quote with VisitorsCoverage |
What is Pikes Peak and Pikes Peak Highway?
Alright, let’s start with the basics. Pikes Peak, affectionately known as “America’s Mountain”, is one of the most famous summits in the United States.
Standing tall at 14,115 feet (4,302 meters), it’s the 32nd highest peak out of Colorado’s 54 ‘fourteeners.’
It’s not just its height, it’s the sheer beauty and grandeur of the mountain that will leave you breathless (literally!).
Now, getting to the summit, there are a few options, one being the infamous Pikes Peak Highway.
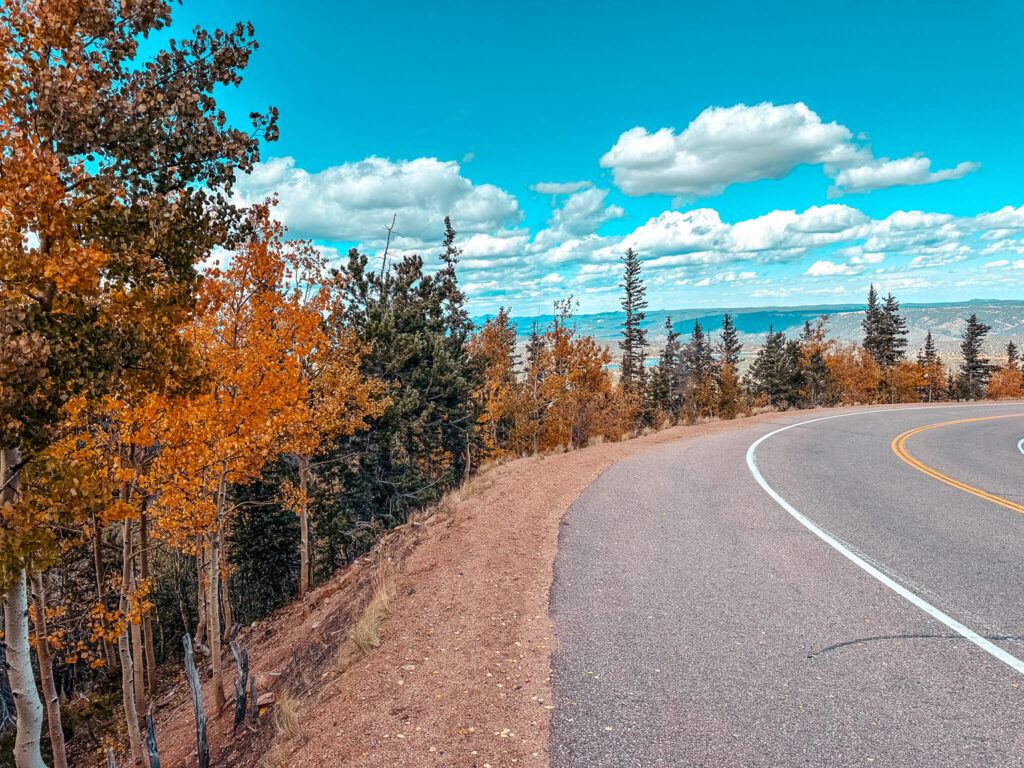
With 156 curves and turns of mountain road, plus 4 different Colorado life zones, the Pikes Peak Highway is an adventurous ride right from Mile 1.
You’ll cruise through the alpine wonderland, past gorgeous reservoirs, beyond timberline, and eventually, onto the summit that inspired the words to “America the Beautiful”.
Read More – Fall Photography Guide
Recommended Tours That Include Pikes Peak Highway
Before we get started, if you don’t feel comfortable driving up Pikes Peak Highway, there are some options for you.
There are fortunately tours for people who don’t want to drive, are coming from Denver, or don’t want to use their own car for the drive.
With a tour, you get to let someone else take care of the logistics while you sit back and enjoy the nature. Some also let you see other natural sites in the area, such as Garden of the Gods.
Here are some ideas, in case you are interested:
Plan Your Trip to Colorado
Find a place to stay
Find the best places to stay in Colorado Springs while you prep for your drive.
Book Activities
There are many Pikes Peak Highway tours if you don’t feel up to the advanced drive.
find a Car to Rent
If you are traveling and don’t have a car, you will need to rent one to drive the Pikes Peak Highway.
Traveler’s Insurance
Because this is a high altitude mountain road, it is always better to be safe than sorry!
How to Photograph Pikes Peak Highway
Before you even start the engine, know this: Pikes Peak isn’t just a drive; it’s a full-on photo adventure.
Every twist in the road gives you a brand-new view, from alpine lakes to clouds drifting below your feet.
At more than 14,000 feet, the light hits differently. It’s bright, bold, and full of contrast. To make the most of it:
- Bring a polarizing filter to cut glare on lakes and pavement.
- Pack a wide-angle lens for those sweeping, cinematic views.
- Toss in a zoom lens too. You never know when a marmot or mountain goat will make an appearance.
Framing pikes Peak Highway
When you’re framing your shots, let the road lead the viewer’s eye through the photo.
The curves, switchbacks, and ridgelines make natural leading lines that tell the story of the climb.
And don’t shy away from weather. Fog rolling across the highway or sunlight breaking through clouds can turn an average photo into something epic.
Most of all, take your time. Step out at the overlooks, feel the altitude (literally), and let the light change around you. Up here, patience pays off — the mountain has a new look every few minutes.
🧜♀️ Mermaid Tip: Keep your batteries warm in your pocket and a lens cloth handy. The wind up here loves to throw a little Colorado “sparkle” (aka dust) on your camera.
Packing List for Driving Pikes Peak Highway
The first time I drove up to Pikes Peak in October, I was wildly unprepared. AKA my hands froze off. Don’t be like me. Be smarter.
Here is what I would recommend bringing from my personal experience.
Adventure Packing List
- Warm Clothing: Even in the summer, temperatures at the summit can be chilly. Make sure to pack layers, hats, gloves, and scarves to stay warm and comfortable. As I mentioned before, I drove up Pikes Peak Highway in October. I was in jeans and a t-shirt at the bottom and was a mermaid icicle at the summit.
- Sunscreen and Sunglasses: At higher altitudes, the sun’s rays are stronger and can burn your skin quickly. Protect your skin and eyes from the harsh sun.
- Water and Snacks: The altitude can make you feel dehydrated and hungry quicker than you might expect. Stay hydrated, and pack some energy-boosting snacks!
- Camera/Phone for Photos: You’ll want to capture the breathtaking views on your journey, trust me! I brought both my camera and my phone during all of my journeys and used them every single time.
- Binoculars: For a closer look at the stunning wildlife and scenery.
- Comfortable Shoes: In case you want to explore some of the trails or walk around the summit.
- Full Tank of Gas: There are no gas stations along the Pikes Peak Highway. Start your trip with a full tank! They will usually check your gas meter at the tollgate.
- Cash/Credit Card: For the tollgate and perhaps a souvenir or two from the gift shop at the summit. Plus, you won’t want to miss out on the donuts!
- A Sense of Adventure: This might be the most important one! Be ready for a thrilling ride, folks!
Photography Packing List
Camera Gear
- Camera body (DSLR or mirrorless) — something with good dynamic range for bright alpine light
- Wide-angle lens (16–35mm) — for sweeping landscapes and those cinematic road curves
- Zoom lens (70–200mm) — for layered mountain views, wildlife, and compression shots
- Circular polarizer filter — reduces glare on lakes, roads, and deepens skies
- Neutral density (ND) filter — for smoothing moving clouds or reflections
- Tripod — lightweight, sturdy (great for sunrise/sunset or long exposures at lakes)
- GoPro / action cam — for dashboard or on-the-road POV shots
- Lens cloth + blower — essential for dust and wind (Pikes Peak loves to throw grit)
- Extra batteries — cold and altitude drain them fast
- Memory cards — more than you think you’ll need. RAW files add up quickly. This has happened to me and it was traumatic, trust me.
My Go-To Travel Cameras: Canon EOS M50 mark II | Canon EOS 5D mark IV | What’s in My Camera Bag?
Pikes Peak Highway Directions and Address
Pikes Peak Highway is nestled in the vibrant state of Colorado, USA, and getting there is just a little tricky.
If you’re coming from downtown Colorado Springs, its about 15 minutes west on Highway 24. I thought I was lost for a minute, but I was going the right way! If you pass this cheesy North Pole area, you are headed in the right direction for the tollgate.
It is easiest to put the tollgate address into your phone or GPS:
5089 Pikes Peak Highway, Cascade, CO 80809
Read More – Best Mountain Towns in Colorado According to Locals
Tollgate and Reservations for Pikes Peak Highway
Pikes Peak Highway Tollgate
When you get to the Pikes Peak Highway Tollgate, this is the start line of your journey!
The friendly staff at the tollgate will get you sorted with your reservation and any unpaid fees (it’s $10-$15 per adult and $5 per child, but double-check just in case!). These fees may change depending on the time and season.
Please note that different entry times and closing times are depending on the season.
Make sure to factor this into your travel plans, you don’t want to miss out on this bucket list drive!
The friendly staff at the tollgate also checked our gas level for at least half. This is because there are no gas stations on the mountain, so come with a full tank of gas just in case.
Pro Tip: when you are at the tollgate, don’t forget to ask for a map. This will be crucial to seeing where you are and locating any stops that you will want to make on your journey up to the summit.
Do You Need a Reservation to Drive Up Pikes Peak?
Yes, you do need to make a reservation to drive up Pikes Peak Highway.
If you book online, you can get $2 off by using the code ‘2off’. This is how I got my reservation and everything went off without a hitch. Also note that depending on the season, you might have to select a timed entry.
You can technically also get a reservation at the tollgate on the same day, but this is pending availability.
Therefore, to avoid disappointment, I would plan ahead and get your reservation online and in advance, especially if it is during peak summer.
When to Drive Pikes Peak Highway
The Pikes Peak Highway is open year round, weather permitting. It is up to you to figure out which time works best for you.
Summer
Summer (June through August) is known as the “tourist season” and with good reason. The weather is warm (as it can be for the summit), the skies are clear, and the whole mountain range comes alive with lush greenery.
Plus, the highway is generally free of snow, making it a safer drive. But be warned, summer also means more crowds and potential traffic.
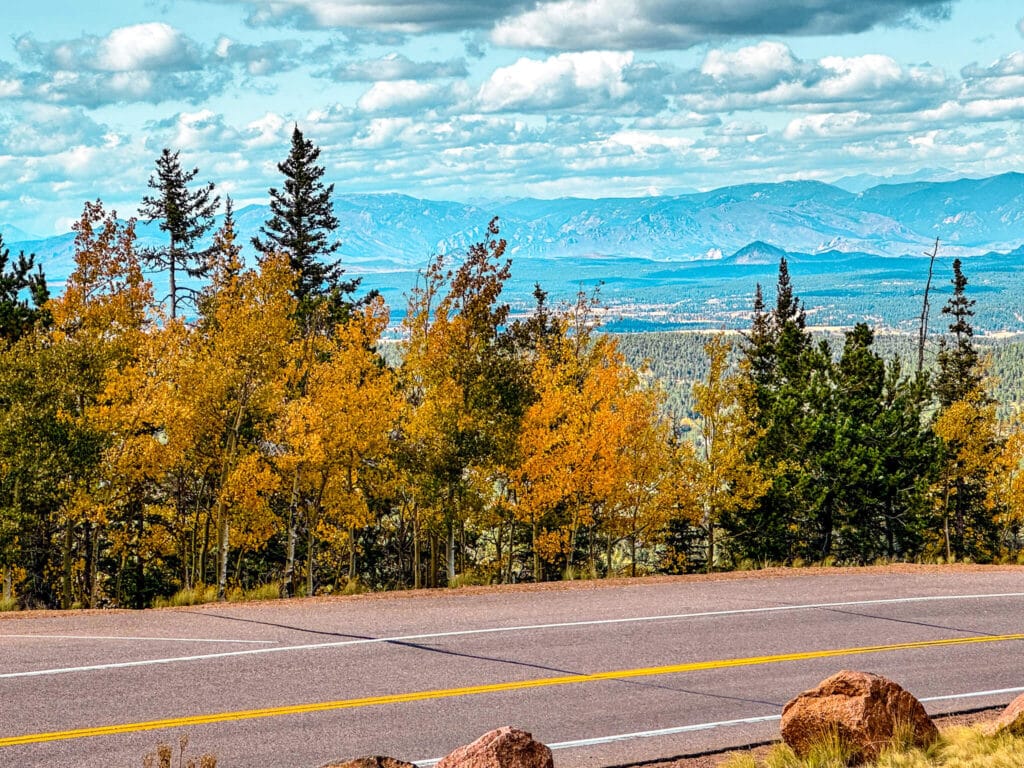
Fall
Now, if you’re a fan of cooler temperatures and fewer crowds, fall (September through November) is your best bet. The changing leaves create a stunning tapestry of colors that’s truly a sight to behold!
But bear in mind that weather can be unpredictable in fall, so be ready for sudden weather changes and closures.
This is my favorite time to go and when I would recommend planning your drive.
If I had to pick a perfect time, it would be late September. That way the Aspens are in full yellow/orange bloom and there are fewer people on the road. This is also my favorite time as a photographer.
Winter
Winter (December through February) offers a snowy wonderland perfect for those stunning Christmas card shots, but it also brings icy conditions and potential road closures – not ideal for driving.
This would be my least favorite option. There is snow up at the summit even during summer, so you can imagine how it would be during winter.
Although the road is open year round, it is often closed due to snow. And take my word for it, you would not want to be driving the last 8 miles or so with icy roads. That would be quite terrifying.
Spring
Finally, spring (March through May) sees the mountain range slowly waking up from its winter slumber with beautiful blooms dotting the landscape.
But like fall, weather can be unpredictable. So, it all boils down to what kind of adventure you’re up for on your bucket list Pikes Peak Highway drive!
So, to recap, my favorite time to go would be fall, and my least favorite time to go would be winter.
How Many Miles is Pikes Peak Highway?
Alright, let’s talk about the distance. The Pikes Peak Highway is a whopping 19 miles of pure scenic beauty. Well, 19.26 miles to be exact.
This means that it has miles of winding roads, breathtaking vistas, and awe-inspiring nature. You bet your bottom dollar, it’s a ride worth every mile!
How Long Does it Take to Drive up Pikes Peak Highway?
The time it takes can vary depending on how many stops you make and how long you spend at each one.
However, on average, you can expect the drive to the summit to take a minimum of 2-3 hours if you’re going at a medium pace.
Remember, this isn’t a race – it’s about enjoying the journey.
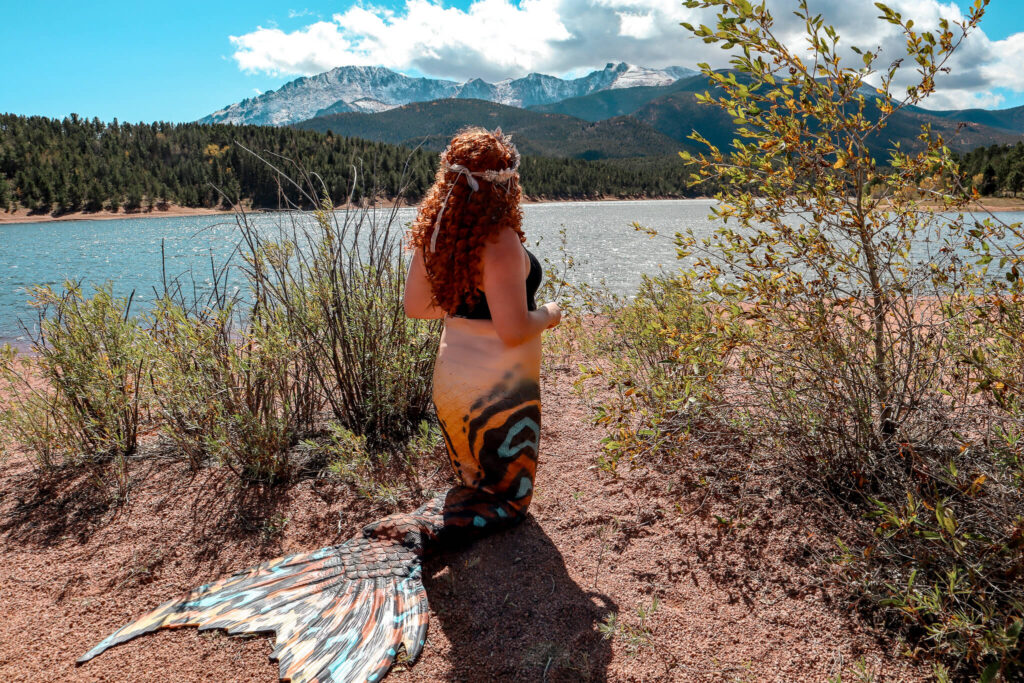
This was actually one of the biggest lessons that I learned when I first drove up Pikes Peak Highway. I budgeted 3 hours total. However, I found that I loved stopping along my journey. I took pictures, enjoyed the view, and even put on my mermaid tail. Then, once I reached the summit, I wandered around, ate donuts, and took even more photos.
Needless to say, I was rushing down the mountain trying to get through the bottom gate before it closed.
Because of this, I really would recommend allowing yourself more time than you think for this epic bucket list activity.
What Stops are Along Pikes Peak Highway?
Just because it is a highway doesn’t mean that the summit is the only place that you have to stop when you are driving Pikes Peak Highway.
Once you hit the tollgate, make sure to pick up a map and ask the staff the best places to stop and stretch your legs for a photo.
I would recommend driving straight up to the top, noting places you would like to stop on the map. Then, on your way down, hit everything that you want to see.
Photo Spots Along Pikes Peak Highway
1. Gateway / Toll Booth Area
Elevation: ~7,800 ft
- This is where your adventure begins. The lower forest area is filled with towering pines and winding roads that peek through the trees.
- 📸 Photo Tip: Use a slower shutter or slight motion blur to capture the feeling of entering the mountain. If it’s early morning, the soft light filtering through the trees is gorgeous for backlit forest shots.
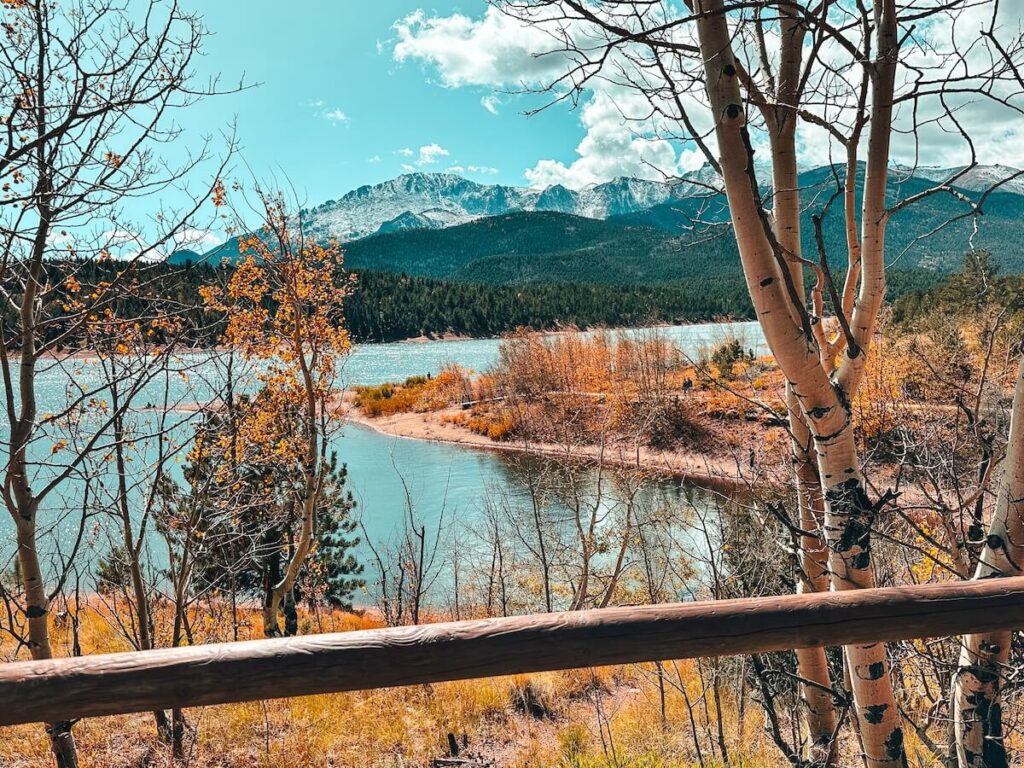
2. Crystal Reservoir
Elevation: ~9,160 ft
- A stunning alpine lake with mirror-like reflections of Pikes Peak behind it. Stop here! It’s one of the most photogenic stops on the entire drive.
- 📸 Photo Tip: Come early when the water is still for perfect reflections. A polarizer helps deepen the blues and cut glare off the surface. Use leading lines from the shore to draw the eye to the peak.
3. Halfway Picnic Grounds
Elevation: ~9,930 ft
- A peaceful stop with dense forest and creeks running through. Great for stretching your legs and capturing intimate forest details.
- 📸 Photo Tip: Use a wide aperture (f/2.8–f/4) to blur backgrounds and create that dreamy forest look. Look for rays of light streaming through the trees.
4. Glen Cove Inn
Elevation: ~11,400 ft
- This is the last major stop before the tree line. You’ll find bathrooms, snacks, and a pull-off with wide valley views.
- 📸 Photo Tip: Step across the road for sweeping panoramas framed by evergreens. A telephoto lens can compress the distant ridges beautifully.
5. Devils Playground
Elevation: ~12,800 ft
- Named for the way lightning dances across the rocks during storms, this area has eerie rock formations, open tundra, and wide-open skies.
- 📸 Photo Tip: Use a low angle to make rock formations look huge and dramatic. Clouds can move fast up here. Use a 1–2 second exposure to catch their motion streaking across the sky.
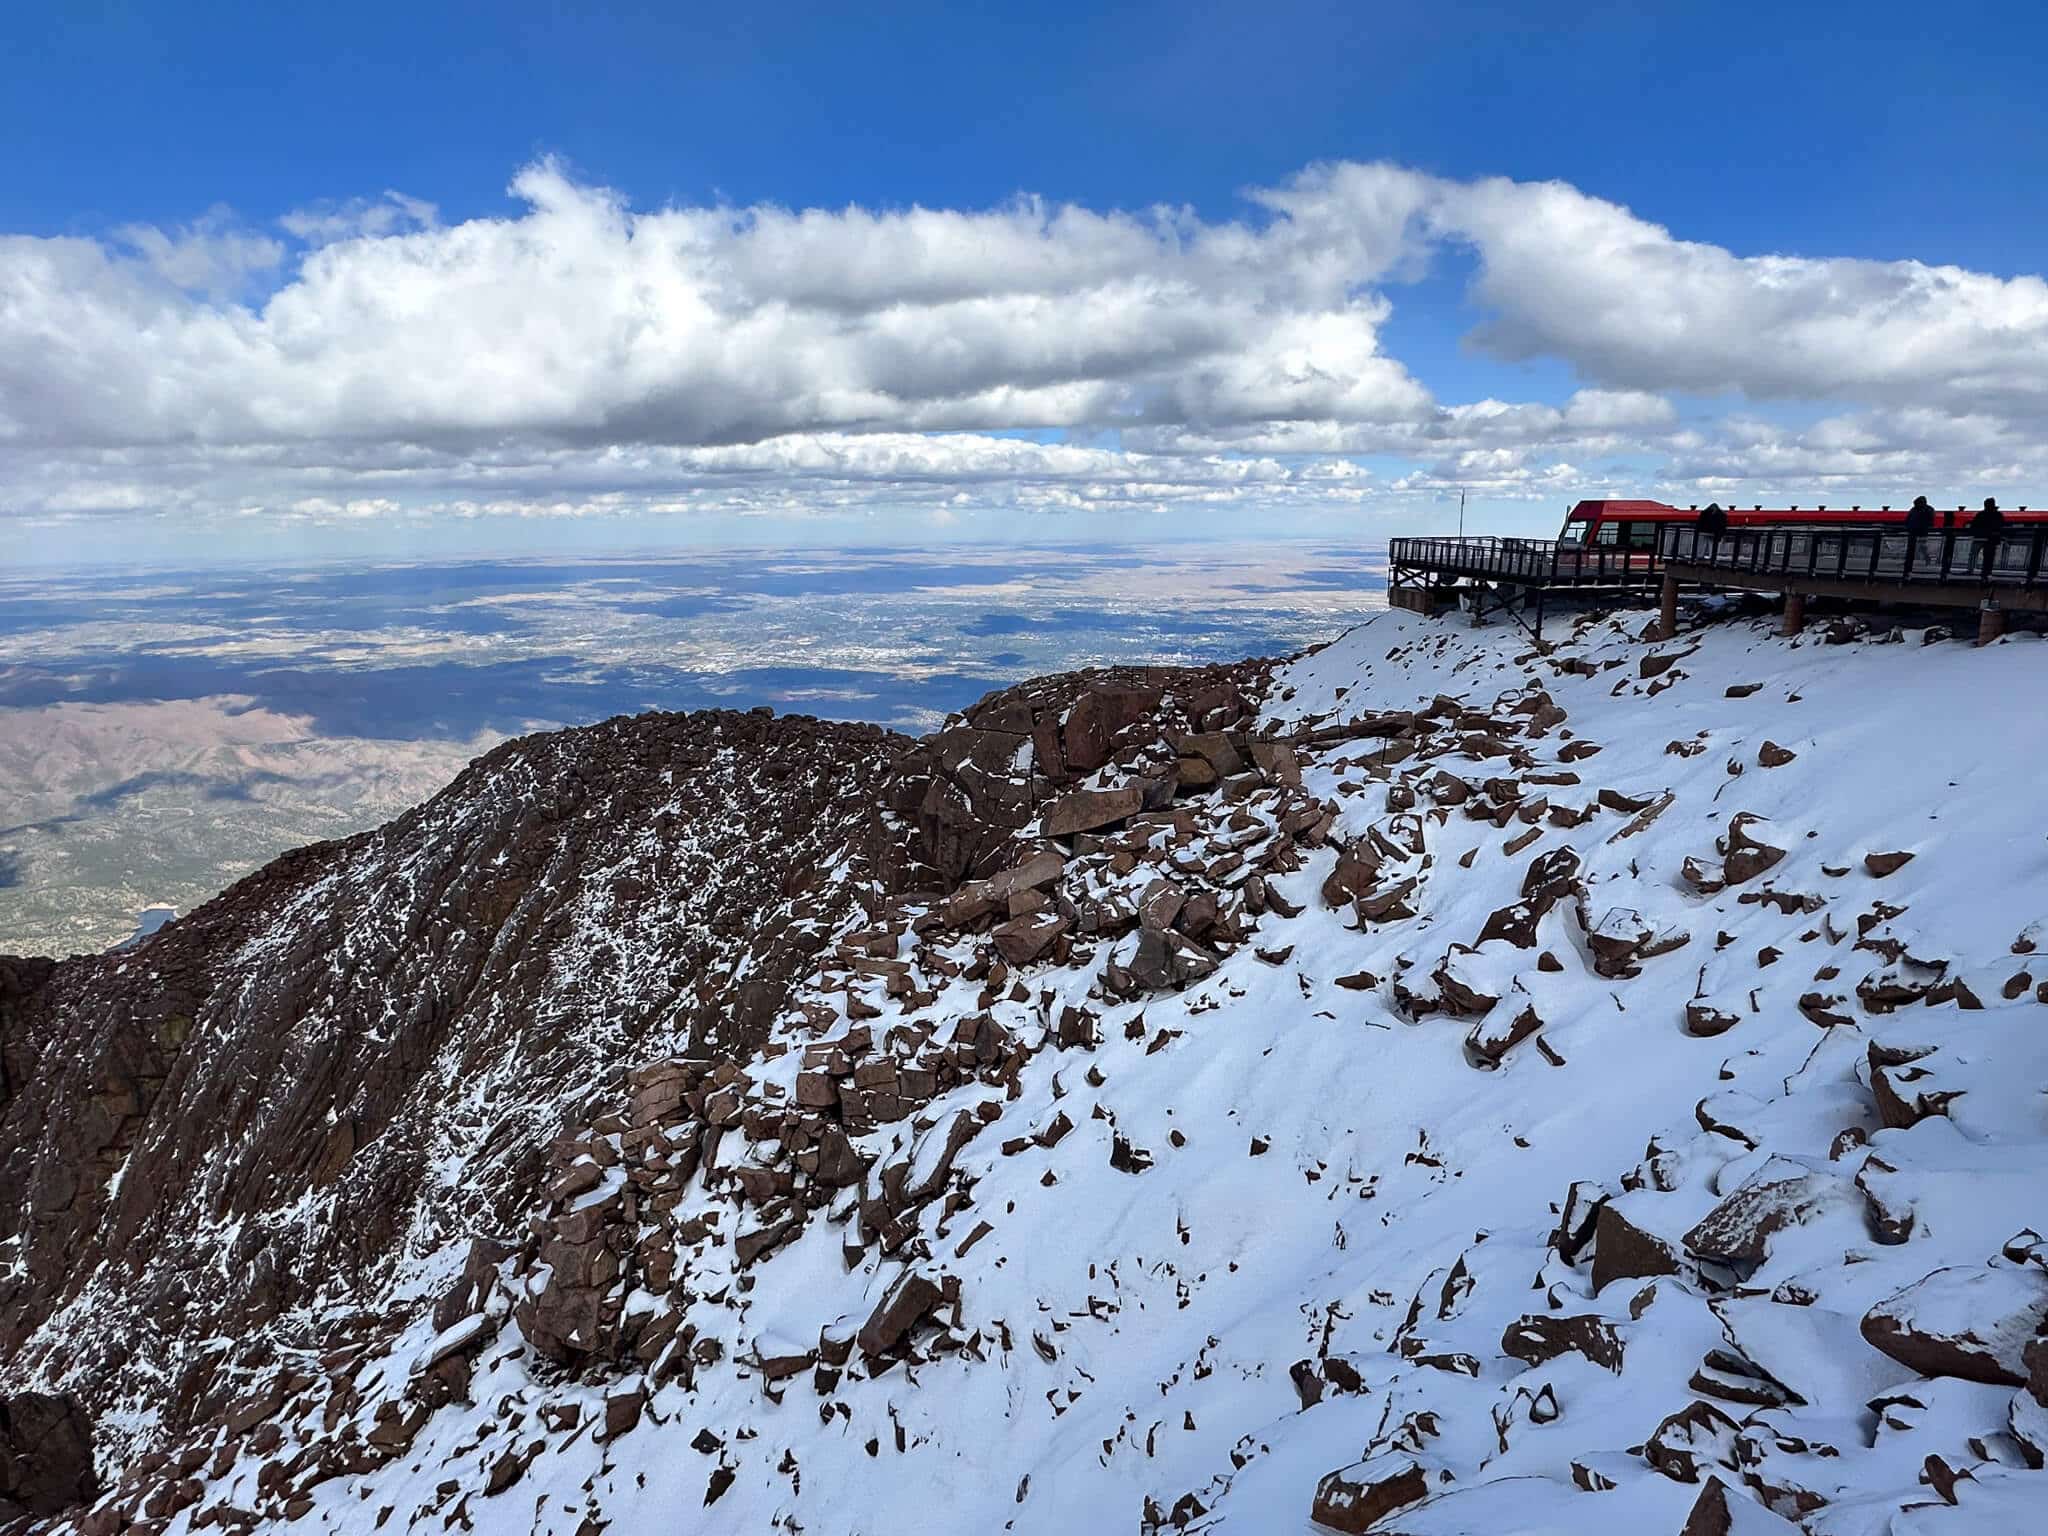
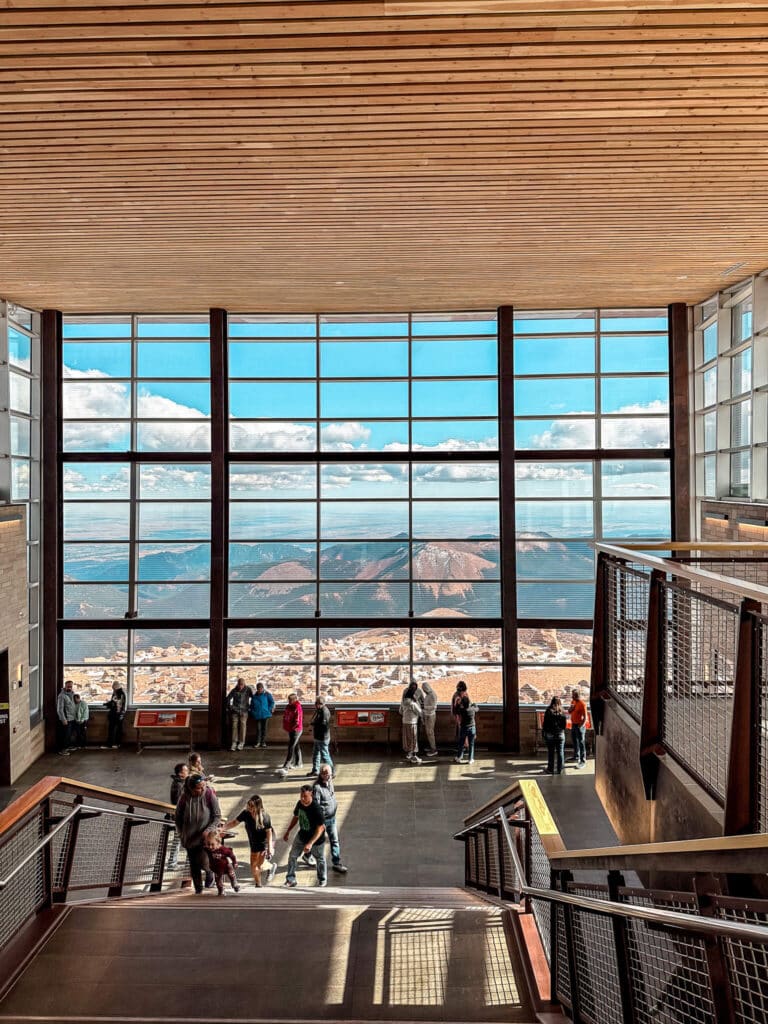
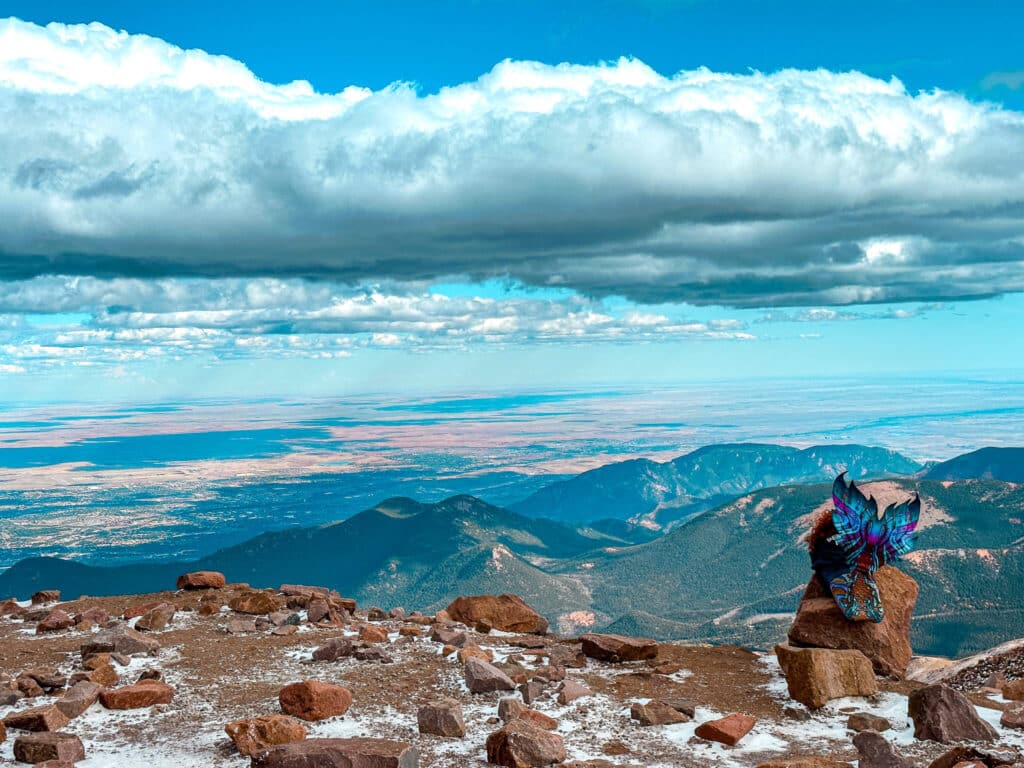
6. Summit of Pikes Peak
Elevation: 14,115 ft
- The grand finale! From the top, you can see five states on a clear day. The views are breathtaking (literally and figuratively).
- 📸 Photo Tip: Bring both wide and zoom lenses – wide for the epic view, zoom for details like distant peaks and light on the ridges. Try a selfie with your car or board at the summit sign for that bucket-list shot!
🧜♀️ Mermaid Tip: Step away from the main viewing deck and find a quiet edge for unobstructed 360° views — sunrise and sunset up here are unreal.
Is Driving Pikes Peak Highway Dangerous?
And now to talk about the thing that is on everyone’s mind but is too scared to ask.
I would confidently say that Pikes Peak Highway isn’t dangerous if you follow all the rules and use a little extra layer of caution.
With that being said, this is a windy mountain road with lots of switchbacks and very few guard rails. Some of my family members refuse to do this drive because they are scared of heights.
Although this drive isn’t for everybody, it is one of the most amazing scenic drives in Colorado.
If you are careful and are comfortable driving mountain roads, you should be just fine!
Is Pikes Peak Highway Paved?
Fear not, road trippers! The Pikes Peak Highway is fully paved all the way up.
From start to finish, you’ll be riding smoothly along a well-maintained road. So you can keep your eyes on the incredible vistas instead of worrying about navigating any rough terrain.
The problems come when the roads get icy and slick. This is why the highway, especially the last bit up to the summit, is prone to closures for your safety.
Brake Checks
Don’t panic, but there are brake checks on the mountain where they check the temperature of your brakes for excessive heat.
This is when you’re descending, about halfway down around Glen Cove. This is to ensure everyone’s safety and prevent any brake failures.
When you do descend, try to be in a lower gear if you can and don’t push your brakes. We were paying close attention to smell if they were burning. And honestly, I didn’t notice anything and had pleasant descent after the mandatory brake check.
And although it was a little unsettling (I had never been brakes checked before), I was ultimately happy to have the safety precaution and it gave me peace of mind when going down the mountain.
Photography Safety Tips
Don’t stop mid-turn or on narrow shoulders. Always pull off at designated overlooks or wider areas. Traffic comes fast, and visibility drops quickly around bends.
Secure your gear between stops. Cameras can slide, bounce, or fall as you climb and descend. Keep everything in padded bags or secured on the seat.
Be cautious stepping out. Wind gusts at high elevation are no joke. Keep straps around your neck or wrist, especially near ledges or railings.
Watch for lens fog. Going from a warm car to cold mountain air can fog up your lens fast. Let your camera acclimate for a few minutes before shooting.
Keep your eyes on the road. If something looks incredible (and it will), pull over safely. Don’t try to shoot while driving. Let your passengers handle that GoPro!
Stay weather-aware. Afternoon storms and lightning are common — if the clouds darken or thunder rolls, head down the mountain immediately.
Brake smartly. Use lower gears on the descent to avoid overheating your brakes. As mentioned, there’s even a checkpoint to make sure they’re not too hot!
Is the drive scary?
I would separate the drive into two sections. Before and after Glen Cove.
Before Glen Cove is stunning. You are driving past lakes, through trees, and you feel submerged in the forest. This part of the drive is easy and not very scary, in my opinion.
The real test of courage comes after Glen Cove. Here, you go above the treeline and the skinny switchbacks start. There are no guardrails and there are some pretty dramatic cliffs when driving up.
When I drove the highway, I did not find this scary at all. I felt in control of my vehicle the entire time. However, I could see how it might be a little unnerving to some travelers who are afraid of heights or are not used to driving mountain passes.
Just go slow and take a deep breath. It will be worth it once you reach the summit–trust me!
Checking Road Conditions on Pikes Peak Highway
No matter what time of the year you journey up to the summit of Pikes Peak, I would highly recommend calling the hotline for road conditions:
+1 719-385-7325 (US number)
This gets information 30 minutes prior to opening and then is updated throughout the day. This will alert you to any changing weather conditions and closures.
I can’t imagine how disappointed I would be if I planned this epic bucket list road trip, only to find that it is closed due to weather.
How to Deal with Altitude Sickness
Let’s talk about something that you might not think about when traveling to Pikes Peak.
Altitude sickness can be a real party pooper when you’re tackling that bucket list drive up Pikes Peak Highway. In fact, when I used to be an EMT, I would see this kind of thing all the time, even at lower elevation.
You might experience some symptoms like dizziness, headaches, or even nausea as your body adjusts to the thinner air.
Prevention is better than cure, right? So, start hydrating a day prior, munch on some carbs (yes, this gives you an excuse to have that extra slice of pizza), and take regular breaks during your drive to acclimate. Remember, this is an adventure, not a race!
I am not a doctor, so please consult them for more details on prevention and treatment.
What To Look out For
But this is what I was taught as a Colorado native:
If you do start feeling symptoms of altitude sickness, stop ascedning towards the summit. Have another person drive if applicable and turn around. Going to a lower altitude should ease the symptoms.
Once you get access, drink tons of water with some over the counter painkillers. Then rest!
If you ever feel like your symptoms are unmanageable or you can’t drive, stop and call for help. Again, always talk to your doctor if you are having symptoms of altitude sickness or have any questions and concerns.
I have asthma and although the air felt thinner, I had no problems.
Will Your Car Make it Up Pikes Peak Highway?
Soooo funny story. The first time I drove up to Pikes Peak, I heard horror stories of the thin roads near the summit.
Because of this, we actually rented a smaller car to do the drive so that I wasn’t traveling in my Ford F-350.
Looking back, I think it was exaggerated a bit and I think my truck could have made it. But the parking lot was SMALL so I am ultimately happy we decided to rent.
If you are wondering if you’re car is good enough for the drive I would ask myself:
- Am I comfortable driving my car on windy mountain roads?
- How good are my brakes?
- Do I have four or all wheel drive just in case I run into snow?
- Am I comfortable parking in smaller spaces at the summit?
If you can confidently ask all of those questions, then I would say you are good to go! It is not as bad as it seems.
Driving Pikes Peak Highway vs The Cograil
Driving isn’t the only way to get to the summit. Okay, I guess you could hike it, but that would take 6-10 of some challenging hiking.
No, I’m talking about the other popular route: The Cograil.
The Pikes Peak Cograil is a cogwheel railway that chugs its way up to the summit, offering you stunning panoramic views and a unique experience that’s hard to match.
I would recommend this if you relate to one or more of the following:
- You love trains.
- You want panoramic views of the mountains.
- Driving Pikes Peak Highway seems like too much work or scares you.
- You want to learn about the area.
- You don’t mind not having very much time at the summit.
I have taken the cograil time and time again when visiting Pikes Peak. It is truly an amazing experience and it is totally different than if you were to take the highway and drive. It is nice to sit back, relax, and enjoy the view.
The only thing I don’t like is there is no option to stop for the views like the highway. And you are on a schedule for when you need to be back on the cog. This can make your time at the summit feel rushed.
When I went, I noticed that they did offer separate views as you take different routes. I don’t think one is prettier than the other, they are just different.
Personally, I liked to drive for the freedom, but the cograil is a bucket list activity in itself.

What to do at the Summit of Pikes Peak
So you’ve reached the summit! Congratulations! Now what?
Here are my favorite things to do once you reach the summit of Pikes Peak.
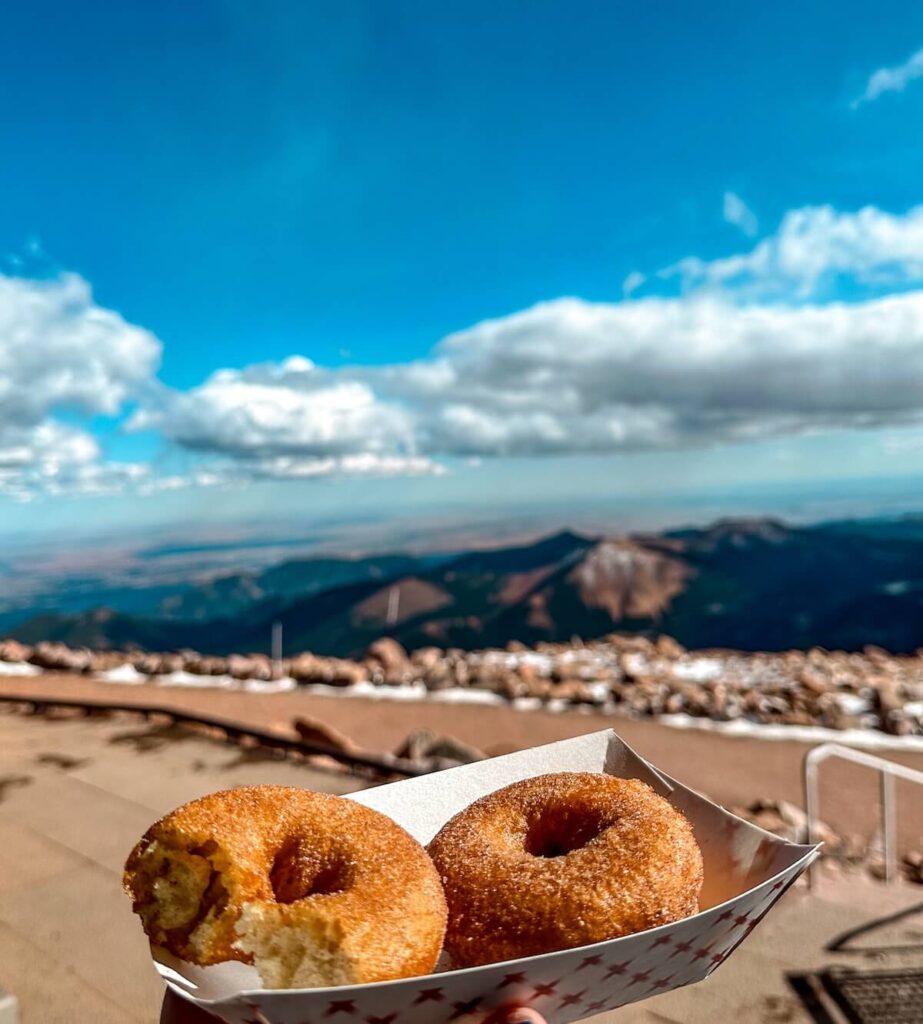
Eat a Donut
Do not leave the summit without eating the the world-famous donuts that are made at this elevation!
Make sure to grab one (or five) – it’s a tradition for all those who conquer the Pikes Peak Summit.
Also, eat them at the summit because if you take them to go, the altitude will change the texture of the donut. This also means that this is one of the only places in the world to do this and you have to be there! How cool is that?
Explore the Visitor’s Center
When I was a kid, this consisted of a small gift shop, the donuts, and crowded bathrooms. Now, it is a newly renovated summit house with views galore!
You can explore educational exhibits about the history, geology, and ecology of Pikes Peak.
They also have a new gift shop and a cafeteria with a seating area.
Wander Around the Summit
Around the visitor’s center you can wander outside and see those gorgeous mountain views from all sides at over 14,000 feet!
If you are going to do this, make sure that you have warm clothes and good sturdy shoes. There is almost always snow up there and it is windy!
But I would highly recommend at least going outside for a minute to breathe that thin and fresh mountain air–there is truly nothing that compares to it!
Meditate or Journal
I have to say this one because I am a yoga instructor. If you go all the way up to the place that inspired “America the Beautiful”, you can bet that it will be a great opportunity to meditate, clear your mind, or journal about where you are in the world (literally on top of it).
I have found that this helps me stay present and practice gratitude, which ultimately enhances the experience and the bucket list memory even more!

Final Thoughts: Driving (and Photographing) Pikes Peak
Driving up Pikes Peak Highway isn’t just another scenic route. It’s a full-on adventure through the clouds.
Every curve is a new composition, every overlook a new perspective, and every shift in light a reminder that the mountain has a mind of its own.
Sure, the thin air might leave you breathless, and your camera roll might fill up faster than your gas tank, but that’s part of the fun.
This is a drive that tests your nerves, rewards your patience, and hands you frame after frame of pure Colorado magic.
Pikes Peak is a masterpiece you get to experience – and capture – one mile at a time.
So pack your camera, drive smart, and let the mountain surprise you. Because on Pikes Peak, adventure and artistry go hand in hand. And every twist in the road tells a story worth photographing. 🚗📸✨
Adventure Bucket List Resources
I am here to help your travel adventures go as smoothly as possible! That way you can check off that bucket list with minimal complications and spending!
SHOP – Shop the best adventure gear and essentials on my Amazon Storefront – handpicked by a full-time adventuring mermaid!
AIRFARE – There are a few I use, but Aviasales is normally my go-to for flights without any extra fees or markups.
ACCOMMODATION – My two favorites are Booking.Com for hotels and VRBO for rentals.
GUIDED TOURS – If you are looking for quick and easy tours, check out GetYourGuide and Viator.
MULTI-DAY TOURS – For more in-depth tours that span several days, TourHub has many great options with reputable travel companies. Use my code (ALEXANDRA1GURU) for up to 5% off your next bucket list adventure.
TRANSPORTATION – You can either rent a car yourself with Discover Cars or do a guided bus tours like Big Bus Tours.
SIM CARDS – Avoid expensive roaming charges with an eSim card with Airalo. Personally, I prefer wifi boxes, and recommend WiFi Candy (get 10% of with the code THEBUCKETLISTMERMAID).
TRAVELER’S INSURANCE – Check out VisitorsCoverage for affordable insurance plans. If you are a nomad or remote worker, I would check out SafetyWing.
SEE MORE – Adventure Resources | Photography Resources