Antelope Canyon Photography Guide (Pro Camera Tips for Jaw-dropping Shots)
This website contains affiliate links from trusted partners. If you purchase through a link on this site, I may earn a commission at no extra cost to you. As an Amazon Associate, I earn from qualifying purchases. See my Privacy Policy and Disclosure for more information.
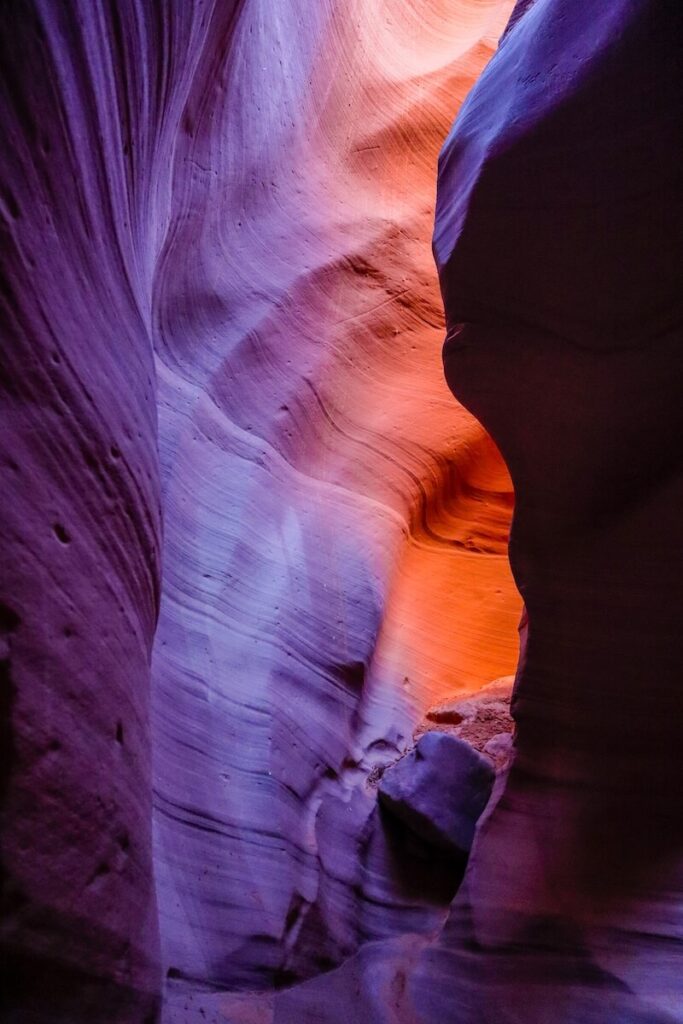
Sunbeams slicing through sculpted sandstone. Shadows twisting into abstract masterpieces. Light and color shifting by the second. Antelope Canyon is a dream, and a nightmare, for photographers.
In fact, I might go on a limb and say that Antelope Canyon might be one of the coolest (and difficult) photography destinations in the entire world. There, I said it!
The unique interplay of light and shadow creates a high-contrast, low-light challenge that can stump even experienced photographers.
Add in strict tour rules, limited shooting time, and crowds of eager visitors, and capturing that perfect shot becomes a true test of skill.
As a full-time adventure photographer (and, yes, a mermaid who chases magic through my lens), I’ve tackled Antelope Canyon’s tricky lighting. I failed and triumphed!
In this in-depth guide, I’ll break down everything you need to know to master Antelope Canyon photography—from the best camera settings to the top photography tours designed to give you the best shot at, well, the best shots.
Inspired? Share Your Photos!
Key Takeaways
- Antelope Canyon draws in photographers from all over the world…and it doesn’t take a genius to see why! This place creates some epic photos!
- However, contrasting lighting, rapidly changing conditions, and low light pose problems for photographing Antelope Canyon.
What is Antelope Canyon?
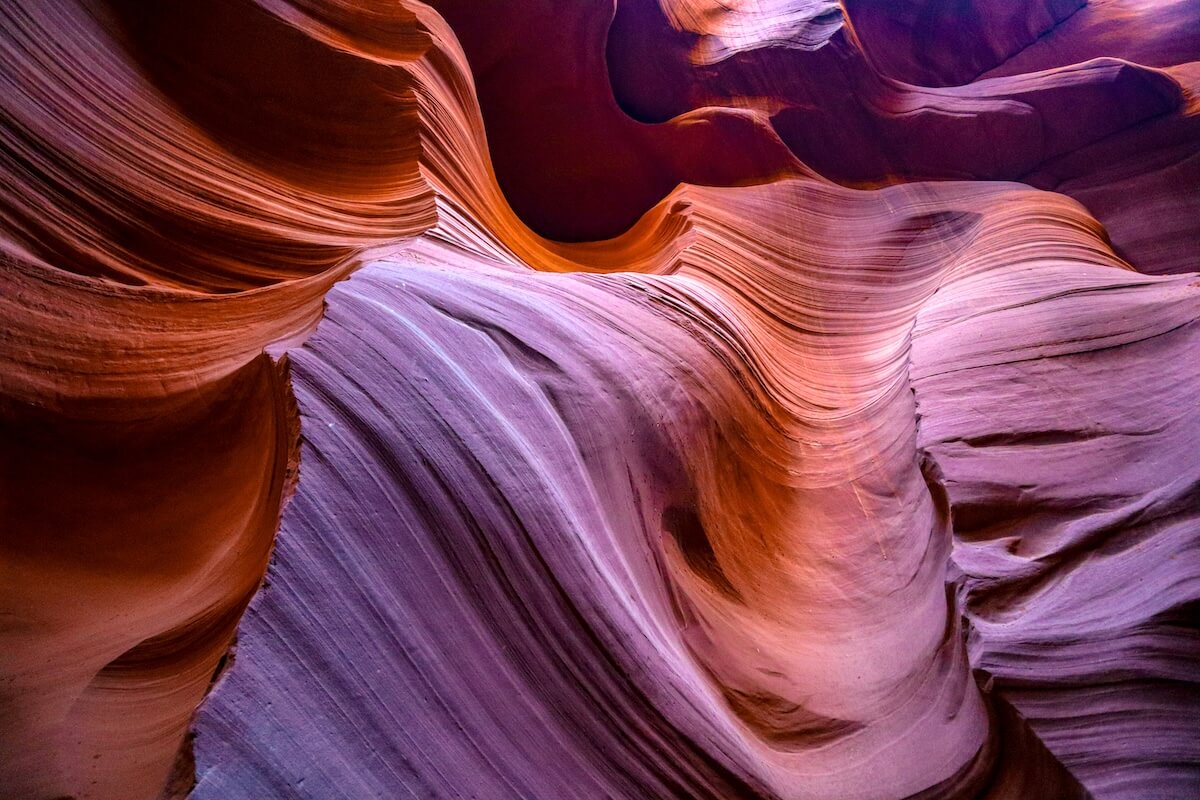
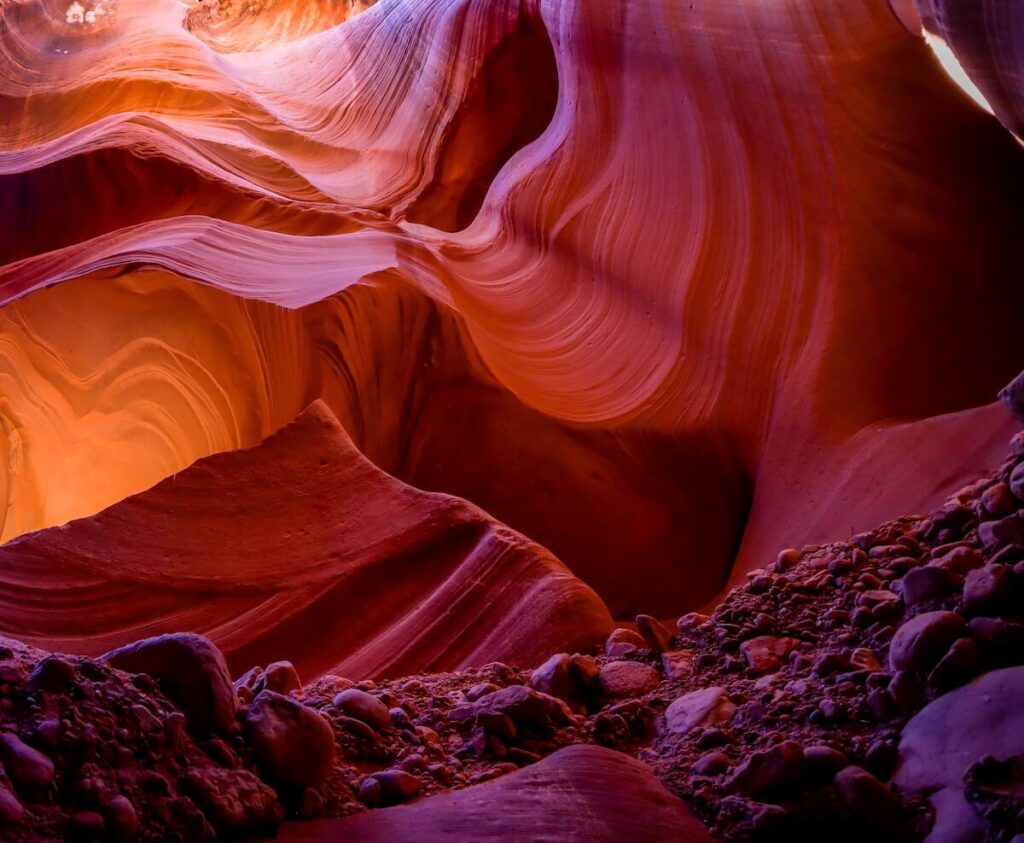
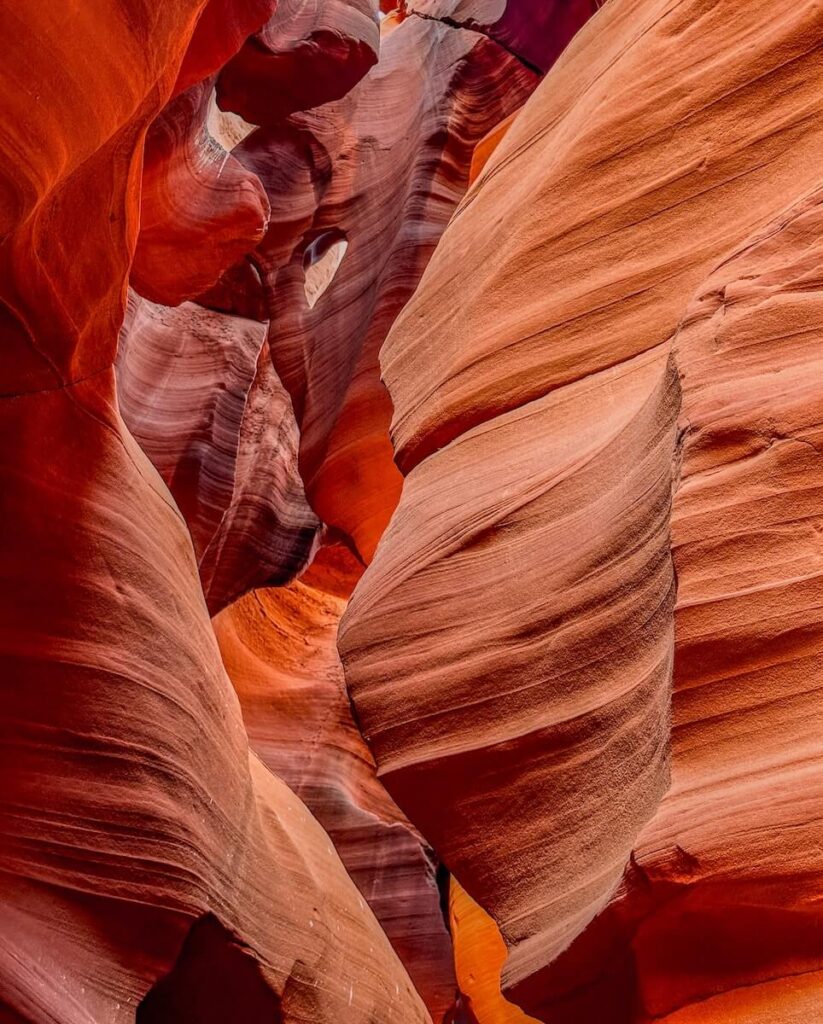
Antelope Canyon is a world-famous slot canyon near Page, Arizona, known for its mesmerizing wave-like sandstone formations and stunning light beams that filter through its narrow passageways.
Carved over thousands of years by flash floods and wind, the canyon’s smooth, flowing walls create a surreal, almost otherworldly landscape.
Although it technically has six sections, it is often divided into two main sections—Upper and Lower Antelope Canyon—each offering unique photographic opportunities.
Accessible only through guided tours, this natural wonder is a bucket-list destination for photographers and adventurers alike.
Read More – How to Become an Adventure Photographer
Upper vs. Lower Antelope Canyon: Which is Better for Photography?
Both sections of Antelope Canyon offer stunning photographic opportunities, but they each have distinct advantages depending on your style and what you want to capture.
Upper Antelope Canyon
- Best for light beams (especially between 11 AM and 1 PM in summer)
- Easier access with flat ground—ideal for carrying camera gear or for any travelers with mobility issues
- More crowded due to its popularity and accessibility
- Limited tour options due to increased restrictions on photography tours
Lower Antelope Canyon
- More narrow and dynamic, offering creative composition opportunities
- Best in early morning or late afternoon
- Less crowded than Upper Antelope, but still very popular
- Requires stair/ladder climbing and maneuvering through tight spaces, which can be challenging with bulky camera gear
- Fewer light beams, but incredible textures and flowing rock formations
The Verdict
If light beams are your top priority, Upper Antelope Canyon is the way to go.
But if you want dramatic textures, fewer crowds, and more compositional variety, Lower Antelope Canyon may be a better choice.
Antelope Canyon X
Antelope Canyon X is a lesser-known but equally stunning section of Antelope Canyon.
It features dramatic sandstone formations, unique lighting conditions, and fewer crowds, making it an excellent alternative for photographers seeking a more peaceful experience.
It is also the only main section I could find that offers specific photography tours.
Other Sections of Antelope Canyon
- Cardiac Canyon – A more challenging and remote slot canyon with fewer visitors, offering stunning rock formations and intense hiking conditions.
- Rattlesnake Canyon – Known for its unique twists and turns, providing diverse compositions for photographers.
- Owl Canyon – A wider, less claustrophobic canyon often home to nesting owls, making it a great spot for wildlife photography.
- Mountain Sheep Canyon – A beautiful yet less-visited slot canyon with a mix of wide and narrow passageways, offering diverse photographic opportunities.
My Opinion
Of course, I had to do both tours to give you the best information possible.
In both the upper and lower sections, I had both my smartphone and camera to test the photography out.
I did Upper Antelope Canyon in the afternoon and then Lower Antelope Canyon the next morning.
As a photographer and adventurer, Lower Antelope Canyon won by a landslide!
When I went in the morning, there was more light, less people, and it was…EPIC! Plus, it was slightly more adventurous, which I loved!
There is one exception to this rule: if you have the right gear, talent, and you manage to find availability for a midday tour of Upper Antelope Canyon.
Then, you might get lucky and capture one of those iconic light beams. Unfortunately, these midday tours for Upper Antelope Canyon sell out months in advance and they are crowded.
Understanding Antelope Canyon’s Unique Lighting
Antelope Canyon is not just a place of breathtaking beauty; it’s a masterclass in light manipulation.
The narrow slot canyon creates a dynamic and ever-changing landscape of light and shadows.
It’s easy to get good pictures of Antelope Canyon, but it is extremely hard to get great pictures.
Understanding how light behaves in this environment is crucial to capturing the most stunning images possible.
How Light Shifts Throughout the Day
Unlike traditional outdoor photography, where light direction can be easily anticipated, Antelope Canyon’s illumination changes dramatically by the hour.
The sun moves across the sky, casting light through the narrow openings above, which then reflects off the canyon walls to create a mesmerizing play of highlights and shadows.
- Morning Light (8 AM – 11 AM): Soft and diffused, perfect for capturing rich tones and deep shadows. This time provides excellent conditions for photographers who enjoy playing with subtle contrasts and textures.
- Midday Light (11 AM – 1 PM): The famous light beams occur during this window, making it the best time for dramatic shots. The sun is directly overhead, allowing beams of light to pierce through the canyon’s openings, creating magical spotlight effects.
- Afternoon Light (1 PM – 4 PM): The light becomes softer again, casting a golden glow on the canyon walls. This is an excellent time for warm-toned photography with deep reds and oranges dominating the scene.
- Late Afternoon & Evening: The canyon darkens significantly as sunlight fades. Without direct illumination, it can be challenging to capture detail without boosting ISO or using post-processing techniques.
The Role of Slot Canyon Depth in Exposure
The deeper into the canyon you go, the less natural light is available.
I found this to be more of a problem in the Upper Canyon, but it depends on the time of day. This means that exposure settings need constant adjustment.
Since light bounces off the sandstone walls multiple times before reaching the bottom, some areas may appear significantly darker or more muted in color than others.
Best Times of Year for Different Effects
While Antelope Canyon is a year-round photography destination, different seasons bring different lighting conditions:
Spring & Summer (March – September): Light beams are at their peak, occurring most frequently between late morning and early afternoon. Colors tend to be more vibrant due to stronger sunlight.
Fall & Winter (October – February): Light beams are rare, but the canyon is less crowded. Shadows and textures become the primary photographic focus.
Read More – Fall Photography Guide
Weather Considerations and How They Affect Lighting
While the canyon’s lighting is dictated by the sun, weather plays a crucial role in how it interacts with the walls.
- Sunny Days: Optimal for bright colors and strong light beams. Contrast is high, so be prepared for challenging exposures.
- Cloudy Days: The canyon takes on a more muted, even-lit appearance, which can be beneficial for capturing fine details without harsh shadows.
- Rainy Days: Heavy rain can cause flash floods, closing the canyon to visitors. Even after rain, moisture can darken the canyon walls, changing how light reflects off surfaces.
Best Camera Gear for Antelope Canyon Photography
Having the right gear can make the difference between a breathtaking shot and a missed opportunity.
Given Antelope Canyon’s challenging lighting conditions, you’ll want equipment that excels in low light, offers dynamic range, and ensures stability for sharp images.
DSLR & Mirrorless Cameras
While you can photograph Antelope Canyon with almost any camera, a DSLR or mirrorless camera will give you the best results.
These cameras provide superior control over settings like ISO, shutter speed, and aperture—critical for adapting to the canyon’s fluctuating light.
As I said, I took photos with both my phone and camera and the camera photos really excelled.
Recommended Cameras:
- Sony A7R IV / A7R V (Mirrorless) – Exceptional low-light performance and dynamic range.
- Canon EOS R5 (Mirrorless) – High resolution and great color depth for vibrant sandstone hues.
- Nikon Z7 II (Mirrorless) – Excellent balance of detail and low-light capabilities.
- Canon 5D Mark IV (DSLR) – A workhorse for professional landscape photography.
- Nikon D850 (DSLR) – Superb dynamic range for capturing shadow and highlight details.
Lenses: Wide-Angle vs. Standard Lenses and Which to Choose
- Wide-Angle Lenses (16-35mm): Best for capturing sweeping views of the canyon’s narrow passageways. A wider field of view allows for dramatic compositions.
- Standard Zoom Lenses (24-70mm): Offers flexibility if you want to capture both wide shots and detailed textures of the sandstone formations.
- Prime Lenses (35mm or 50mm): Great for isolating specific details or creating artistic compositions.
Read More – Best Lenses for Travel Photography
You need to be clear on the shot you are going for and which lens will get you there.
To make matters more stressful, you certainly don’t have time to be switching lenses between every shot.
I did take my 24mm-70mm zoom lens as well as my 70mm-200mm telephoto lens.
I found that I did generally prefer the wider shots, but the telephoto lens did great for capturing incredible textures.
See what style you like and go from there!
Recommended Lenses:
- Sony 16-35mm f/2.8 GM (for Sony users)
- Canon RF 15-35mm f/2.8L IS USM (for Canon mirrorless)
- Nikon Z 14-30mm f/4 S (for Nikon mirrorless)
*Make sure that the lens fits your camera body before you purchase😁
The Hot Gossip on Tripods in Antelope Canyon
Tripods are not allowed!
There are a lot of sources out there telling you that you can bring tripods into the Upper and Lower Canyon if you are on a photography tour.
Well, good luck and have fun finding those.
The short answer is that tripods and other stabilizing camera gear (monopods, selfie sticks, etc) are prohibited in the main parts of the canyon.
This poses a challenge because of the low light and no way to stabilize your camera.
You can now see why Antelope Canyon can be a nightmare for photographers.
Filters: Are ND Filters or Polarizers Helpful?
- Neutral Density (ND) Filters: Generally not necessary unless you plan to experiment with ultra-long exposures. Since tripods aren’t allowed, good luck with that.
- Polarizing Filters: Can help reduce glare but may also darken the already low-lit canyon. Use with caution.
Important note on Camera Gear!
Check with the company ahead of time, but generally you are not allowed to bring a backpack.
This means that you need to hand carry all of your camera gear.
This is probably for the best since you do not have time to be fumbling around with camera gear and different lenses.
Only take what you can carry and, if you deem it necessary, things that can be adjusted/changed within a few seconds.
I ended up bringing my phone in one pocket, some small accessories in my other pocket, and then wore my camera around my neck.
Bring Something to Clean Dust
I was very surprised how dusty it was!
Therefore, I also brought a lens pen that was a lifesaver! You could also bring a lens wipe.
Whenever I could, I would try to clean the lens before every major shot.
I would also suggest picking one lens and sticking to it. You really don’t have time to be switching out lenses and it gets dusty everywhere.

Mastering DSLR & Mirrorless Camera Settings for Antelope Canyon
This section is for die-hard photographers who are looking to level up their photography game in Antelope Canyon.
They are the people who aren’t content with the mediocre and grainy “point and shoot” phone shots. They are interested in the photographs that are good enough to print out and hang in their living room.
This section is going to be pretty technical and nerdy. If this isn’t your cup of tea, no worries!
Shooting in MAnual
Antelope Canyon requires some extra love and attention when it comes to camera settings.
If you just “point and shoot” in program mode, odds are you won’t like the outcome.
For difficult conditions like this, you need to have as much control as possible.
That is why I would encourage you to shoot in manual mode.
However, it has to be fast, so I would also suggest being comfortable in manual mode on your camera before your Antelope Canyon tour.
ISO
Antelope Canyon’s lighting varies dramatically from one section to another. Some areas are illuminated by strong beams, while others are deep in shadow.
Because of this, you need to find the right ISO balance:
- Start at ISO 400-800 – This range provides enough sensitivity to capture detail without introducing too much noise.
- Increase ISO in darker areas – Lower Antelope Canyon and deeper sections may require ISO 1000-1600, but anything higher may introduce excessive grain.
Honestly, I would play with this and keep an eye on your light meter.
I would caution you – I know it is tempting to crank up the ISO due to the low light. This introduces so much grain that is a nightmare to edit later.
You can see some photos with high ISO so you can see what noise to expect.
Aperture
Aperture controls both the depth of field and how much light enters your lens. The right choice depends on the shot you’re aiming for:
- For sharp, detailed images: Use f/8 to f/11. This range ensures a deep depth of field, keeping foreground and background elements crisp. This is generally what I shot in because I liked the entire canyon to be in focus, but couldn’t go much higher without bumping up the ISO.
- For artistic depth and subject isolation: If you want a more dramatic effect, such as a blurred background or softened edges, use f/4 to f/5.6.
- Avoid f/2.8 or wider unless necessary: While wider apertures allow more light in, they may create an overly shallow depth of field, causing parts of the image to be out of focus. Can be use artistically, but be careful.
Shutter Speed
The ever-shifting light beams in Antelope Canyon make shutter speed a critical setting, especially in the Upper Canyon.
- To freeze light beams effectively: Use a shutter speed of 1/125s to 1/250s to keep the beams crisp and well-defined.
- For a balanced exposure: A shutter speed of 1/60s to 1/100s works well when shooting in more evenly lit areas of the canyon.
- If light is scarce: In the darkest sections, you may need to slow down to 1/60s or slower—but only if you have very steady hands, since tripods aren’t allowed.
- Use burst mode for action shots: If you want to capture dust swirling in the light beams, shoot in continuous mode at a fast shutter speed.
Are you new to shutter speed, aperture, and ISO? Check out my beginner’s guide to the exposure triangle for adventurous photographers.

HDR Mode
High Dynamic Range (HDR) mode can be a game-changer when photographing Antelope Canyon, helping to balance the extreme contrast between bright sky spots and deep shadows.
Since the canyon’s lighting varies dramatically, HDR mode ensures that both the darkest and brightest areas retain detail, creating a more balanced and visually striking image.
What is HDR Mode?
HDR mode works by capturing multiple exposures of the same shot—typically a bright, normal, and dark exposure—then blending them together to create a final image with a wider range of detail.
Basically, I took three shots with varying exposure. Then, I stitched them all together later in Lightroom. The result was an evenly (ish) exposed photo.
This is especially useful in Antelope Canyon, where intense light beams can blow out highlights while deep canyon walls remain underexposed.
Auto Exposure Bracketing (AEB)
Set your camera to take 3–5 bracketed shots at different exposures (+2, 0, -2).
This took me a while to figure out on my camera and I had to be on manual mode.
What I recommend is looking at the camera’s manual or googling/YouTubing “[your camera name] + auto exposure bracketing”
When shooting in this mode, it will automatically take three photographs. Then, you merge them together later in editing.
In my experience, this either worked brilliantly or terribly. Sometimes, it was an artistic choice and I loved it or I hated it.
Therefore, I would suggest shooting both normally and in HDR just in case.
Don’t forget to shoot in raw. This gives you maximum flexibility when merging images in editing software like Adobe Lightroom or Photoshop.
Read More – How to Edit Adventure Photos
When to Use HDR in Antelope Canyon
- Capturing Light Beams: HDR helps retain detail in both the bright beam and the darker canyon walls.
- Reducing Harsh Shadows: The canyon’s high contrast often results in overly dark or bright areas—HDR balances them out.
- Enhancing Texture and Depth: The subtle sandstone details become more pronounced with proper HDR merging.
When to Avoid HDR Mode
While HDR can be useful, it’s not always the best choice. Avoid using HDR when:
- Shooting Moving Subjects: Tourists walking through your frame can cause ghosting effects.
- Chasing a More Natural Look: Sometimes, HDR processing can make images appear overly processed or artificial.
- Using Long Exposure Techniques: If you’re intentionally blurring light beams or enhancing motion, HDR may not be necessary.
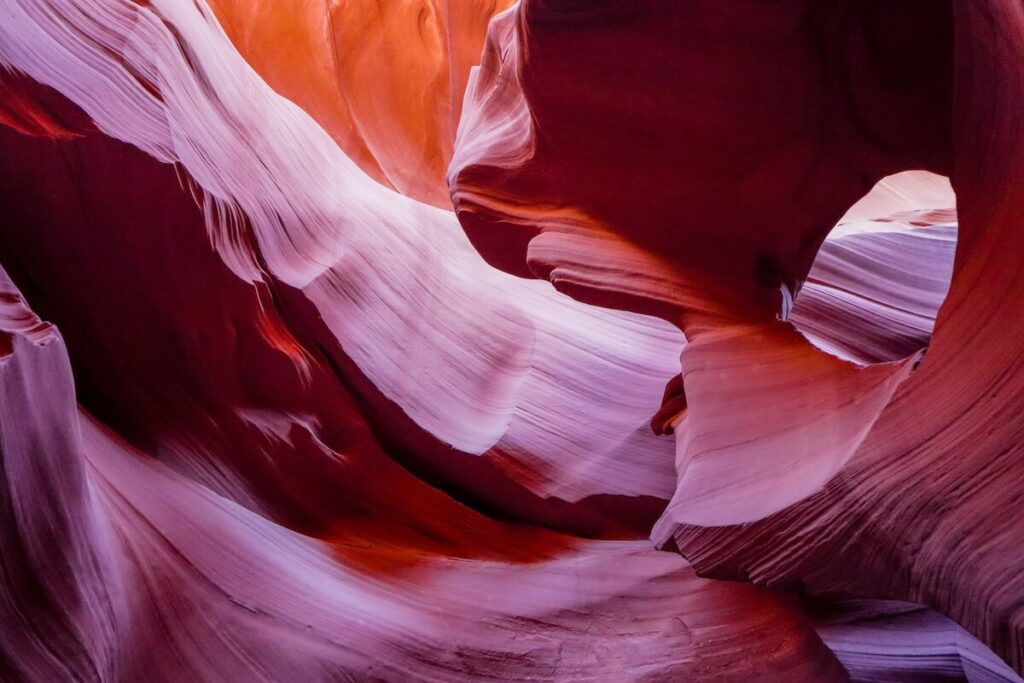
Composition Techniques for Stunning Shots
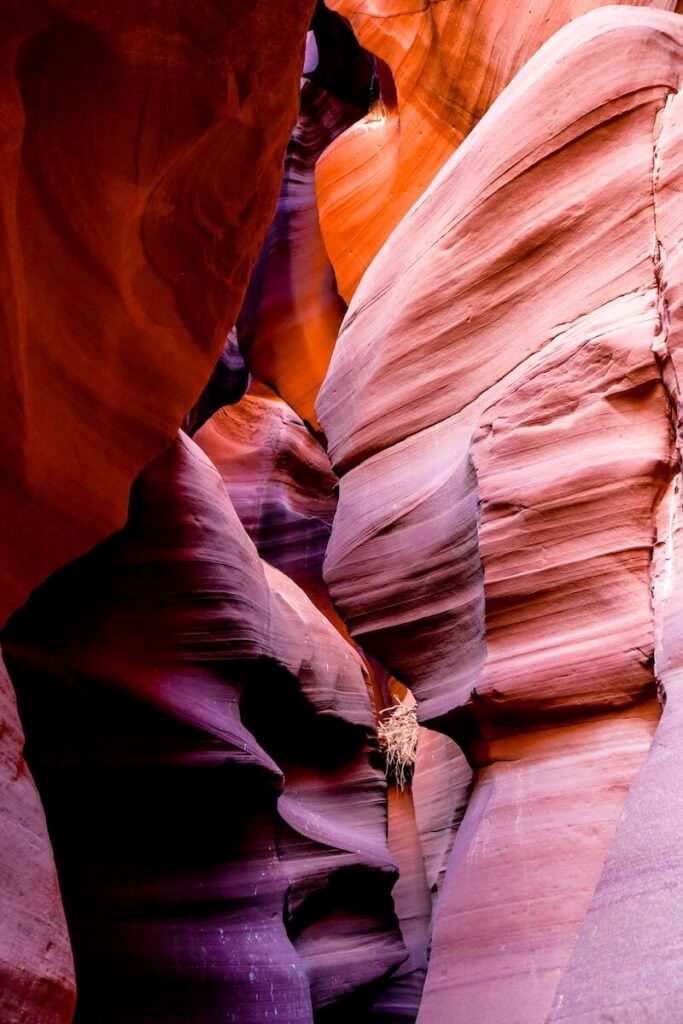
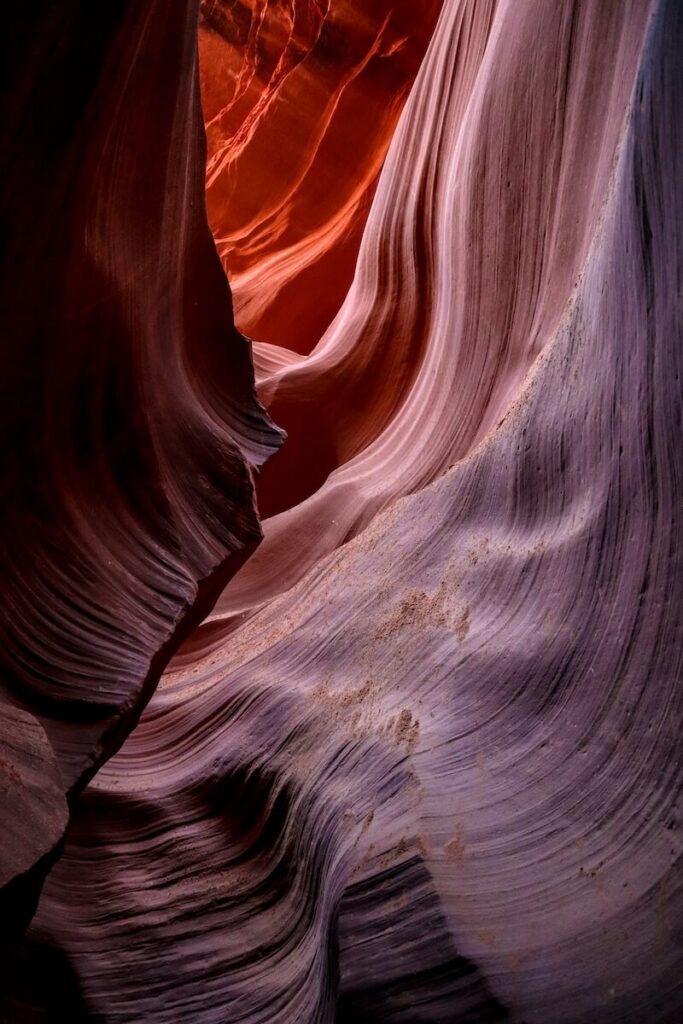
Antelope Canyon is a natural masterpiece, filled with flowing sandstone curves, dramatic shadows, and ethereal light beams.
But capturing its magic requires more than just the right camera settings—you need strong composition techniques to make your shots stand out.
Antelope Canyon is the canvas and YOU are the artist! Get creative!
Framing & Leading Lines
One of the most powerful composition tools in Antelope Canyon is the natural curves and lines of the rock formations.
These organic shapes act as leading lines, drawing the viewer’s eye deeper into the scene.
- Follow the Flow: Look for sweeping curves in the rock walls that create a natural path through the image. Position these lines to lead toward the main focal point—whether it’s a light beam, an arch, or an interesting rock texture.
- Use Framing Elements: The canyon’s narrow passageways create built-in frames. Use arching rock formations or shadowed edges to frame the center of your image and add depth.
- Avoid Dead Space: Since the canyon is full of intricate details, be mindful of empty areas in your frame. Fill the composition with interesting textures and shapes to maintain visual engagement.
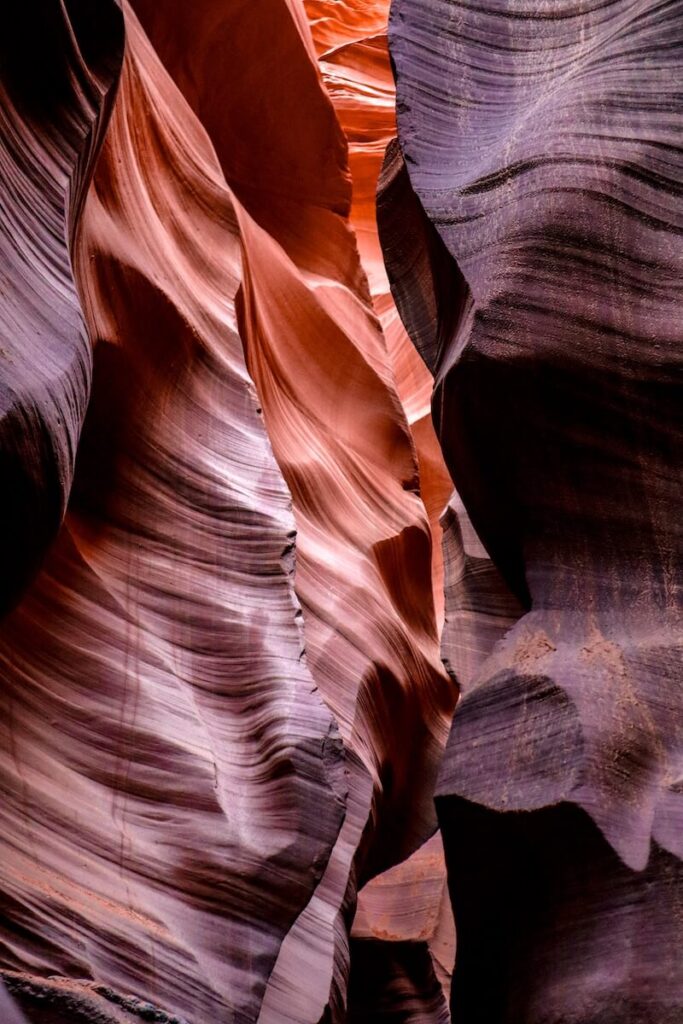
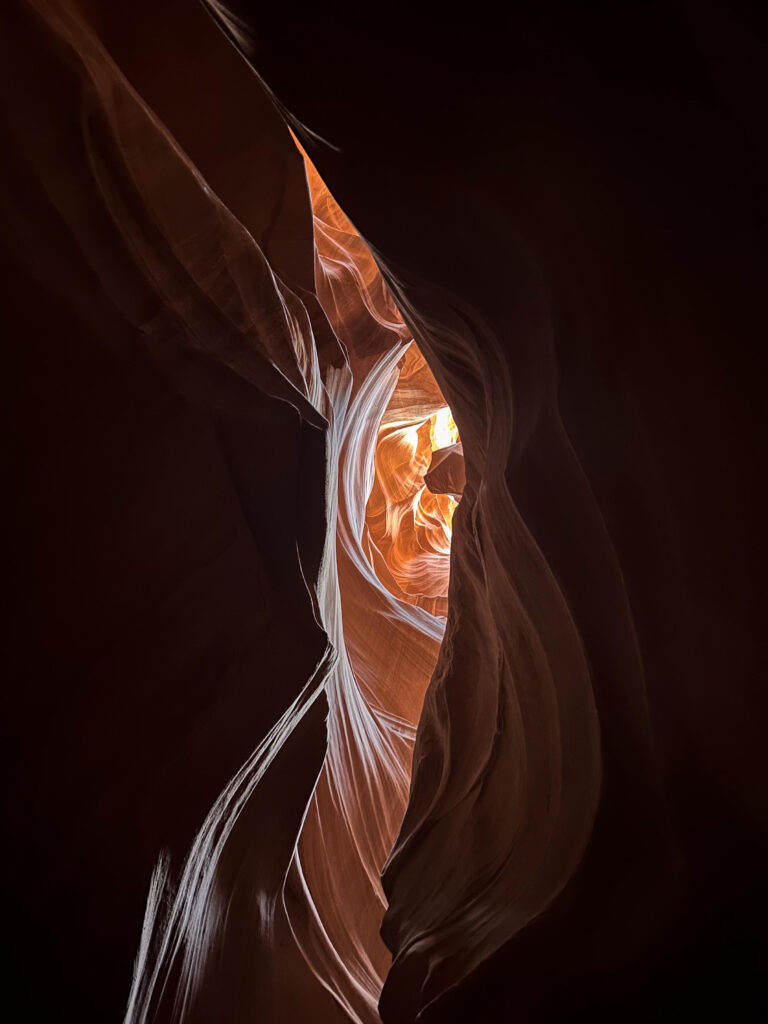
Light Beams & Shadows
The famous light beams you see in Antelope Canyon photography don’t last long, and positioning is everything to get that perfect shot.
- Time It Right: Light beams occur mostly between 11 AM and 1 PM from late spring to early fall. Be ready with your camera settings dialed in before they appear.
- Find the Best Angle: Light beams look most dramatic when shot straight on. Position yourself so the beam stands out against the darker canyon walls.
- Enhance the Beam: Tour guides often toss sand into the air to make light beams more visible. If you’re on a photography tour, ask if they can help create this effect.
Shadows also play a big role in the canyon’s drama. Instead of fighting them, use them to add depth and contrast to your images.
Capture the interplay between light and shadow to emphasize the canyon’s textures.
Perspective & Depth
With so many photographers capturing Antelope Canyon, finding a unique perspective is key.
Low Angles: Shooting from a lower perspective can make the canyon walls feel more towering and dramatic. Try placing your camera close to the ground and angling it upward.
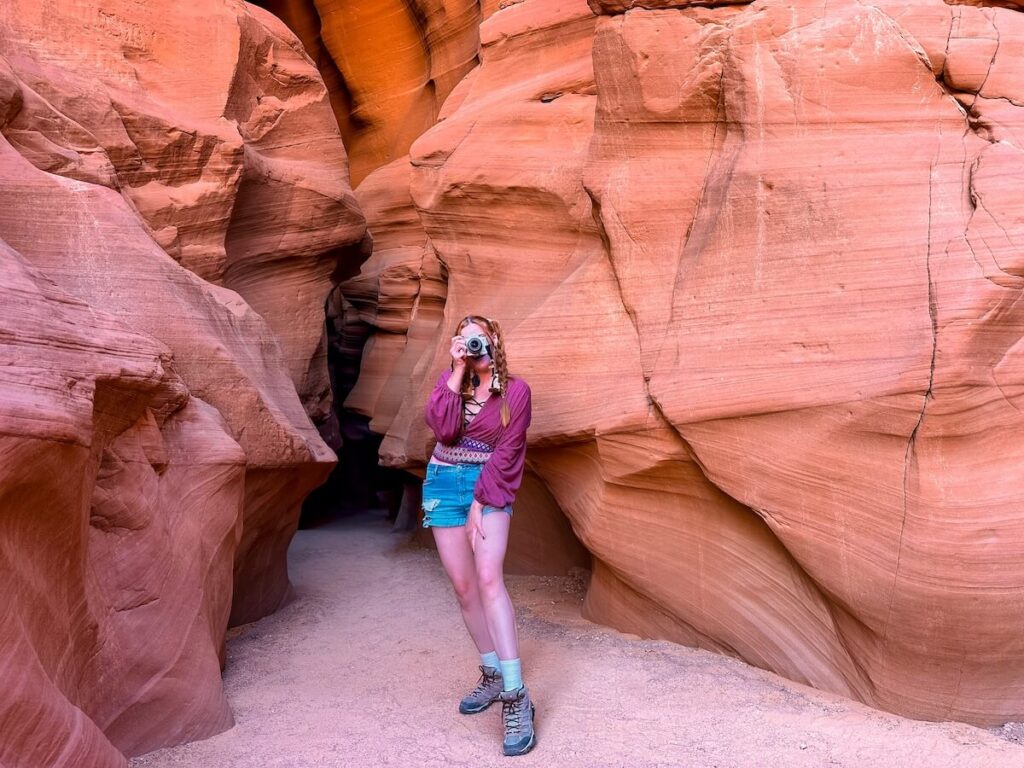
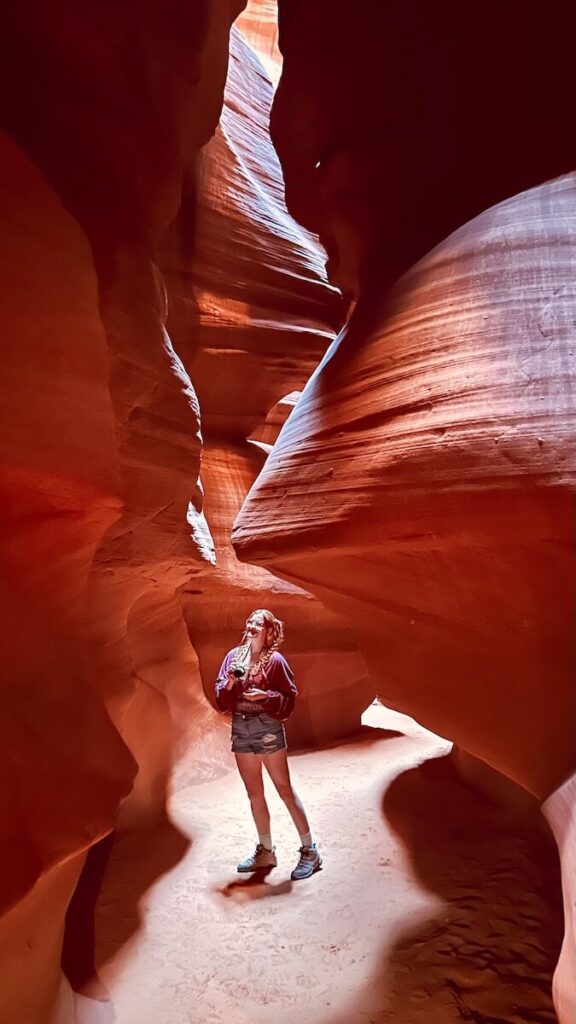
Include a Subject: If allowed, adding a person in the frame (wearing a contrasting color like red or blue) can provide a sense of scale and make the canyon’s vastness more striking.
Look Up & Behind: Don’t just shoot forward—some of the best compositions are above you or behind you. Twisting rock formations and hidden beams can create unexpected masterpieces.
Avoiding Tourist Crowds
Antelope Canyon is one of the most visited slot canyons in the world, which means avoiding crowds is nearly impossible.
However, with some strategy, you can still get clean, tourist-free shots.
- Shoot Upward: Focusing on the canyon walls and sky eliminates people from the frame entirely.
- Be the Last in Your Group: If you are the last, you might be able to catch some shots as your group is leaving and the next group is coming in. But be quick, the guides are on a time crunch and will yell at you if you take too long.
- Pay Attention to Time: Pick a tour that isn’t as popular or visit during shoulder/off season.
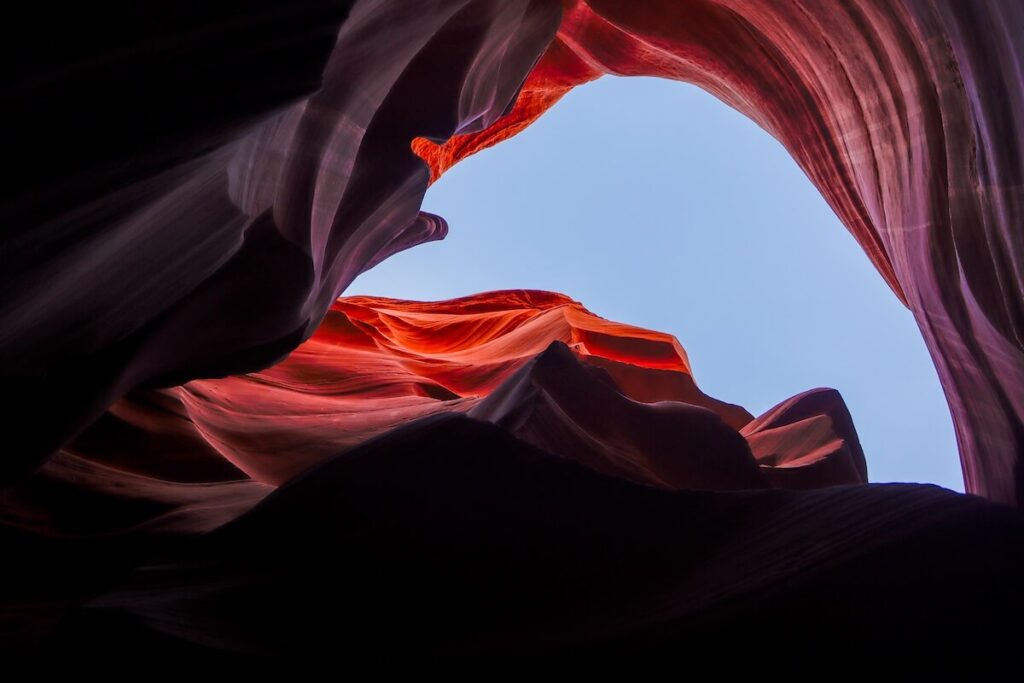
Be Careful Including the Sky
If you are shooting upward, you might be tempted to include the sky peaking out above the slot canyon.
Although I managed to get some “okay” shots, this was extremely tricky. It would either blow out the sky or the entire canyon would go dark.
Overall, I much preferred the shots that were still angled up to avoid the crowds but just focused on the canyon.
Minimalist vs. Dramatic Shots
Antelope Canyon photography can be captured in two main styles—minimalist and dramatic. Each creates a different mood:
- Minimalist: Focuses on simple, clean compositions with smooth curves and soft gradients of light. Works well for smartphone photography or when emphasizing textures.
- Dramatic: Uses strong contrast, deep shadows, and intense colors. Often highlights bold beams of light and grand perspectives. Ideal for DSLR photography with post-processing adjustments.
Ask Your Guide To Take Your Photos
Here’s an idea: don’t take the picture at all! Ask your guide to do it!
I went solo through the Upper Canyon. Therefore, there was a lot of times when I asked my tour guide to take a picture of me.
They know all of the best spots! For example, one shot I got looked like I had angel wings! I would have had no idea without my guide.
On both of the tours that I took, our guide was more than happy to line up the “secret shots” for us.
Important Note: if you are going to use this strategy, make sure that your camera is ready to go with the camera settings you want.
Photography Tours in Antelope Canyon
Disappointment all around! People really need to update their articles!
I was soooo excited to go on a specific Antelope Canyon photography tour where it was longer, I could potentially snap a shot in my iconic mermaid tail, and I could have a tripod.
Nope, no tours to be found anywhere! Why?
Update on Photo Tours
As of December 2019, there are, unfortunately, no more photo tours of Upper and Lower Antelope Canyon🥲
This means that tripods and special photoshoots are not a thing in the main sections of the Canyon.
The only part of Antelope Canyon that has photo tours would be of Antelope Canyon X.
There’s no way around it, this sucks. However, don’t fear! I managed to get some epic photos of the Upper and Lower Antelope Canyon on a standard sightseeing tour.
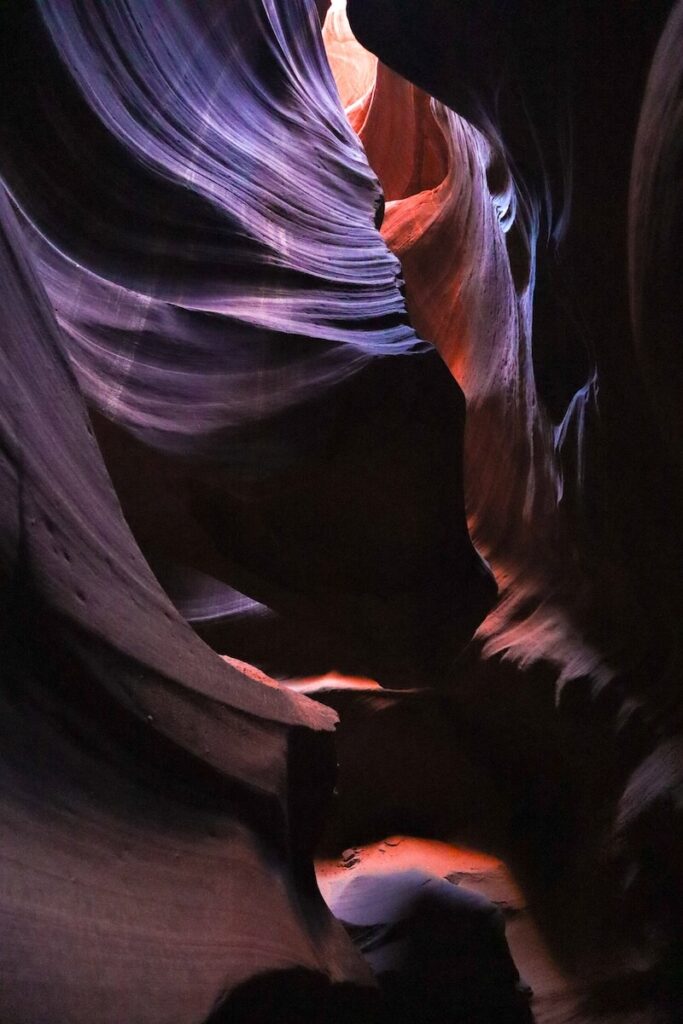
Photo Tour Vs Sightseeing Tour of Antelope Canyon
Antelope Canyon photography tours are rare due to increased restrictions. In fact, I could only find one in Canyon X.
The main difference is that specific photo tours are use for special occasions and styled photo sessions. It gives you more freedom if you have a vision and need extra support.
These types of sessions are required to have a Special Use Permit that is issued from the Lake Powell Tribal Parks and Recreation Office.
I checked with both of my tour companies before and I did not need a Special Use Permit if I was on a normal sightseeing tour.
As for the normal tour, you are still allowed to take standard pictures and can go into the Upper and Lower Canyon. However, you might have less time and can’t do a full photoshoot.
Best Antelope Canyon Tours
You need a tour to enter Antelope Canyon!
Below are some options for tours in both the upper and lower sections of Antelope Canyon.
Antelope Canyon tours sell out months in advance, especially the Upper Antelope Canyon midday (because everyone is trying to photograph those iconic light beams).
Booking early is crucial! Also, check for current regulations, as rules change frequently.
Here are the exact tours I booked👇
If you are in Page, Arizona already, I would also consider getting a bundled tour and also going and photographing Horseshoe Bend.
What to Expect on a Photography Tour: Time Limits, Rules, and Tips
Antelope Canyon is on Navajo land, and tours are strictly regulated. Here’s what you need to know before signing up for a photography tour:
- Time Limit: Tours typically last 1.5 to 2 hours, but photography tours may allow more time inside.
- Tripod Rules: No tripods (or any camera gear like monopods or selfie sticks) are allowed in Antelope Canyon.
- No Backpacks: I wasn’t allowed to take a backpack in and had to carry all of my camera equipment.
- Group Size: Standard tours normally max at 15 people.
- Tour Guide Regulations: Guides will often escort you through quickly—you won’t have unlimited time to set up shots, so work fast!
- Strict No-Touch Policy: You cannot touch the canyon walls, as oils from hands can damage the delicate sandstone over time.
What To Bring (and not bring) on an Antelope Canyon Tour
What you’re allowed to bring on a tour of Antelope Canyon depends on the tour operator, but here are the general rules:
Allowed Items:
- Camera & Lenses – DSLR, mirrorless, and compact cameras are allowed.
- Smartphone – Phones are allowed for photography, but video may be restricted.
- Water Bottle – Only clear, reusable or disposable bottles are allowed in some tours.
- Sunglasses & Hat – Useful for protection outside the canyon.
- Jacket or Light Layer – The canyon can be cooler, depending on the season.
Restricted or Prohibited Items:
- Tripods & Monopods – Only permitted on special photography tours.
- Selfie Sticks & Gimbals – Typically not allowed.
- Large Backpacks & Bags – Most tours restrict these due to space limitations.
- Food & Snacks – Not allowed to prevent littering.
- Drones – Completely prohibited.
- Professional Lighting Equipment – No flashes or external lighting setups.
Always check with your specific tour provider, as some rules may vary slightly between Upper and Lower Antelope Canyon tours!
How to Maximize Your Time on the Tour
Since Antelope Canyon tours move quickly, preparation is key. Follow these tips to make the most of your Antelope Canyon photography journey:
- Arrive Early: Some tours leave exactly on time, and being late means you’ll miss your slot.
- Have Your Settings Ready: Adjust your camera settings before entering the canyon to avoid wasting time.
- Know Your Compositions in Advance: Study famous compositions online before your tour so you know where to position yourself for iconic shots.
- Shoot in Burst Mode: This helps capture the perfect moment when light beams hit just right.
- Respect Your Guide’s Instructions: They know the best spots and can help you capture the best images—but they’re also on a strict schedule.
Editing Your Antelope Canyon Photos
Antelope Canyon photography is just the beginning because editing is where your photos truly come to life.
The canyon’s natural lighting can be tricky, often resulting in high-contrast images with deep shadows or overexposed highlights.
With the right editing techniques, you can enhance the colors, bring out hidden details, and ensure your shots reflect the breathtaking beauty you experienced in person.
Again, don’t forget to shoot in RAW so that editing is easier after your adventure is finished.
Find Your Style
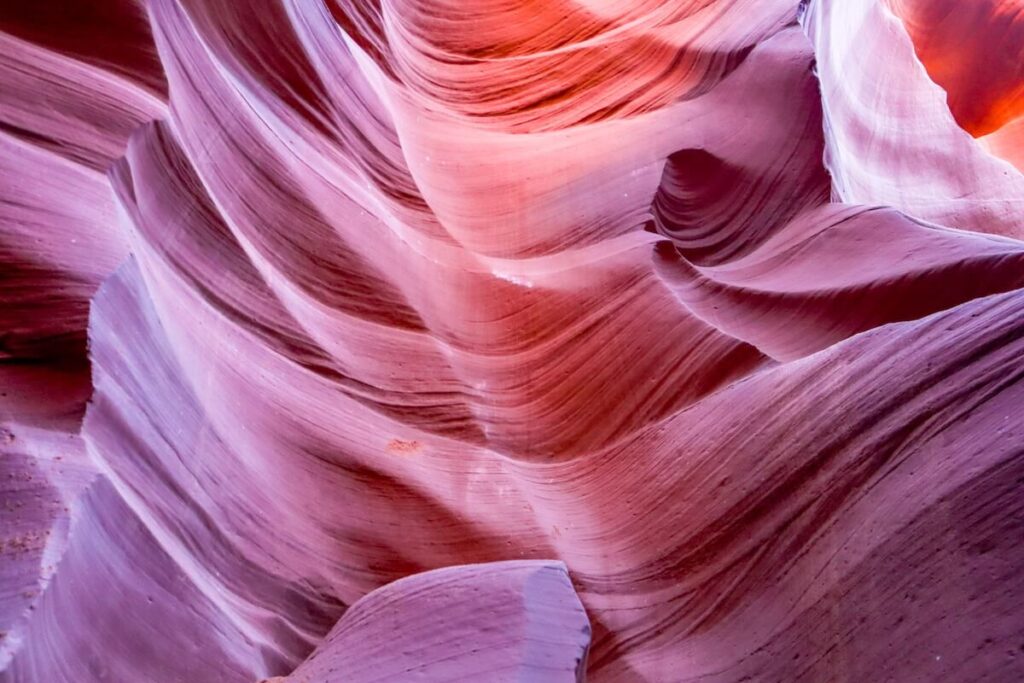
My Antelope Canyon photos look very different than anyone else’s and I think that’s beautiful.
Personally, I loved bringing out the purple/blue tones in addition to the red/orange hues.
I liked increasing the shadows and contrast to create more dramatic photos.
That might not be your vibe – and that’s okay!
You are the artist here and the fun doesn’t stop once you leave Antelope Canyon. The editing is just as crucial as taking the photo.
If you don’t know your style yet, I would highly recommend checking out my workbook. This simple e-book will help you dig deeper and get more meaningful photos that feel like YOU ↓
Best Software for Editing
The right software can make a huge difference in post-processing. Here are some top choices:
- Adobe Lightroom (Best for Overall Editing) – Ideal for adjusting exposure, color, and sharpness while keeping a natural look. Great for batch editing multiple photos at once.
- Adobe Photoshop (Best for Detailed Adjustments & Object Removal) – Useful for advanced edits like removing tourists, blending exposures, and fine-tuning specific areas of the image.
- Snapseed (Best Free Mobile App) – A powerful and user-friendly option for quick edits on the go, allowing adjustments to brightness, contrast, and selective editing.
- Luminar Neo (Best for AI-Enhanced Edits) – Offers tools for enhancing sky details, removing noise, and boosting contrast with AI-powered adjustments.
- VSCO & Lightroom Mobile (Best for Social Media Edits) – If you’re editing photos to post quickly, these apps offer excellent presets and manual adjustment tools for mobile photographers.
Adjusting Contrast, Highlights, and Shadows
Antelope Canyon’s lighting creates a high dynamic range, meaning parts of your image may be overly bright while others are in deep shadow. To balance this:
- Lower the highlights – This helps recover details in bright areas, like light beams or sunlit canyon walls.
- Lift the shadows – Bringing up shadows will reveal more texture in darker areas without making the image look flat.
- Increase contrast moderately – Slot canyons naturally have strong contrast, but too much can make the photo look unrealistic.
- Use the Dehaze tool (Lightroom) – This is excellent for adding definition to dusty air and light beams without over saturating the image.
Enhancing Colors
Antelope Canyon’s sandstone naturally glows in shades of red, orange, and purple, but cameras don’t always capture the full vibrancy.
Here’s how to enhance the colors without making them look artificial:
- Adjust White Balance – If your image has an unwanted color cast (too blue or too yellow), tweak the temperature slider to bring back natural warmth.
- Boost Vibrance Instead of Saturation – Increasing vibrance enhances muted colors without oversaturating already-rich hues.
- Fine-Tune Individual Colors (HSL Panel in Lightroom) – If reds look too overpowering, reduce the luminance or saturation of that specific color rather than affecting the entire image.
Fixing Overexposed or Underexposed Areas
Since Antelope Canyon has extreme lighting conditions, some areas of your image may be too bright (overexposed) or too dark (underexposed). To correct this:
- Use the Exposure Slider Carefully – If the whole image is too dark or bright, adjust exposure slightly while keeping details intact.
- Recover Highlights and Shadows Individually – Pull down the highlights and lift the shadows instead of relying solely on exposure.
- Use Graduated Filters (Lightroom) – These can help balance bright and dark areas by selectively adjusting exposure in different parts of the image.
FAQs & Final Tips For Photographing Antelope Canyon with a Camera
Extra questions to help on your photography journey through Antelope Canyon
Conclusion: Capture the Magic of Antelope Canyon
Photographing Antelope Canyon is an unforgettable experience, but like any great adventure, it takes practice, patience, and a willingness to experiment.
Whether you’re adjusting ISO settings to balance the low light, composing shots that highlight the canyon’s dramatic curves, or perfecting your edits to bring out those rich, natural hues, every photo you take here will challenge and improve your overall photography skills.
Shooting in a dynamic environment like Antelope Canyon will make you a better photographer—forcing you to adapt to ever-changing light, work efficiently under time constraints, and master exposure settings in ways that will benefit all of your future landscape and adventure photography.
The skills you develop here will carry over to every slot canyon, cave, and low-light scene you encounter in your travels.
I want to See Your Photos!
But the journey doesn’t end once you step out of the canyon. Photography is meant to be shared!
I’d love to see your captures, hear your experiences, and connect with fellow adventure photographers.
Share your best shots on Instagram, tag fellow photography enthusiasts, or join online travel and photography communities to swap tips and inspiration.
So grab your camera, dive into the world of slot canyon photography, and keep pushing your creative boundaries.
The magic of Antelope Canyon is waiting—you just have to capture it. Happy shooting! 📸✨
More Travel Resources
Adventure Bucket List Resources
I am here to help your travel adventures go as smoothly as possible! That way you can check off that bucket list with minimal complications and spending!
SHOP – Shop the best adventure gear and essentials on my Amazon Storefront – handpicked by a full-time adventuring mermaid!
AIRFARE – There are a few I use, but Aviasales is normally my go-to for flights without any extra fees or markups.
ACCOMMODATION – My two favorites are Booking.Com for hotels and VRBO for rentals.
GUIDED TOURS – If you are looking for quick and easy tours, check out GetYourGuide and Viator.
MULTI-DAY TOURS – For more in-depth tours that span several days, TourHub has many great options with reputable travel companies. Use my code (ALEXANDRA1GURU) for up to 5% off your next bucket list adventure.
TRANSPORTATION – You can either rent a car yourself with Discover Cars or do a guided bus tours like Big Bus Tours.
SIM CARDS – Avoid expensive roaming charges with an eSim card with Airalo. Personally, I prefer wifi boxes, and recommend WiFi Candy (get 10% of with the code THEBUCKETLISTMERMAID).
TRAVELER’S INSURANCE – Check out VisitorsCoverage for affordable insurance plans. If you are a nomad or remote worker, I would check out SafetyWing.
SEE MORE – Adventure Resources | Photography Resources
See Some PHotos You Like?
Check out my full photography page for a full gallery and prices.