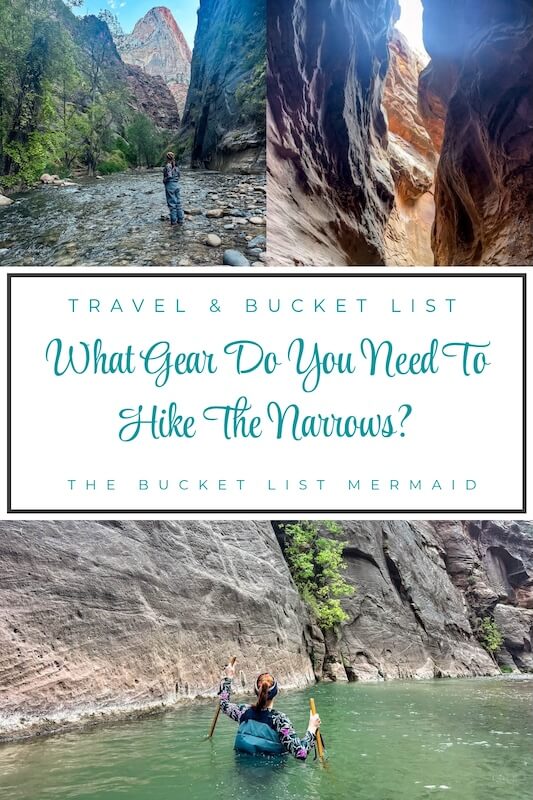
The Narrows Gear Guide (That Won’t Leave You Soggy and Sad)
This website contains affiliate links from trusted partners. If you purchase through a link on this site, I may earn a commission at no extra cost to you. As an Amazon Associate, I earn from qualifying purchases. See my Privacy Policy and Disclosure for more information.
The Narrows is not just a hike – it’s an experience. Towering sandstone walls, emerald waters, and the kind of magic that makes you forget your legs are numb.
But here’s the catch: the “trail” is literally a river. And if you show up in soggy gym shoes and denim, you’re gonna regret every step (and probably go viral for the wrong reasons).
With so much gear advice floating around – do you rent? bring your own? wear dry pants or go all out? – it’s wildly confusing to know what you actually need.
I’m a full-time RVer and adventure addict, and I’ve hiked The Narrows (and obsessed over the gear situation so you don’t have to).
Spoiler: it’s my favorite hike of all time. But I definitely learned a few lessons the wet way – and now I’m spilling all the tips, tricks, and packing secrets I wish I knew before that first step into the river.
In this guide, you’ll get the real talk on what to bring, what to rent, what to wear, and pro-level tips that’ll keep your adventure epic – not soaked in regret.
By the end, you’ll be fully geared up, stress-free, and ready to wade through Zion’s most iconic slot canyon like an absolute boss. Let’s do this!
What are The Narrows?
And why is everyone suddenly obsessed with waterproof socks?
So… imagine hiking a canyon so narrow, the sky disappears, and your trail? It’s a literal river.
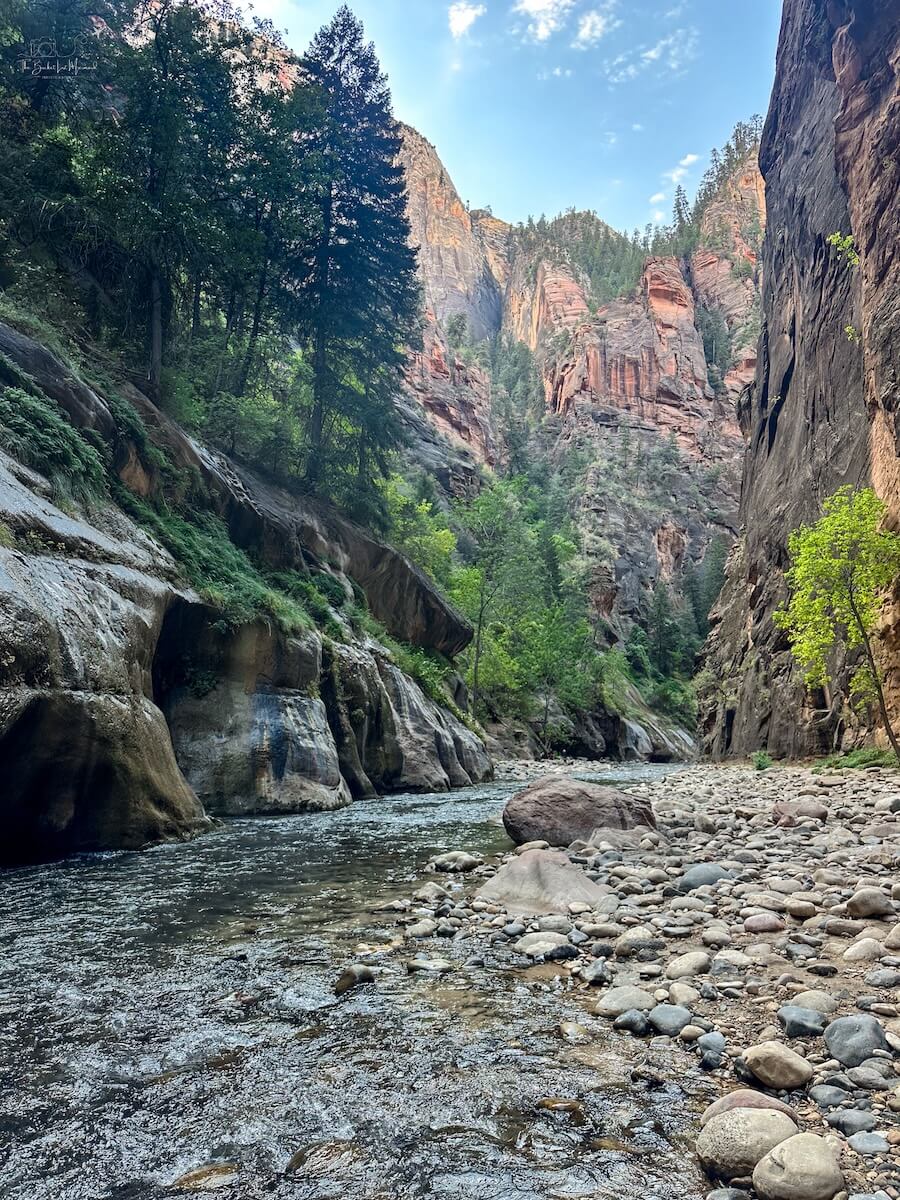
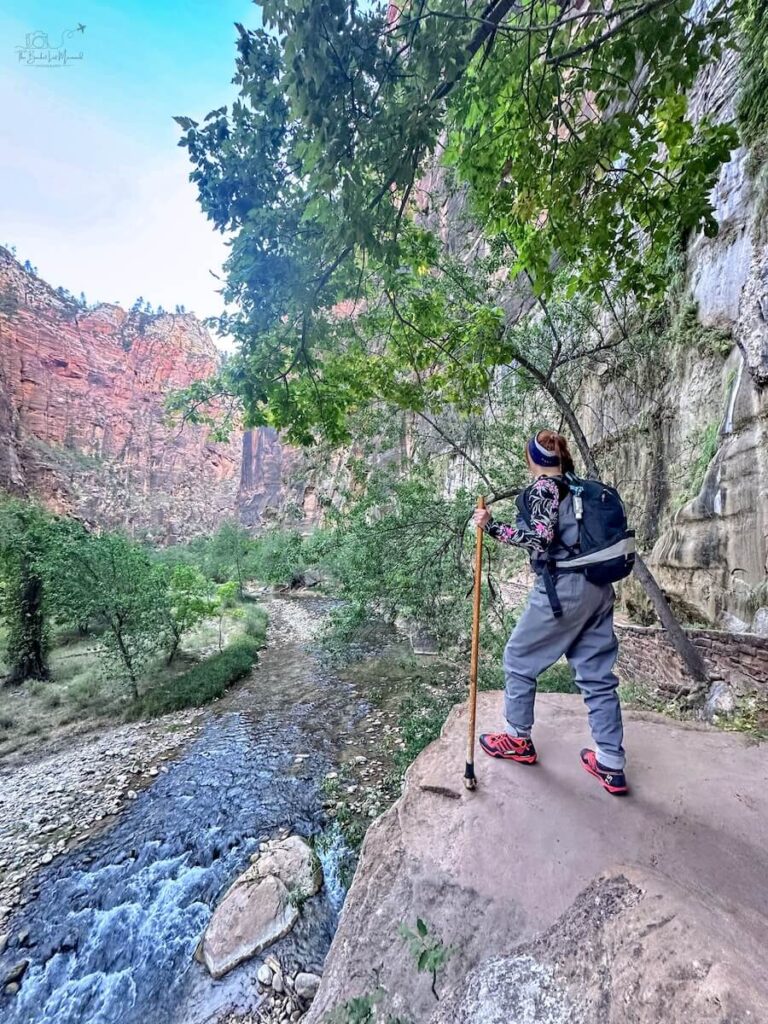
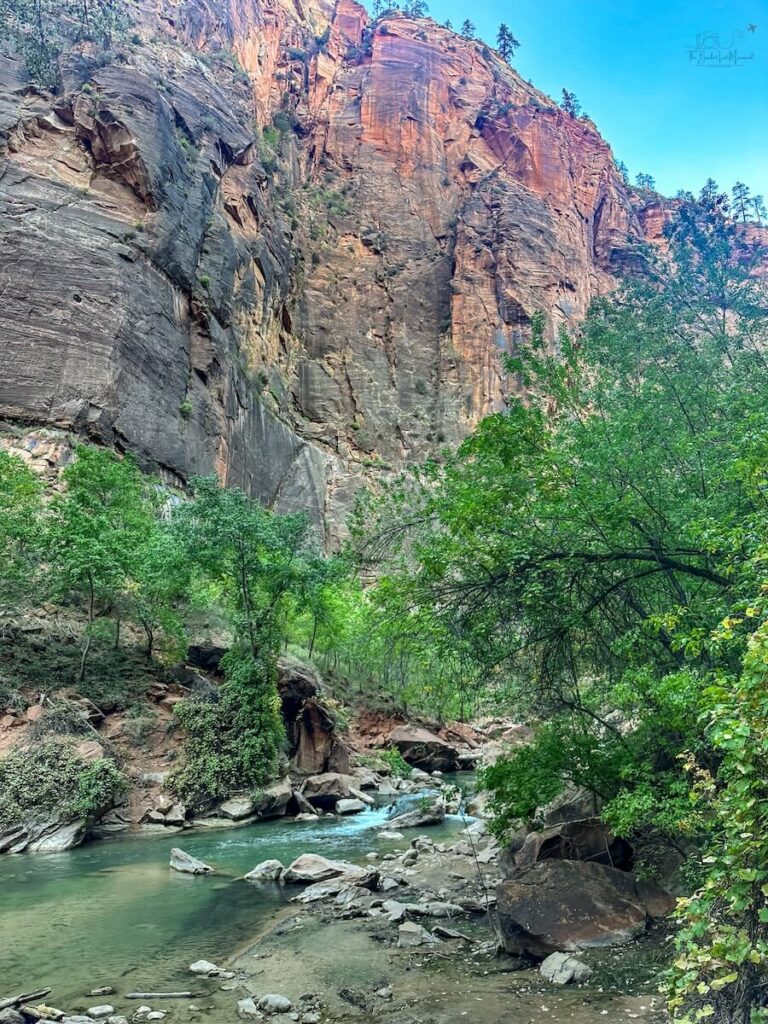
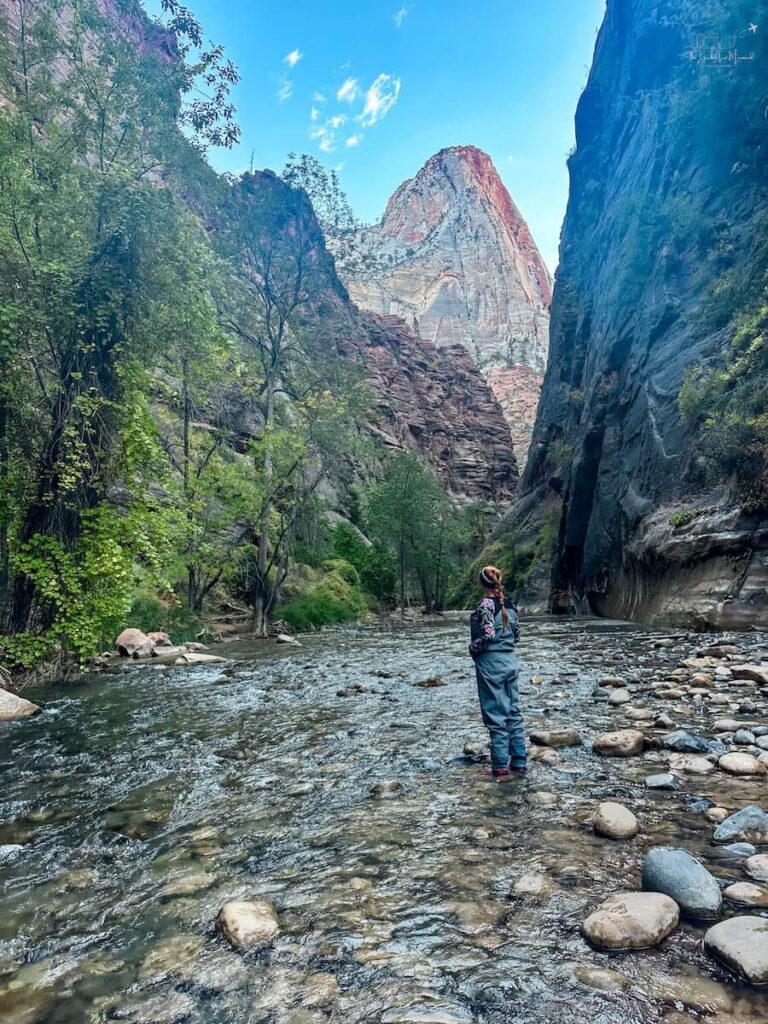
The Narrows is Zion National Park’s most iconic hike – and for good reason. It’s not your average dirt trail.
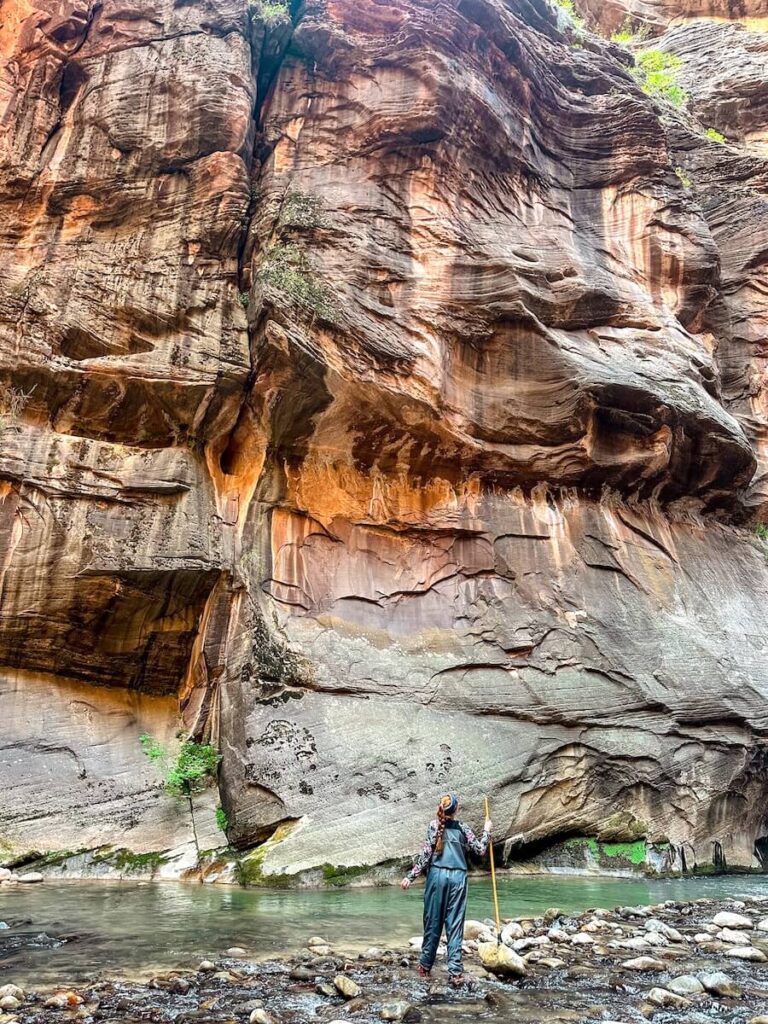
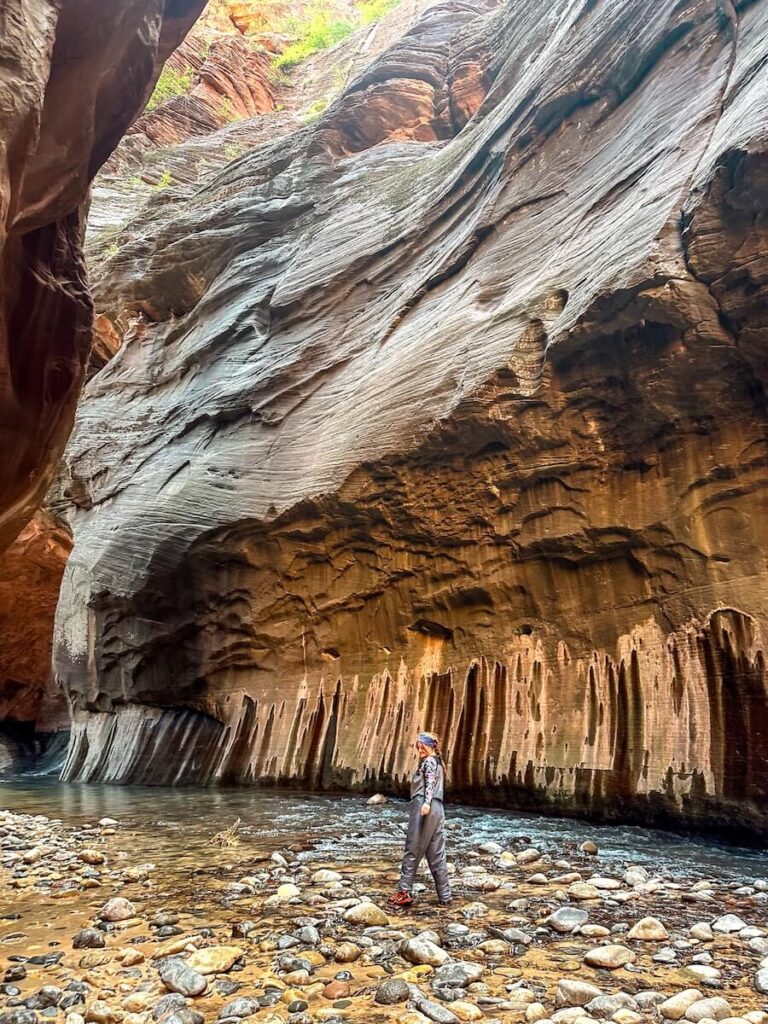
Instead, you’ll be hiking directly through the Virgin River, surrounded by towering canyon walls that soar up to 1,000 feet high and squeeze in as tight as 20 feet across.
It’s dramatic, otherworldly, and absolutely unforgettable.
Here’s what makes it special:
- The “trail” is the river – You’ll literally be hiking in water for most of the route.
- Slot canyon vibes – The sheer cliffs and narrow passages are straight out of a fantasy novel.
- Choose your own adventure – Most people hike bottom-up from the Temple of Sinawava (no permit required), but the full top-down route is a 16-mile epic that requires permits and planning.
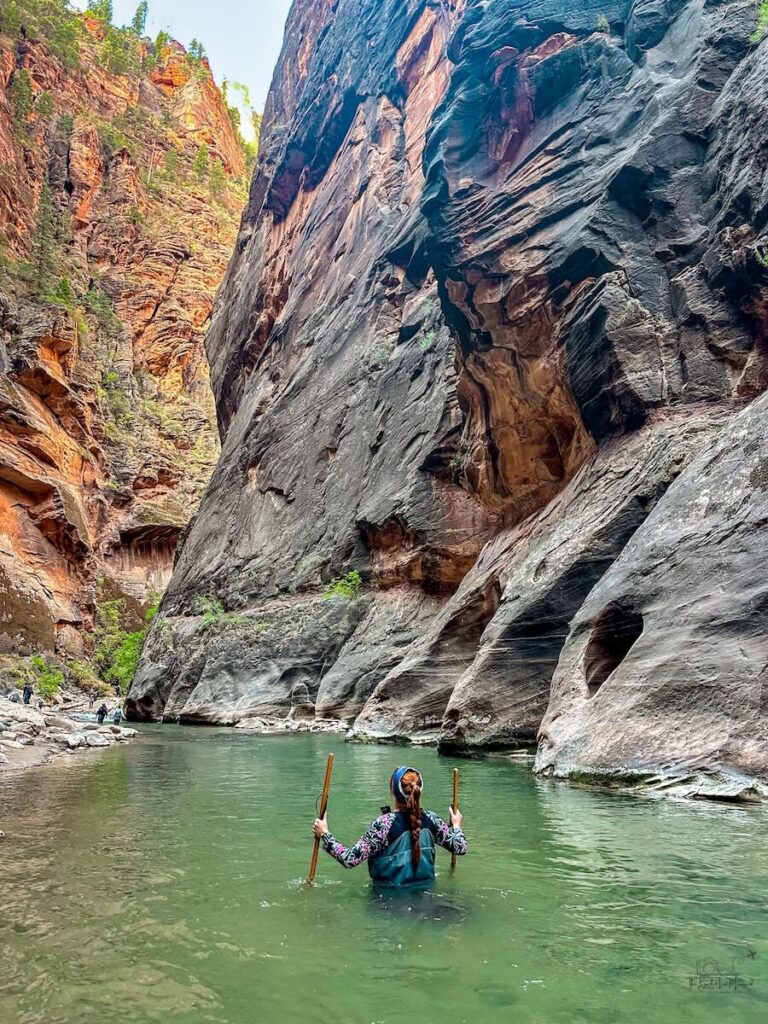
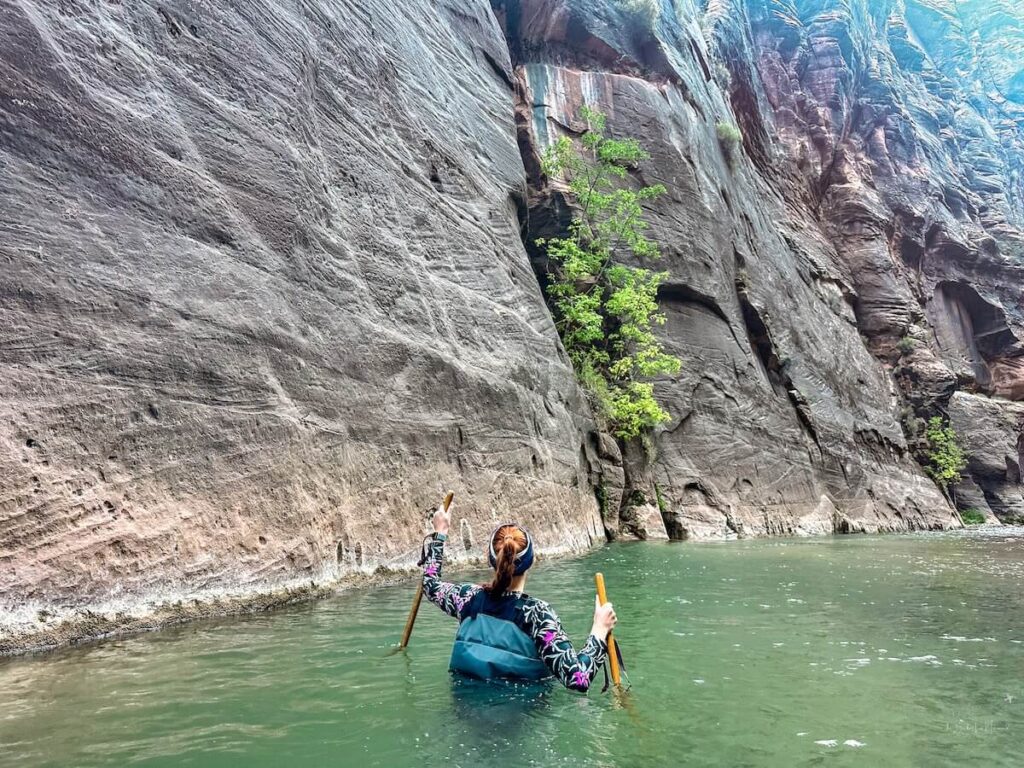
Depending on conditions, you’ll be wading through:
- Ankle-deep babbling flows one minute…
- And waist to chest-deep plunge zones the next (yes, even in summer!).
Add in slick rocks, changing currents, and the ever-present chill of that river water – and suddenly, gear becomes a very big deal.
If you are worried about checking “The Narrows” off of your bucket list, I would highly recommend taking a tour where all of the hard stuff is taken care for you.
This is also a great way to learn more about the geology, formations, and plants in the area.
What to Wear to Hike The Narrows (From Head to Toe)
Now that you have your necessary rented gear, let’s go through what to wear from head to to while hiking the Narrows.
Let’s get one thing straight: this is not the hike to “wing it” with whatever’s in your closet.
What you wear in The Narrows matters, and the wrong outfit can turn your bucket list hike into a soggy, squishy regret fest.
You’re basically stepping into a wet obstacle course for hours – so let’s get your wardrobe river-ready.
Base Layers: Quick-Dry or Cry Later
Start with a good foundation. Your base layers should do two things:
1. Keep you warm (or cool), and
2. Dry quickly:
- Best choices: moisture-wicking shirts, quick-dry leggings, synthetic thermals (if cold)
- In summer: a long-sleeve rash guard can be a game-changer for UV protection
- In cooler temps: add a light fleece under your dry bibs
What NOT to wear:
- Cotton (it gets wet and stays wet – and you don’t want to chafe)
- Jeans (never a good idea on a hike, especially a wet one)
- Bulky fleece or sweatshirts (they hold water like a sponge and weigh a ton)
I wore fuzzy pajama pants 🤨 Was it terrible? No. Was it great? Also no.
Don’t be like me. Wear something that dries quickly and is insulated.
Dry Gear
Now that we’ve talked about base layers, odds are that you are going to have some form of dry gear on top.
Most likely, these will be rented.
Depending on your personal preferences and the season, you have some options here…
Dry Pants
- These are waist-high waterproof pants with tight ankle seals (usually latex or neoprene).
- Great for spring, fall, and chilly summer mornings.
- They don’t protect your upper body – so you’ll still want layers up top.
- Often paired with canyon boots + neoprene socks.
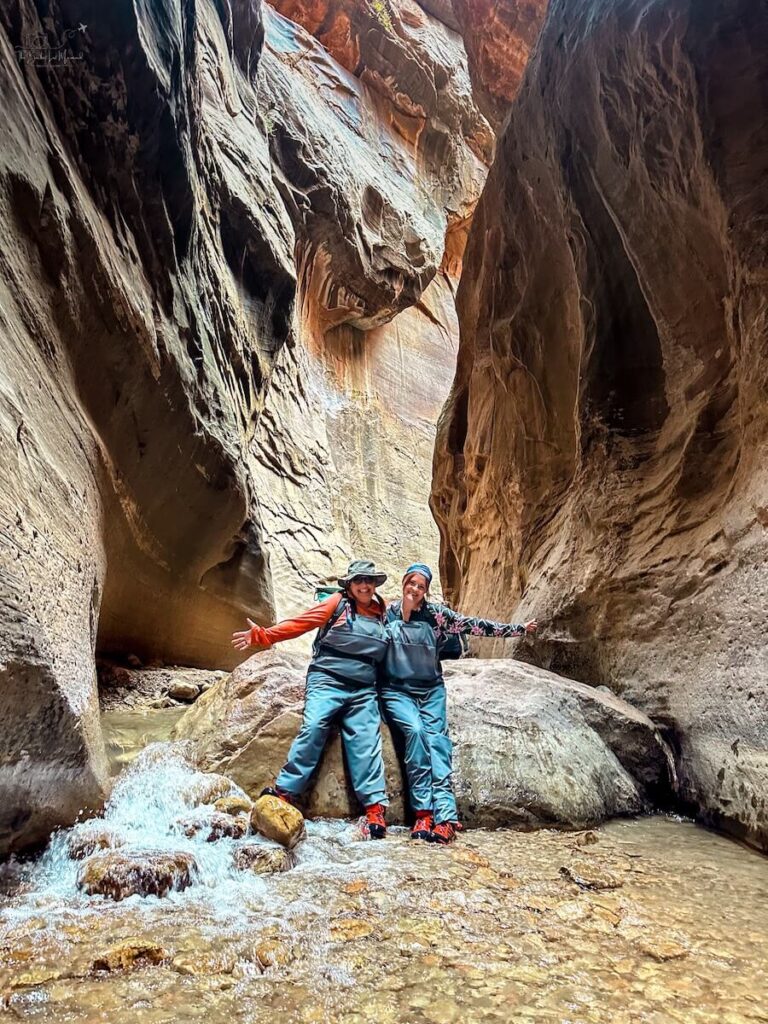
Dry Bibs
- Like dry pants… but they go up to your chest, kind of like fishing waders.
- Offer better protection against deeper water and unexpected dips.
- Usually rented as part of a cold-weather Narrows package.
- Can still be paired with your own top layers (fleece, thermal, etc.).
I used these on my fall hike and loved the extra coverage – especially when I stepped into a surprise waist-high plunge.
Dry Suit
- The full deal: head-to-toe waterproof armor, complete with wrist and neck seals.
- Best for winter hiking or the top-down Narrows route.
- You’ll wear thermal base layers underneath.
- Overkill for summer but a must for snowmelt season.
Which Should You Choose?
| Dry Gear | Coverage | Best For | Worth It? |
|---|---|---|---|
| Dry Pants | Waist-down | Spring/Fall/Summer AMs | Yes, for cool seasons |
| Dry Bibs | Chest-down | Cold water, deeper wades | Extra protection, worth it |
| Dry Suit | Full body | Winter/Top-down hike | Only if it’s really cold |
Socks + Footwear
I would HIGHLY recommend renting socks and footwear no matter what time of the year you hike The Narrows.
This combo is crucial, and the reason you don’t want to just show up in your running shoes.
Neoprene Socks
These are like wetsuits for your feet. They don’t keep your feet bone-dry, but, like a wetsut, they trap a warm layer of water against your skin – so even if your socks get wet (they will), your feet stay warm(ish).
It’s important to note that although I wasn’t miserable, my feet were cold for the entire hike. Fortunatly, the socks help.
- They’ll feel weird at first – thick, squishy, slightly damp – but they work like magic after the first 10 minutes.
- If you’re renting, make sure they fit snugly but not tight. You don’t want rubbing or bunching.
Please, for the love of all that is good and holy, don’t wear normal socks. Nobody likes wet socks for a reason. And hiking all day in them? No thanks!
Canyon Boots (a.k.a. The Narrows Shoes)
Built for slippery, underwater terrain, these boots have grippy soles and toe protection that your trail runners simply don’t.
- Don’t expect the cushy comfort of your favorite sneakers. They’re utilitarian but necessary.
- If you’re renting: try them on with the neoprene socks and walk around a bit before committing.
Don’t wear your own hiking shoes unless you never want to wear them again. They’ll be soaked, heavy, and possibly ruined by the end.
I was trying to find an option to buy my own. I didn’t find the exact ones, but I think these water hiking shoes would work.
Hats, Gloves & Other Smart Add-Ons
These aren’t must-haves, but they’re solid comfort-boosters…especially when weather conditions change halfway through the hike (spoiler alert: they will).
- Hat:
- Summer? Go with a breathable sun hat or ball cap to keep rays off your face.
- Cold or windy? A beanie helps hold in heat.
- I am obsessed with my Tilley Wanderer Hat – just make sure to measure your head correctly if you want to invest in one.
- Gloves:
- In spring, fall, or early mornings, your hands will be gripping a cold, wet hiking stick for hours.
- Lightweight, water-resistant gloves can make a huge difference.
- When my mother hiked The Narrows, she got some blisters on her hands from gripping the stick. Gloves would have been better…
- Buff or neck gaiter:
- Great for sun or wind protection and can double as a face wipe, headband, or impromptu towel.
- My gaiter was amazing on my ears in the morning when I was freezing.
Bonus tip: Don’t forget sunglasses with a strap. You will bend over in the river, potential fall, and you will lose expensive shades if you’re not careful.
What to Pack in Your Backpack for The Narrows
Here’s everything that earned a spot in my pack – and a few things I wish I’d stuffed in last minute.
Backpack Basics
- Waterproof backpack – If you own one, this is its time to shine. Some stores near Zion rent them.
- Regular backpack + dry bags inside – Totally workable! I used a combo of lightweight dry sacks and a big trash bag liner to waterproof my gear.
- Bonus tip: Use smaller dry bags to group items (snacks, electronics, clothing) so you don’t have to rummage around with wet hands.
⚠️ IMPORTANT: Expect your backpack and everything in it to be soaked by the end of your hike.
Everyone did attempt to hold their backpacks over their head when trudging through the deep parts, but there were sections where I was full-on taking a swim.
And there were times when I just lost my footing and fell into the water.
The bottom line? Everything is fair game to get wet on this hike. Pack accordingly…
Water & Hydration
- Hydration bladder (2L minimum) – Easy to sip while hiking without having to stop or remove your pack.
- Water bottles – If bladders aren’t your jam, toss in a couple of refillable bottles. Personally, I love HydroFlask and Yeti.
- Electrolytes – Powder, tabs, or pre-mixed. You’re exerting more energy than you think, especially through water. Stay salty, my friend.

Snacks = Sanity
You’re moving slower than on a regular trail, burning calories with every step (and stumble). Pack snacks that are high-calorie, compact, and not crumbly.
Great options:
- Trail mix
- Energy bars
- Peanut butterƒ
- Jerky
- Gummy candy (for morale)
Electronics & Protection
- Phone – In a waterproof case or double Ziplocked and dry-bagged. I had a separate dry bag for my phone and then put it in another dry bag!
- Action Camera/GoPro – If you’re bringing the fancy stuff, it needs its own dry setup. Waterproof point-and-shoots or action cams are ideal. I brought a GoPro and Insta360 (get a free accessory with my link!)
- Microfiber cloth – For wiping off your lens after splash attacks.
Quick Note on Photographing The Narrows
I am a travel photographer and this place is TRICKY to photograph.
Read More – How to Become an Adventure Photographer
My phone did get brought out a few times, but it was easier just to use my action cameras.
I attached each one to my backpack so it was easily within reach when there was something incredible!
If you are really into photography and want to risk it…I would recommend looking at my Antelope Canyon photo guides since this environment is similar to a slot canyon and the photography techniques can be applied to The Narrows.
Read More – Antelope Canyon Phone Guide | Antelope Canyon Camera Guide
Emergency + Nice-to-Haves
- First aid basics – Blister pads, Band-Aids, ibuprofen, etc.
- Ziplock bag or trash bag – For wet socks, bathroom stuff, and trash. Don’t leave anything behind!
- Wet Wipes – Sooo nice! I used them for going to the bathroom, wiping my face, and doing a quick wash before eating. Don’t forget to pack them out!
- Towel + dry clothes – Left in your car, not in your pack. You’ll thank yourself later.
- Permit or park pass – Especially for top-down hikers or if you’re starting early.
- Map or downloaded offline trail info – Cell signal is dicey.
The Narrows Rental Gear Options
If you saw that list and said, “Who the heck has a dry bib laying around?”…don’t panic!
What I Rented to Hike The Narrows
As a full-time RVer, space is tight. So I rented, and let me tell you – it was worth every penny.
Here’s what I got, what I paid, and how it held up mile after watery mile.
My Exact Rental Setup
I rented my gear from Zion Outfitter in Springdale, and here’s what they hooked me up with:
- Canyoneering Boots
- Neoprene Socks
- Dry Bib
- Walking Stick
Cost Breakdown & Rental Tips
I ended up paying around $55 for a dry bib, canyoneering boots, 5mm neoprene socks, and a wooden hiking stick (prices subject to change).
Other companies had anything from $50 to $85. They also had bundles that were made for summer and ones made for winter. I chose the bundle that was “middle ground”.
I was there on a chilly October morning and it was worth every penny! They even let me pick it up the night before (which I would 100% recommend).
After I was done with the hike, I just dropped it back of on my way back to the RV while eating a giant pizza.
Worth noting
- Most outfitters offer multi-day discounts.
- Sizes can go fast on weekends – book early if you’re visiting during peak season.
- Don’t be afraid to ask for fit adjustments. Blisters in the Narrows? No thank you.
Pro Tips for Renting Gear
- Try everything on before you leave the shop. Especially the socks + boots. If anything feels off, fix it then.
- Don’t forget to grab a map or ask how far the water goes. Some outfitters have updated info on water levels and conditions.
- Leave a towel in your car. You will be damp when you finish, even with dry pants. Don’t soak your rental car seat or RV.
So… Do You Have to Rent Gear?
Technically? No. But unless you’re an experienced canyoneer with waterproof gear on hand, it’s a hard yes from me.
Hiking The Narrows in sneakers is like skiing in flip-flops – it’s possible, but also…why?
The Necessities You Shouldn’t Hike The Narrows Without
I absolutely would NOT do the Narrows WITHOUT…
- Canyoneering Shoes – If I did that in my regular hiking shoes I’m not sure they would have survived constantly hiking in water.
- Neoprene Socks – I don’t care what time you hike, that water is chilly! Those socks are lifesavers. Regular socks in cold water for hours? That’s a HARD “no” from me.
- Thick Wooden Hiking Stick – Standard hiking poles aren’t going to cut it on those slick rocks with rushing currents. Not to mention, you are going to ruin your gear because they will get more beat up than a loser in an MMA fight.
What about the waders/Dry Bib?
These were 50/50 for me. I’m glad that I had them in the morning because they definitely kept me warm.
My problem was I hit a section where I had to swim and water poured in near my neck and armpits.
I couldn’t get the water out without taking off everything so just ended up hiking with water sloshing around everywhere.
Not to mention (awkwardly) how inconvenient it was to go to the bathroom.
My only option was to spend 20 minutes gearing all the way down to pee in the river or pee in them and have it sit at my ankles for the rest of my hike. Gross. No thanks.
I would only opt in for the dry bib or suit if you are hiking in fall/spring/winter.
Where to Rent Your Gear For The Narrows
Whether you’re planning ahead like the trail champ you are, or rolling into Springdale the night before your hike, you’ll want to rent your Narrows gear from a reputable outfitter.
Luckily, Zion has a few solid options right outside the park entrance. But there are key differences between them – so let’s break it down.
Main Narrows Gear Provider Comparison
| Feature | Zion Adventure Company | Zion Outfitter | Zion Guru | Other Options (St. George, etc.) |
| Location | Just off Zion Park Blvd | Literally at the park entrance | Just off Zion Park Blvd (Springdale) | 45–60 mins away (St. George) |
| Gear Packages | Full rental kits + custom builds | Full rental kits, fewer extras | Specialized Narrows-specific packages | May have fewer Narrows-specific items |
| Online Reservations | ✅ Yes | ✅ Yes | ✅ Yes | Sometimes |
| Walk-in Rentals | ✅ First-come, first-served | ✅ But often crowded | ✅ Available, best to reserve | Limited availability |
| Staff Expertise | ⭐⭐⭐⭐ Highly trained guides | ⭐⭐⭐ Basic gear help | ⭐⭐⭐⭐ Expert & knowledgeable staff | Varies |
| Early Opening Hours | Yes (as early as 6–7 AM) | Yes (usually 7 AM) | Yes (pickup available afternoon before) | Varies |
| Rental Returns | Same-day or next morning | Same-day or next morning | Same-day or next morning | Varies – check policies |
| Dry Suit Rentals | ✅ Yes | ❌ Not available | ✅ Yes | Maybe – call ahead |
My Recommendation?
Zion Adventure Company is great for personalized gear setups, specialty rentals (like dry suits), and if you want to chat with actual guides who know their stuff.
Zion Outfitter wins on convenience. It’s right next to the visitor center and the shuttle stop, making pick-up and return super easy. This is perfect if you want to grab gear and go. This is the one I decided to go with.
Zion Guru offers specialized Narrows packages with top-notch gear, plus the perk of afternoon-before pickup, so you can get an early start without stress. Their expert staff and tailored options make them a strong contender, especially if you want gear that fits like a glove.
What If Your Size Is Sold Out?
It happens – especially during peak season (June–September) or weekends.
Here’s what to do:
- Reserve online early – Most outfitters allow reservations weeks in advance.
- Go first thing in the morning – Walk-ins get picked over fast.
- Call other shops in Springdale – There are smaller gear stores that may have backups.
- Consider driving to St. George – It’s a bit of a hike, but if you’re desperate, it’s an option (just budget an extra 1–2 hours round-trip).

Seasonal Gear Adjustments for The Narrows
Because what works in July might get you hypothermia in October.
Here’s the truth: The Narrows is a year-round hike… but it’s definitely not a one-size-fits-all kind of gear situation.
The water is always cold, but air temps, water flow, and flash flood risk shift dramatically with the seasons.
If you want to be comfy (and not freezing, overheating, or caught in a storm), your gear needs to match the calendar.
Summer
- Warm Air, Cold Water, Lots of Tourists
- Air temps: 85–100°F (29–38°C)
- Water temps: Still cold, but tolerable
- Flash flood risk: High during monsoon season (July–September)
Do you need dry pants/bib in summer?
Not necessarily. In peak heat, you can usually hike in quick-dry clothes or leggings and skip the dry bibs.
Your feet will still get cold, but your legs? Probably fine.
Neoprene socks and canyon boots are still a must.
💡 Pro tip: Start early to beat crowds and heat. Afternoon sun can roast you in the exposed sections.
Spring & Fall
- The Shoulder Seasons
- Air temps: 50s–70s (F) depending on the month
- Water temps: COLD. Like, “Why did I do this?” cold.
This is where cold water protection becomes non-negotiable.
I highly recommend dry pants or bibs + neoprene socks. Your body will thank you after 10 minutes in waist-deep water.
Gloves and a fleece base layer wouldn’t hurt either.
This is my personal favorite time to hike The Narrows – fewer people, moody canyon light, and that ooooh crisp fall feeling. But only if you’re dressed for it.
Read More – Fall Photography Guide
Winter
Only for the brave (and properly insulated).
Yes, The Narrows is hikeable in winter – but you’ll need to gear up like you’re wading through a glacial river… because you kinda are.
Must-haves:
- Dry suit or full dry bib setup
- Insulated base layers (fleece or thermal)
- Gloves + warm hat
- Waterproof everything
Pros? Solitude, dramatic lighting, fewer tourists.
Cons? You will be cold. But if you’re geared right? You’ll also feel like a badass.
Flash Flood Season: Don’t Play Chicken with The NArrows
Monsoon season (July–September) brings sudden, fast, and dangerous floods. The Narrows becomes a death trap during a flash flood.
Even if it’s sunny where you are, storms upstream can send a wall of water barreling through the canyon.
Always check the Zion NPS flood rating before you hike.
- Green: You’re good to go
- Yellow: Caution. Assess conditions carefully.
- Red: Don’t even think about it
Read More – Zion National Park Photography Guide
Seasonal Gear Recap
| Season | Dry Gear? | Gloves? | Layer Up? | Flash Flood Risk |
| Summer | Optional | Nope | Light | High (Jul–Sep) |
| Spring/Fall | Yes | Optional | Yes | Moderate |
| Winter | Absolutely | Yes | Absolutely | Low |
Things I Wish I Knew Before Hiking The Narrows
Because there are just some things the gear rental shop won’t tell you…
Don’t get me wrong…the Narrows is straight-up magical. But also? It’s weird. And wet.
And full of unexpected little surprises that no one seems to mention until it’s too late.
So here’s the stuff I wish someone had told me before I stepped ankle-first into one of the coolest hikes on the planet.
Neoprene Socks Feel Like Wet Hamsters at First
They’re warm. They’re functional. They work.
But also? They feel super weird for the first 20 minutes.
It’s like sloshing around in two rubbery puddles strapped to your feet. Totally normal. Totally worth it. Just don’t panic…you get used to it quickly.
Your Backpack Gets Heavy
Water adds weight, and while your gear may feel light and breezy when you start, by mile 4 your pack will feel like a soggy toddler clinging to your back.
Tips:
- Pack light. Only bring what you actually need.
- Use a hip strap if your backpack has one – it saves your shoulders.
- Keep your heavier items near your back and centered so you’re not wobbling through waist-deep water like a drunken penguin.
The Hike Takes Longer Than You Think
Even if you’re fit and used to long hikes, moving through a river is slow.
You’re navigating current, slippery rocks, and narrow passageways. Plan for:
- Bottom-up to Wall Street (popular turnaround point): ~4–6 hours round trip
- Bottom-up to Big Springs (full permitted route): ~8–10 hours round trip
Don’t rush. Take breaks. Enjoy the views. This isn’t a “check the box” hike – it’s a soak it in kind of adventure.
There’s No Cell Service
You’re deep in a canyon. The walls are high. The signal is nonexistent. It’s beautiful.
- Download offline maps or trail info beforehand
- Let someone know your plans and ETA before you leave
- Bring a paper map or screenshot key points just in case
Let’s Talk About Peeing (Because Nobody Else Does)
You’re hiking for hours, drinking tons of water, and guess what? Nature’s gonna call.
Here’s the deal:
Pee in the River
Yup. It’s what the park service recommends.
Just walk into a shallow section and do your thing. Avoid doing it on land (it damages the fragile environment).
As I have complained about before, this is extremely hard and awkward to do in the dry bib/full gear.
Honestly, once you get over the initial awkwardness, peeing in a river is… kinda liberating?
#2 💩?
That’s a whole different game. If you’re doing the top-down route or spending the full day in the canyon, consider bringing a wag bag (and pack it out).
No digging cat holes here.
The Narrows Gear Frequently Asked Questions
Because someone out there is definitely Googling “Can I hike The Narrows barefoot?” right now.
This is your lightning-round guide to the most common (and let’s be honest, occasionally ridiculous) gear questions people have before hiking The Narrows.
Gear Up, Get Out There, and Hike the Narrows
The Narrows is one of those hikes that sticks with you. It’s not just because your socks were wet for eight hours (though, yeah, that too), but because it’s truly unforgettable.
Towering canyon walls, crystal-clear water, and that feeling of total awe with every twist and turn. It’s not just a hike…it’s an experience.
And the right gear? It makes all the difference. Whether you’re renting everything in Springdale or packing your own waterproof wonder-kit, I hope this guide gave you the confidence to prep like a pro and hike without the guesswork.
Personally? I’d hike this again tomorrow if I could. It’s that good.
If you’ve still got questions, drop them in the comments or DM me on Instagram @TheBucketListMermaid. I’m always happy to help a fellow adventurer get ready to dive in…literally.
Share Your Photos – If you get those incredible Narrows photos, feel free to share them with me in my Facebook group – Shutterbugs Gone Wild!
Now get out there, soak it all in (preferably not your socks), and make some canyon magic. 🥾✨
More Travel Resources
Adventure Bucket List Resources
I am here to help your travel adventures go as smoothly as possible! That way you can check off that bucket list with minimal complications and spending!
SHOP – Shop the best adventure gear and essentials on my Amazon Storefront – handpicked by a full-time adventuring mermaid!
AIRFARE – There are a few I use, but Aviasales is normally my go-to for flights without any extra fees or markups.
ACCOMMODATION – My two favorites are Booking.Com for hotels and VRBO for rentals.
GUIDED TOURS – If you are looking for quick and easy tours, check out GetYourGuide and Viator.
MULTI-DAY TOURS – For more in-depth tours that span several days, TourHub has many great options with reputable travel companies. Use my code (ALEXANDRA1GURU) for up to 5% off your next bucket list adventure.
TRANSPORTATION – You can either rent a car yourself with Discover Cars or do a guided bus tours like Big Bus Tours.
SIM CARDS – Avoid expensive roaming charges with an eSim card with Airalo. Personally, I prefer wifi boxes, and recommend WiFi Candy (get 10% of with the code THEBUCKETLISTMERMAID).
TRAVELER’S INSURANCE – Check out VisitorsCoverage for affordable insurance plans. If you are a nomad or remote worker, I would check out SafetyWing.
SEE MORE – Adventure Resources | Photography Resources
See Some Photos You Like?
Check out my full photography page for a full gallery and prices.