How to Edit Adventure Photos That Hit You Right in the Wanderlust
This website contains affiliate links from trusted partners. If you purchase through a link on this site, I may earn a commission at no extra cost to you. As an Amazon Associate, I earn from qualifying purchases. See my Privacy Policy and Disclosure for more information.
The summit was unreal, the adrenaline was pure, but now you’re staring at your screen, wondering why your photo looks nothing like what it felt when you were adventuring.
Welcome to the art of editing adventure photos.
This is where light changes faster than your heartbeat, and no preset on earth can save a blown-out glacier at noon.
Adventure photography is its own beast. It’s part travel, part landscape, part sport, and entirely unpredictable. There’s harsh sun, foggy ridge lines, mud, motion blur — you name it.
It’s my goal to have you take pride in the photo and the edits of your adventures. This isn’t another “click Auto in Lightroom and pray” kind of guide. Nope.
This is a full-blown adventure editing expedition for thrill-seekers with a camera. You’re about to learn how to tame wild light, balance vibrance and mood, and make your images feel as alive as the day you shot them.
I’ve spent years editing through sandstorms, summit sunrises, and twelve-hour hikes that ended in headlamp light. I’ve learned every trick to pull the magic back out of those hard-earned pixels, and now, I’m handing you the map.
By the end of this guide, you’ll have a repeatable adventure editing workflow that makes your photos look just as epic as they felt in real life.
Ready to dive in? Let’s crack open Lightroom and relive the chaos.
Key Takeaways
- 🥾 Adventure editing is about storytelling, not perfection. Aim to capture the feeling of the moment, not just the scene.
- 📸 Build a clean workflow and use color and contrast to breathe life back into your images.
- 🌎 Keep it real. The best edits don’t scream “filter,” they whisper “I was there.”
Understand the Adventure Edit Mindset
Adventure photography isn’t about perfection. It’s about aliveness. It’s storytelling in raw form.
Every speck of dust on your lens, every ray slicing through fog, every crooked horizon? That’s texture. That’s truth. Adventure photos should feel like the moment you shot them.
Let’s draw some lines here.
Travel editing is about destination beauty, clean colors, postcard vibes.
Landscape editing focuses on perfection like balanced exposure, sweeping detail.
But adventure editing? It’s storytelling in motion. It’s capturing the chaos of movement, weather, emotion, and danger, turning that mess into visual poetry.
Prep Work Before You Even Open Lightroom
Alright, before we dive into sliders and tone curves, let’s talk prep, because even the best edit can’t save a disorganized mess of files and JPEG regrets.
Adventure editing starts before Lightroom ever opens.
Organizing Your Files
First, get your files in order. Sort everything by location, date, and story arc. Think like a documentarian, not a scatterbrained adventurer.
If you shot a three-day trek, organize folders by each day or key location — “Summit Push,” “Base Camp,” “Trail Magic.”
Future you (and your sanity) will thank you.
Always Shoot in Raw
Next: shoot RAW, always. Adventure lighting changes faster than your heart rate on a ridge line.
RAW files hold the detail and flexibility you need when you’re dealing with shadows, highlights, and that moody golden-hour glow.
JPEGs? Cute for phone shots, but not for real edits.
Backups
Then comes the unsexy but essential part: backups. A cloud service + external hard drive combo is your lifeline.
Because nothing crushes the soul like losing your best sunrise shot to a corrupt SD card.
I back my photos up on an external T7 hard drive and on SmugMug.
Culling
Finally, cull and choose your hero shots. I’ve learned that it takes practice to cull your own photos.
What helped me out was to not cling to technical perfection. Go for emotion. The dirtier, grittier, more chaotic moment might be the one that tells the story best.
Your photo doesn’t need perfect composition if it tells a badass story.
Lightroom Basics of Adventuring Editing
Alright, the digital tent’s pitched. Now time to fire up Lightroom and start shaping your raw chaos into visual gold.
Think of this stage as basecamp: no fancy summit edits yet, just building a rock-solid foundation for everything that follows.
Start with your import and catalog workflow. When you load your shots, make sure they’re tagged, keyworded, and sorted into collections that make sense — “Patagonia Trek,” “Desert Run,” “Canyon Camp.”
This saves you from later scrolling purgatory when you’re trying to find that one killer shot.
Basic Corrections
Now, dive into your basic corrections:
- White Balance: Adjust for the real mood or a specific style. I always correct this first because it sets the tone of the photo.
- Crop & Geometry: I then crop my photo and add some geometry (straighten it out) if necessary. Straighten horizons, emphasize leading lines, and make your composition tell the adventure’s path.
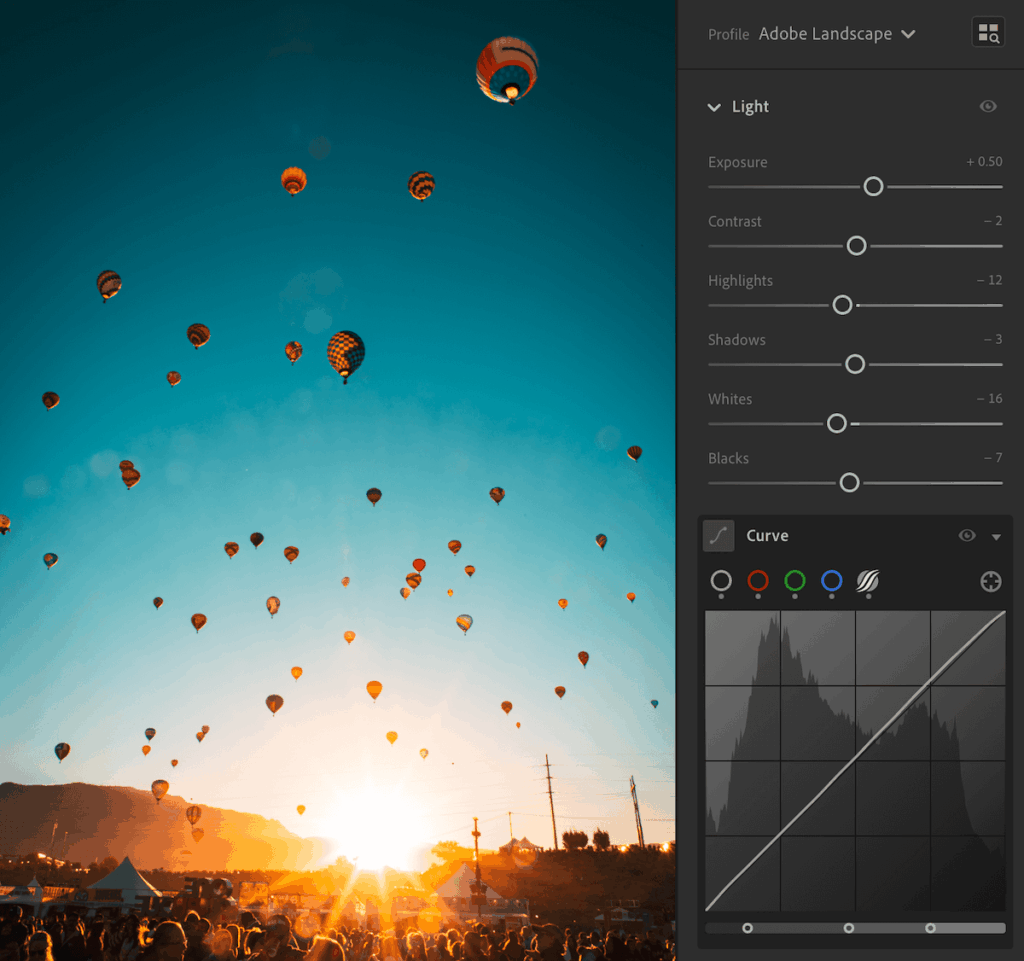
- Adobe Adaptive/Landscape: Instead of hitting “auto”, I instead change the profile to either Adobe Adaptive or Landscape. This brings out natural colors and leaves the base foundation slides alone.
- Exposure: Bring balance to the drama. Recover shadows without flattening them.
- Contrast: This is your adventure edit secret sauce, but don’t overdo it.
Tone Curve
Once the essentials are dialed, open the Tone Curve. This is where the magic lives.
A gentle S-curve adds punch and depth, mimicking that crisp morning air.
Want mood? Pull down those shadows and watch your photo breathe.
Texture and Clarity
Clarity and Texture are your grit sliders. They are the secret ingredients for that “I can feel the dust” energy.
Bump up Clarity to punch midtones and make light pop off rock faces or gear. Personally, I prefer to bump up clarity more than texture.
Texture to bring out fine details like windblown hair, trail rocks, or mountain ridges. I think of this as my grungy 90s slider. Too much and your photo goes from epic realism to sandpaper filter real quick.
Sharpening & Noise Reduction
Add sharpening and noise reduction next. Bring out the rocky textures and jacket details, but don’t overdo it. Remember that grain can be part of the story.
Lens Corrections
Finally, enable lens corrections (goodbye warpy edges). I do this about 70% of the time, so if it makes your photo weird, just take it off.
Adventure-Specific Lightroom Settings
- 🏔 Mountains: Clarity + texture for rugged detail
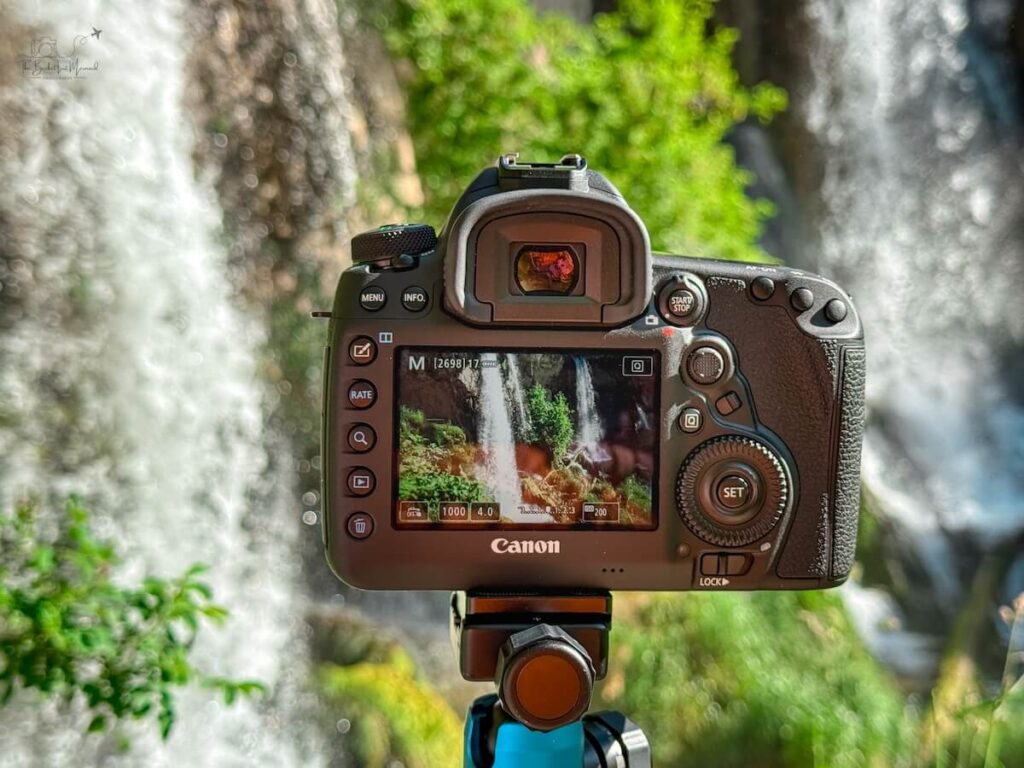
- 💦 Waterfalls: Dehaze + cool tones for misty magic (check out this real-time waterfall editing video)
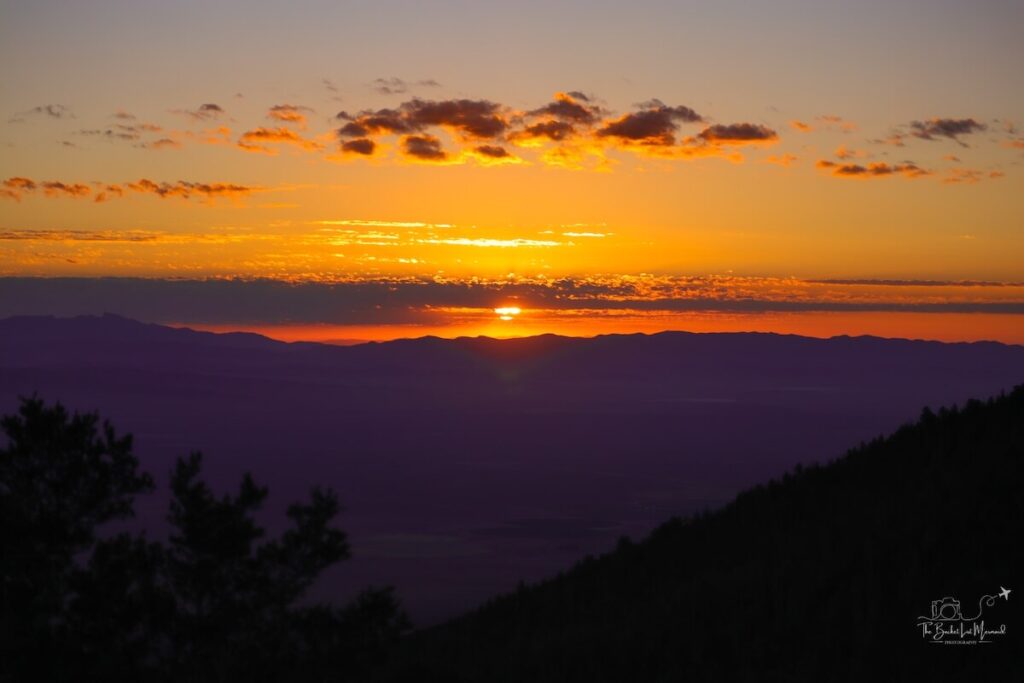
- 🏜 Deserts: Warm tones + vibrance for that golden scorch
- ❄️ Snow: Adjust white balance + recover shadows to keep detail in the whites
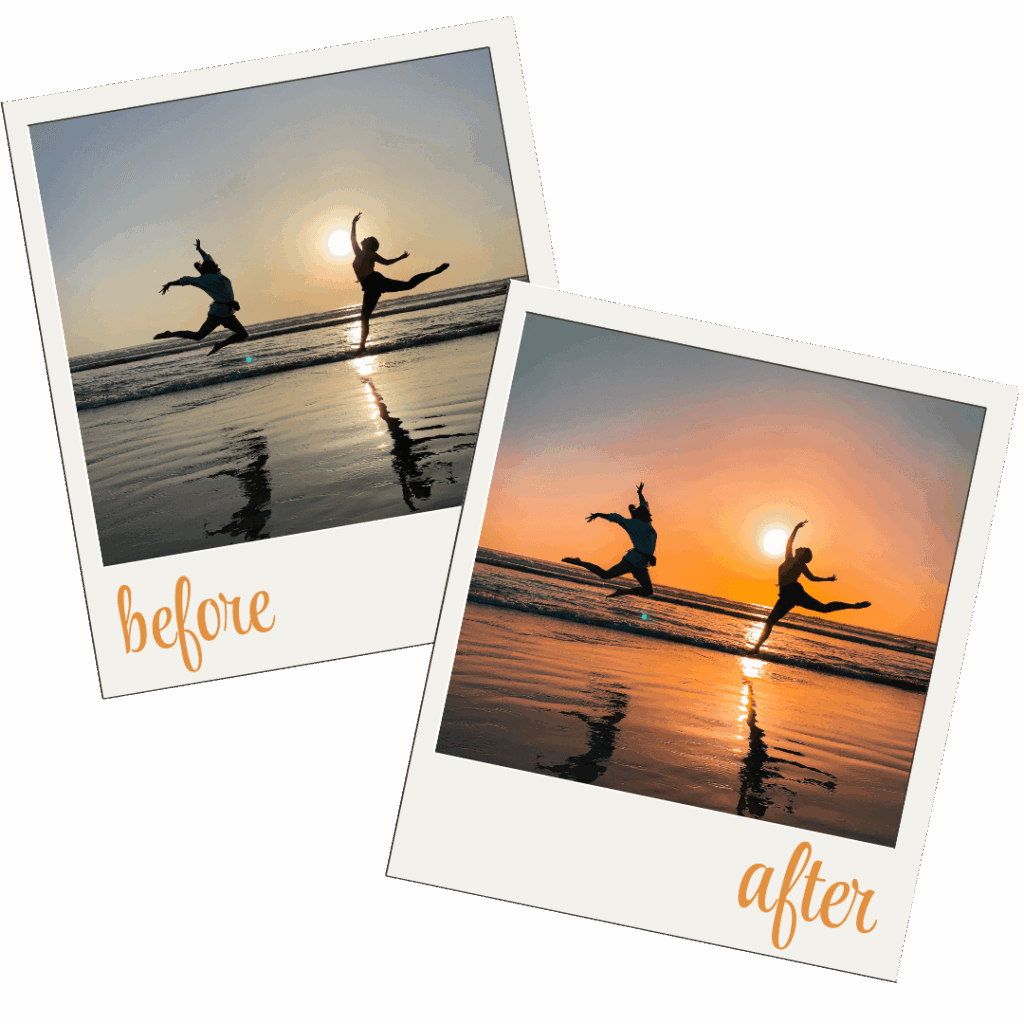
Adventure photos thrive on contrast. The bolder your highlights and shadows, the more alive your image feels.
Master Color & Mood For Your Adventure Photos
Here’s where your adventure photos go from “nice shot” to “holy crap, I can feel that.”
Color and mood are your emotional storytellers.
They pull viewers into the moment, let them taste the dust, feel the chill, and squint against the sunrise. This is the heartbeat of an adventure edit.
hsl Panel
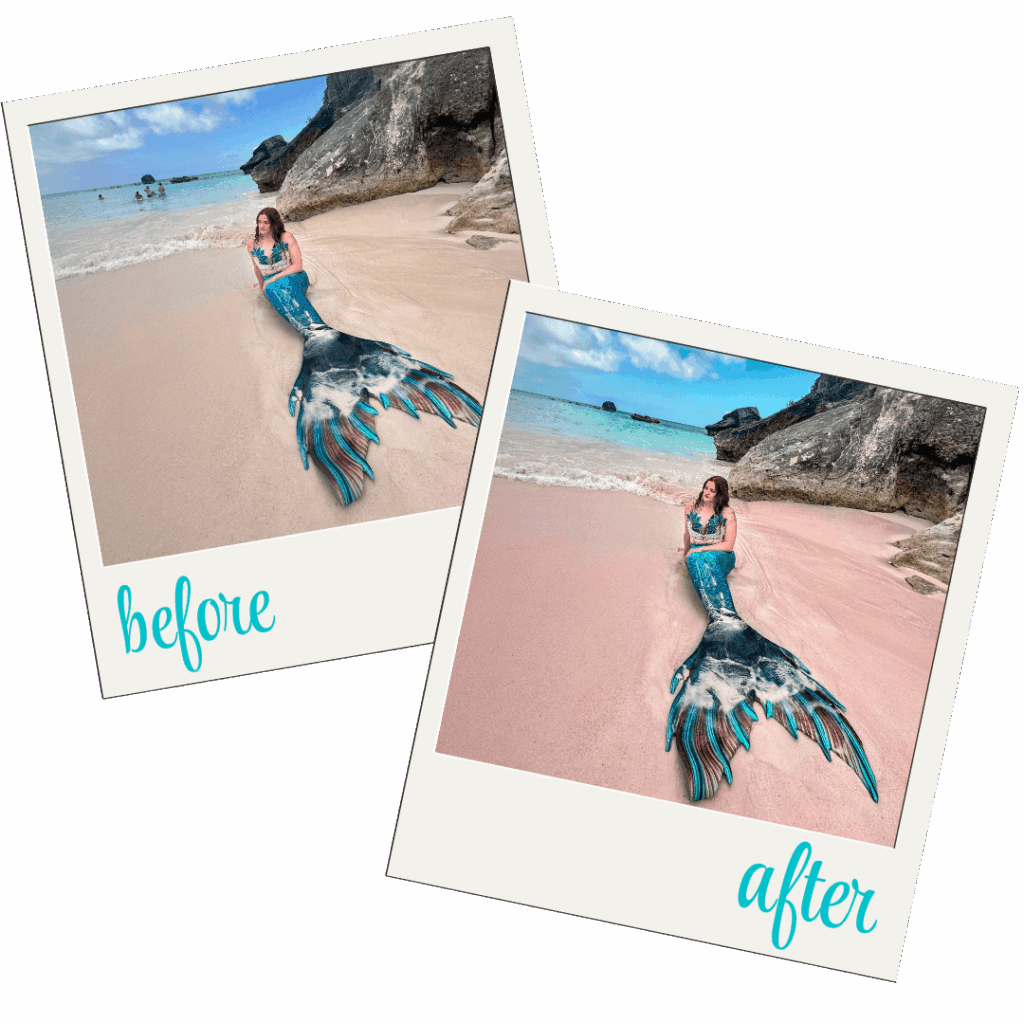
First, hit the HSL panel. This is your adventure palette control board. Here’s where you fine-tune those wild colors nature throws at you:
- Warm up desert sands.
- Cool down alpine blues.
- Deepen those lush jungle greens.
- Balance realism with emotion; the trick is to make viewers feel the place, not just see it.
For consistent results, I would recommend picking one shade of blue and green, then sticking to it!
And please, for the love of glaciers, avoid over-saturation. Punchy is good; radioactive is not. That sky shouldn’t glow like it’s auditioning for a Marvel movie.
Color Grading
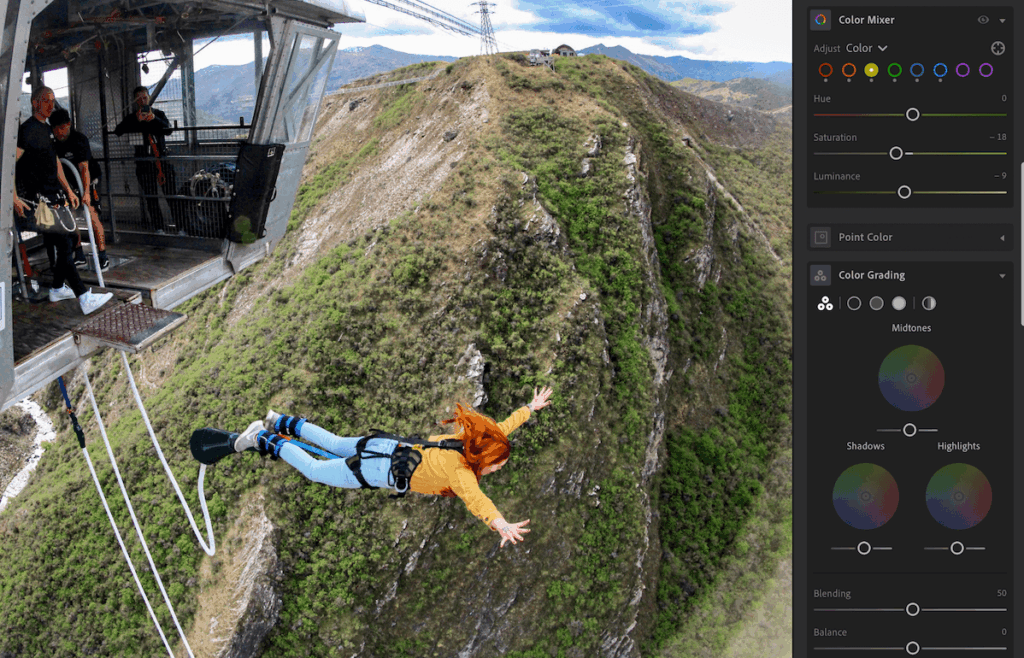
Next, jump in with some color grading. This is the art of emotional storytelling.
Warm tones evoke heat and passion (think desert hikes and volcanic sunsets).
Cool tones feel crisp, lonely, and high-altitude (icy peaks, alpine mornings).
The trick? Don’t just edit for accuracy; edit for emotion. What did it feel like to stand there? Let that guide your palette.
For my style, I normally set my highlights to one color and then I’ll set my shadows to near the opposite side of the color wheel for balance.
Presets
Now, consistency: the secret sauce behind that signature adventure look.
Sync your settings across a series so your photos tell one cohesive story, not a chaotic color carnival.
Presets can be your best friend or your worst crutch.
Custom ones give you total control. Premade ones (or my custom presets) can jumpstart your workflow, especially when you’re finding your style.
The goal isn’t to copy. It’s to build your own consistent vibe. Start with a base preset and tweak until it feels like you.
Let your colors tell a story… not scream for attention.
The Fine-Tuning Magic
This is the polishing phase and where your photo goes from solid edit to chef’s kiss masterpiece.
You’ve built the foundation, shaped the mood, and now it’s time to finesse those little details that make the shot breathe.
Masking Like a Pro
Masking is where your adventure photos level up from “cool” to cinematic.
It’s the art of adventure editing only where it matters and guiding the viewer’s eye like a secret trail through your image.
Think of it like this: instead of blasting contrast or exposure across your whole photo, you selectively enhance the best parts like that golden light on the ridge, the glow around your subject, the storm brewing over the pass.
Here’s how to make it work:
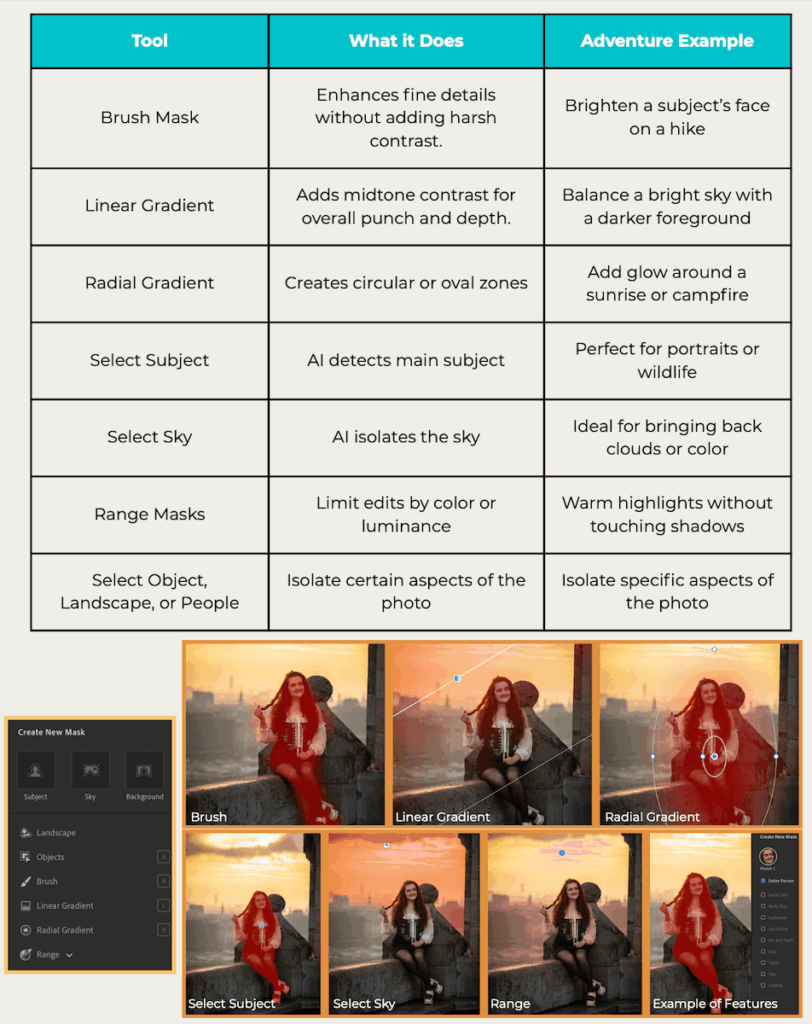
1. Start with Subject + Sky Masks
Lightroom’s AI masking tools can detect skies, people, and subjects automatically. Use them to:
- Deepen a sky without nuking your mountains.
- Brighten your hiker’s face hidden in shadow.
- Add glow around sunlit peaks for a touch of drama.
2. Manual Masks for Precision
Brush in light where you want attention, maybe the curve of a trail or a sunbeam cutting through fog.
Use low flow (20–30%) and stack layers gradually.
3. Combine Masks for Control
Subtract from your masks to protect areas you don’t want changed. Example: darken the sky but exclude the mountaintop for a halo effect.
4. Keep It Natural
Feather edges generously. The goal is seamless… no hard lines, no halo weirdness.
Masking isn’t about fixing flaws. It’s about directing the story. Light where it matters, shadow where it doesn’t.
Some Masking Tricks I Use
- Lightening the eyes of subjects
- Lightening the subject and darkening the background
- Adding a halo behind the subject to make it stand out.
- Adding “fairy spots” or subtle areas of increased exposure
- Darkening sections of the photo to guide the eye
- Dehazing mountains
- Isolating the sky and lower the highlights
Using Generative AI for Object Removal
Generative AI is like your trail-cleanup crew for photos. It quietly erases the distractions so your adventure story stays front and center.
Stray hiker in your summit shot? Random signpost in your perfect landscape? Mud splatter on your lens? Gone.
In Photoshop and Lightroom’s Generative Fill (and similar tools), you can simply select the unwanted object, hit Generate, and let AI fill in the gap using the surrounding pixels.
It’s shockingly good at matching texture, lighting, and color with no clone-stamping gymnastics required.
When to Use It
- Removing unwanted people or gear that distracts from the scene.
- Cleaning up tent stakes, footprints, or sensor spots.
- Repairing small gaps or edge clutter in wide shots.
When it Sucks
Although it is powerful, it also does some weird things.
For example, I once tried to edit out a person from a Day of the Dead photo and it generated a completely new face protruding from the Scary Catrina.
It was pure nightmare fuel.
With that being said, I have great luck with this about 80% of the time. The other 20%? It’s weird and normally not fixable. It’s part strategy and part luck.
It is very important to talk about mental health and burnout with travel photography (yes, that’s a thing)! Always take care of yourself and don’t forget to live!
Tackling Noise Like a Pro
Noise happens, especially when you’re shooting high ISO under starlight, chasing headlamp trails, or freezing your butt off at a midnight summit.
Grain can look cool and cinematic up to a point… but when it starts eating detail, it’s time to step in.
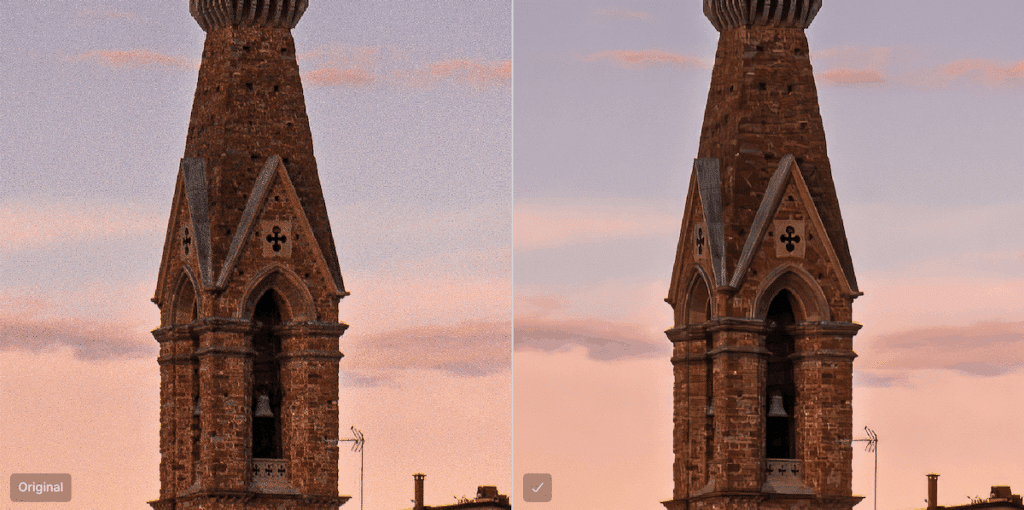
Lightroom’s Denoise
Start with Lightroom’s Denoise tool. The new AI version does a solid job of cleaning up high-ISO files while keeping your edges crisp.
Slide too far, though, and your image can slip into wax-doll territory. Always zoom in and check skin, trees, and rock textures before calling it done.
When Lightroom’s Denoise can’t quite handle the chaos (think ultra-dark shots or heavy shadows), that’s when Topaz Photo AI steps in.
It’s a powerhouse for AI-based noise reduction and sharpening, especially on underexposed adventure shots. Topaz can recover details that Lightroom smudges out.
Export Your Adventure Photos Like a Pro
You’ve conquered the mountain of adventure editing. Now it’s time to bring your masterpiece into the world.
Exporting is where a lot of great photos go to die (RIP crushed colors and pixelated sunsets), so let’s make sure yours shine wherever they land.
Export Settings
Start with export settings. For Instagram and social, go with:
- JPEG format
- sRGB color space (that’s what most screens use)
- 3000px on the long edge
- Around 80–85% quality (crisp, but not bloated in size).
If it’s going on websites and portfolios, size up to 4000px on the long edge and stay in sRGB to keep tones consistent across browsers.
For prints, export in TIFF or high-quality JPEG, Adobe RGB color space, and full resolution.
Little Export Details
Now, don’t skip the details:
- File naming: Keep it clean and searchable (e.g., “Iceland_Glacier_Sunset_2025”).
- Resolution: 300 DPI for print, 72 DPI for web.
- Watermarking: A subtle signature is great for brand recognition, but don’t slap your logo across the mountain. Keep it minimal and elegant if you choose to use a watermark.
If you’re noticing your colors shift across devices, it’s usually a color space mismatch. Double-check you’re exporting in sRGB for digital use.
Your adventure edit deserves a proper send-off. This is your grand finale, so make it count.
Advanced Moves for the Bold Adventurers
You’ve mastered the basics… now let’s get spicy 🌶️
This is where adventure photographers step into pro territory: Faster, cleaner, and more cinematic edits that still keep the soul of the story intact.
Read More – How to Become an Adventure Photographer
When to Head Into Photoshop
First up, when to take it into Photoshop. Lightroom handles 90% of what you need, but sometimes you’ve got a tent zipper photobombing your hero shot or a random hiker wandering into frame. That’s Photoshop time.
Use it for composites, object removal, and advanced masking, but keep it believable. If you start moving mountains, you’ve gone too far (literally).
AI Masking Tools
Next, speed things up with AI masking tools. Lightroom’s adaptive subject and sky masks can save you hours on batch edits.
They’re like having a digital assistant who knows exactly where the light hits. Perfect for fine-tuning multiple photos from the same location or lighting conditions.
Speaking of efficiency… if you’re editing a multi-day expedition, a batch workflow is your best friend.
Edit one hero image, sync the look across the rest, then fine-tune as needed. Boom. Consistency and speed in one move.
On the go? Mobile Lightroom lets you edit from your tent, van, or airport floor. Sync your presets so your vibe stays locked in wherever you roam.
Adventure Photography Editing FAQ
Common questions about editing your travel photos.
Resources & Gear List
Every epic edit starts with solid gear. Here’s what lives in my pack (and on my desk):
- My Camera Body: Canon EOS 5D Mark IV | My Camera Bag
- Favorite Lenses: See Best Lenses for Travel Photography
- Memory Cards: Samsung T7 (never cheap out here)
- Presets & Editing Tools: My Custom Presets + Editing Services for instant adventure vibes
Come Sit in My Brain While I Edit
Final Thoughts on How to Edit Adventure Photos
Before you shut down Lightroom and crack a victory beer, take a beat. Remember why you do this.
Adventure photography isn’t about showing off… it’s about remembering. It’s proof that you stood somewhere wild and felt something real.
Every edit should bring you back to that heartbeat moment… wind howling, light breaking, lungs burning.
Editing is storytelling, not surgery. Don’t chase perfection; chase emotion. If a shot makes you feel something, it’s already done its job. The scrapes, sweat, and imperfect light? That’s the magic.
Now, I want to see what you’ve created. Share your finished edits and tag me! Let’s build a community of creators who value grit over gloss.
Use my hashtag or drop your shots in the comments; your perspective could inspire the next adventure junkie to grab their camera and hit the trail.
Ready for More Adventure?
Ready to go deeper? Check out my Adventure Guide for on-the-ground shooting tips, my Presets + Editing Services to fast-track your color style, and my Amazon Storefront for the gear I trust when the trail gets sketchy.
Now go chase adventure with your camera in hand! Your next edit starts out there.
More Adventure Photography Inspiration
Waterfall Photography 101: How to Nail Every Shot (Even If You’re a Beginner)

How to Take Pictures in a Museum: Photography Tips for Travelers

The Ultimate Guide to Zoo Photography: Make Your Photos Look Like a Safari!
Travel Photography Hashtags: 500+ Ideas & Ready-to-Use Sets
More Adventure Resources
Adventure Bucket List Resources
I am here to help your travel adventures go as smoothly as possible! That way you can check off that bucket list with minimal complications and spending!
SHOP – Shop the best adventure gear and essentials on my Amazon Storefront – handpicked by a full-time adventuring mermaid!
AIRFARE – There are a few I use, but Aviasales is normally my go-to for flights without any extra fees or markups.
ACCOMMODATION – My two favorites are Booking.Com for hotels and VRBO for rentals.
GUIDED TOURS – If you are looking for quick and easy tours, check out GetYourGuide and Viator.
MULTI-DAY TOURS – For more in-depth tours that span several days, TourHub has many great options with reputable travel companies. Use my code (ALEXANDRA1GURU) for up to 5% off your next bucket list adventure.
TRANSPORTATION – You can either rent a car yourself with Discover Cars or do a guided bus tours like Big Bus Tours.
SIM CARDS – Avoid expensive roaming charges with an eSim card with Airalo. Personally, I prefer wifi boxes, and recommend WiFi Candy (get 10% of with the code THEBUCKETLISTMERMAID).
TRAVELER’S INSURANCE – Check out VisitorsCoverage for affordable insurance plans. If you are a nomad or remote worker, I would check out SafetyWing.
SEE MORE – Adventure Resources | Photography Resources
See Some Photos You Like?
Check out my full photography page for a full gallery and prices.